How to Fix Broken Screen Data on Android Phone?
Accidents happen, and one of the most common accidents that can happen to your phone is a broken screen. A broken screen can be frustrating and can make using your phone impossible. However, it does not mean that all hope is lost. In this article, we will explore different methods of recovering data from an Android phone with a broken screen.
Part 1. Is Android Broken Data Recovery Possible?
If your phone's screen is broken, you might think that all your data is lost. However, that's not the case. You can still recover your data even if your phone's screen is broken. There are various methods that you can use to recover data from your phone with a broken screen. The method that you choose will depend on whether you have enabled USB debugging on your phone or not.
Part 2. How to Recover Data from Android Phone with Broken Screen?
Method 1. Retrieve Data from Android Phone with Broken Screen with USB Debugging
If you have enabled USB debugging on your phone, you can easily retrieve data from your phone using a computer. Here are two options that you can use to retrieve data from your phone with a broken screen.
Option 1. Recover Android Data to Computer with Data Recovery Software
Data recovery software is a great tool that you can use to recover data from your phone with a broken screen. We recommend one powerful data recovery software-AnyRecover. It supports PC&iOS&Android to recover your lost/ accidentally deleted data. Files it can recover can reach to 1000+.
AnyRecover Data Recovery on Windows/Mac/Android/iOS
- No.1 Restore deleted, lost, formatted or corrupted files from a full range of devices.
- No.2 Recover 1000+ file types: photos, videos, office documents, emails, audio, etc.
- No.3 Work well with both Mac and Windows.
- No.4 Recover up to 8 files for free with trial verison.
- No.5 Super user-friendly interface for no tech-savvy.

Here are the steps that you can follow to recover data from your phone using AnyRecover data recovery software.
Step 1Get Your Device Ready
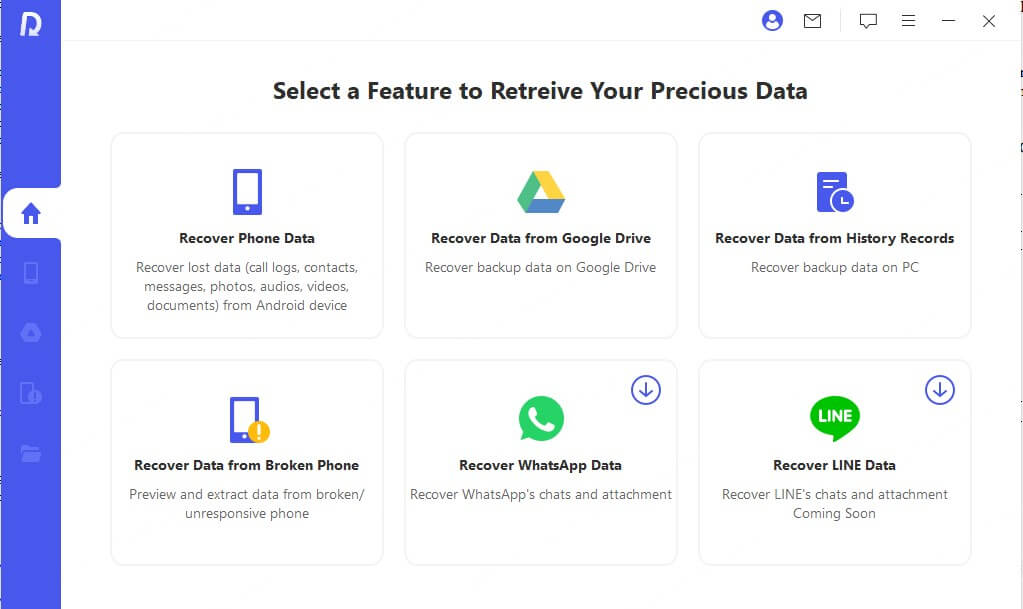
Download and launch AnyRecover (Android) on your PC and choose a recovery mode that works for your situation.
To begin, select Recover Phone Data from the screen.
Step 2Connect Device to Computer
On the Recover Phone Data tab, you will be asked to connect your device. Make sure your device is in debugging mode. Then click Start to continue.
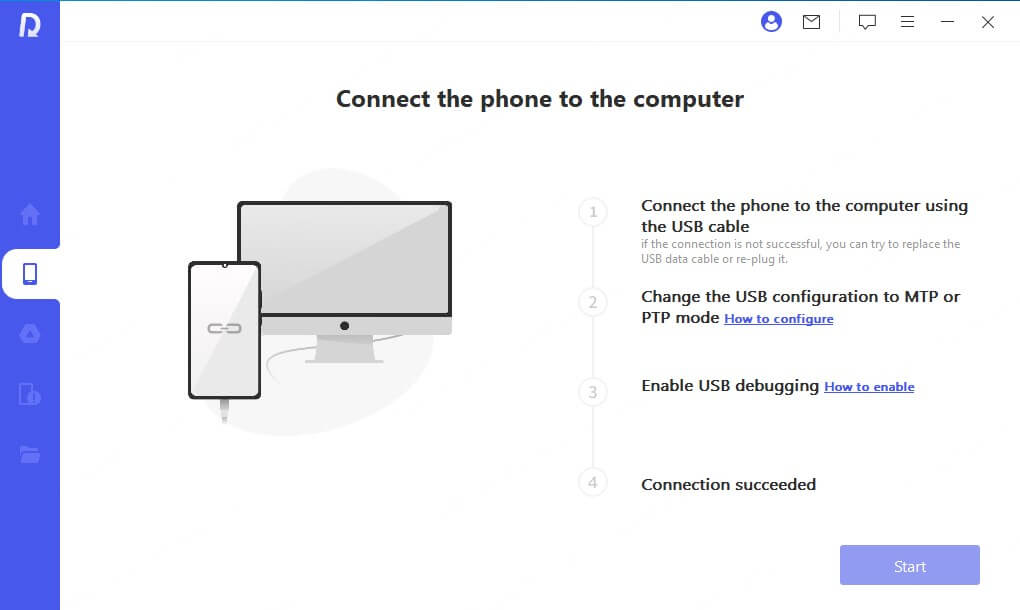
- If your device wasn't detected, please follow the on-screen instructions.
Step 3Choose The Scan Method
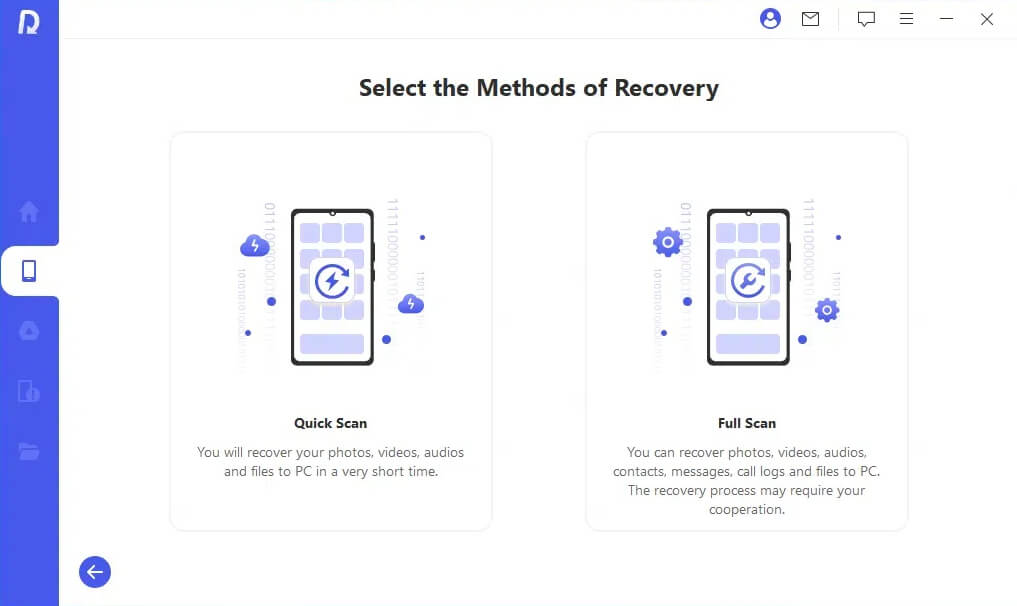
Once your device is detected by the computer, you can choose a scanning method that suits your needs. It provides two scan modes. We recommend the full scan if you didn't find your desired files.
Step 4Obtain Device Infomation
Then AnyRecover (Android) will begin analyzing your device and obtaining the files automatically. It might take some time, please wait patiently.
Step 5Recover Lost Files
After scanning, all the lost files on your Android device will be listed in detail, allowing you to preview and select which ones you need.
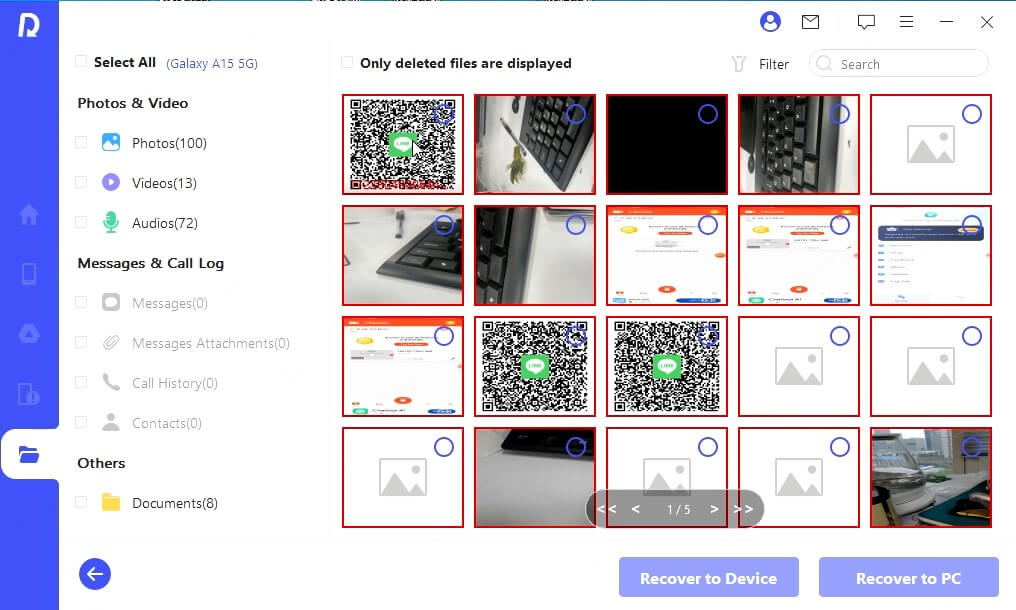
Now the selected files will be retrieved by clicking Yes. Additionally, you can choose the desired file format.
Success! The lost files are recovered!
Option 2. Copy Files from Android Internal Storage to Computer via File Explorer
If you don't want to use third-party software, you can use your computer's file explorer to retrieve data from your phone. Here are the steps that you can follow to retrieve data from your phone using file explorer.
Step 1: Connect your phone to your computer using a USB cable.
Step 2:Open your computer's file explorer. Locate your phone's internal storage.
Step 3:Copy the files that you want to retrieve to your computer.
Method 2. Restore Data from Android Phone with Broken Screen Without USB Debugging
If you have not enabled USB debugging on your phone, you can still restore data from your phone using these options.
Option 1. Use Google Drive
If you have backed up your data to Google Drive, you can easily restore your data to a new phone or a computer. Here are the steps that you can follow to restore your data from Google Drive.
Step 1: On your computer, go to Google Drive. Sign in to your Google account.
Step 2:Locate the backup file that you want to restore.
Step 3:Follow the on-screen instructions to restore your data.
Option 2. Use SD Memory Card
If you have saved your data to an SD memory card, you can easily retrieve your data using a card reader. Here are the steps that you can follow to retrieve your data using an SD memory card.
Step 1: Remove the SD memory card from your phone. Insert the card into a card reader.
Step 2:Connect the card reader to your computer.
Step 3:Copy the files that you want to retrieve to your computer.
Option 3. Recover Data from Android Phone with Broken Screen via Google Account
If you have enabled Google sync on your phone, you can easily retrieve your data using your Google account. Here are the steps that you can follow to retrieve your data using your Google account.
Step 1: On your computer, go to Google. Sign in to your Google account.
Step 2: Locate the data that you want to retrieve.
Step 3:Follow the on-screen instructions to retrieve your data.
Option 4. Recover Data from Broken Screen Android via AutoPlay
If you have enabled AutoPlay on your computer, you can easily retrieve data from your phone using a USB cable. Here are the steps that you can follow to retrieve data from your phone using AutoPlay.
Step 1: Connect your phone to your computer using a USB cable.
Step 2: Select the "Open folder to view files" option.
Step 3:Locate the files that you want to retrieve. Copy the files to your computer.
Method 3. Recover Data from Android Phone with Broken Screen with a USB OTG Cable
If your phone supports USB OTG, you can use it to connect a mouse to your phone and retrieve data from it. Here are the steps that you can follow to retrieve data from your phone using a USB OTG cable.
Step 1: Connect a USB OTG cable to your phone.
Step 2: Connect a mouse to the USB OTG cable.
Step 3:Connect a mouse to the USB OTG cable. Retrieve the data that you want.
Part 3.FAQs About Android with Broken Screen
How to Enable USB Debugging on Android with Broken Screen?
If you have not enabled USB debugging on your phone, you can still enable it by following these steps.
Step 1: Connect your phone to your computer using a USB cable. Open a command prompt on your computer.
Step 2: Type "adb devices" and press Enter.If your phone is detected, type "adb shell" and press Enter Type "su" and press Enter.
Step 3:Type "settings put global development_settings_enabled 1" and press Enter. Type "exit" and press Enter. Type "exit" and press Enter again.
How to Recover Files/Photos/Contacts from Android Phone with Broken Screen?
You can recover files, photos, and contacts from your phone using the methods that we have discussed in this article. If you have enabled USB debugging, you can use AnyRecover data recovery software or file explorer to retrieve your data. If you have not enabled USB debugging, you can use Google Drive, an SD memory card, Google account, or AutoPlay to retrieve your data.
Conclusion
A broken screen can be frustrating, but it does not mean that all hope is lost. You can still recover your data from your phone using the methods that we have discussed in this article. Remember to always back up your data to prevent data loss in case of accidents.
Time Limited Offer
for All Products
Not valid with other discount *

 Hard Drive Recovery
 Deleted Files Recovery
