Automatic Repair Couldn't Repair Your PC Error: How to Solve & Recover Data
"My HP pavillion laptop was working fine and then half an hour later I went to start it again and it said it was preparing for automatic repair and then ‘Automatic Repair couldn't repair your PC’. I tried system restore but it said I had no previously recorded points, please help!"
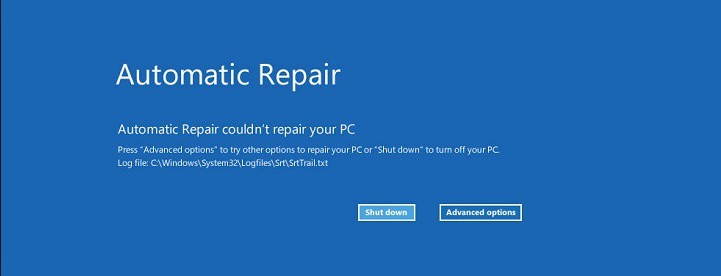
Windows 11/10/8 comes with an Automatic Repair tool that is designed to assist users in fixing a range of system problems. However, the Windows Automatic Repair may sometimes fail to cure the computer problem and get stuck in the "Automatic Repair couldn't repair your PC" loop. The error message "System32\Logfiles\Srt\SrtTrail.txt" is also related to this automatic repair failure. If you are, by any chance, be confronted with this problem, there is no need to get terrified because there are several plausible solutions as explained in this article. Read on to check the methods!
Part 1: Solutions to "Automatic Repair Couldn't Repair Your PC" Error
Solution 1. Use Check Disk Utility
If you get stuck in the Automatic Repair loop in Windows 11/10/8 after using the System Restore function, running Check Disk Utility can help cure this problem.
Step 1: Insert the bootable disk in the problematic computer and boot from it.
Step 2: In the Windows Setup screen, choose your preferred language and hit "Next" to proceed.
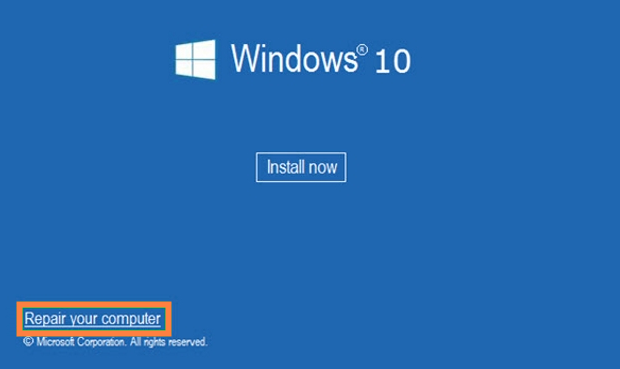
Step 3: Click the "Repair your computer" link at the bottom left of the next window.
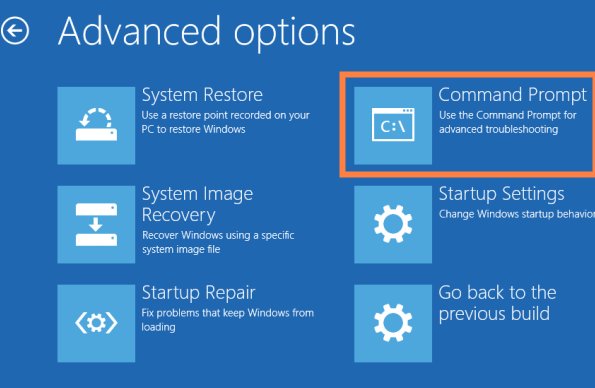
Step 4: Now choose the "Troubleshoot" and then select "Command Prompt".
Step 5: Type the "chkdsk /f /r C: " and press the Enter key. Then type "exit" and again press the Enter key to exit.
Step 6: Restart your computer and see if the problem is fixed.
Solution 2. Rebuild the BCD
If solution 1 fails to solve the problem, try to rebuild the Windows' BCD following the steps below:
Step 1: Turn on your ailing computer and wait for Boot Menu to display. Choose Troubleshoot > Advanced options > Command Prompt.
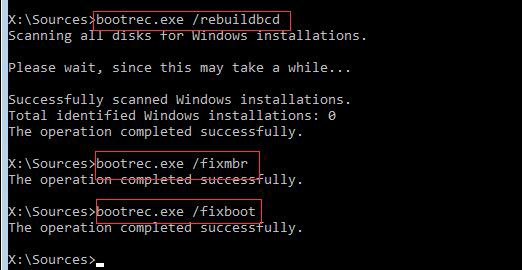
Step 2: When the CMD opens, separately enter the following commands and press the Enter key after each one of them.
"bootrec.exe /rebuildbcd"
"bootrec.exe/fixmbr"
"bootrec.exe /fixboot"
Solution 3. Troubleshoot in Safe Mode
Automatic Repair couldn't repair your PC might result from unstable updates, a failed driver, or a recently installed app that is causing problems. You can try to troubleshoot your computer in safe mode and see if that works.
Step 1: In the Boot Menu, select Troubleshoot > Advanced options > Startup Settings.
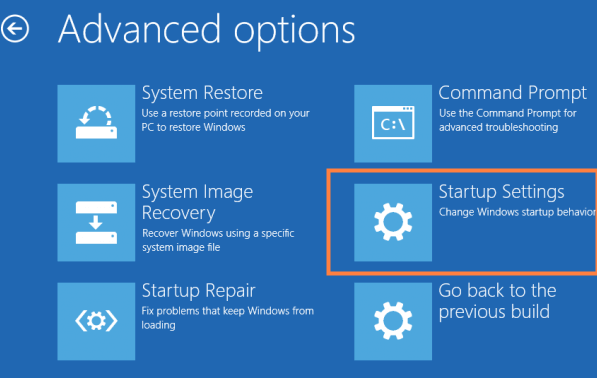
Step 2: Click the "Restart" button and the computer will give you restart options.
Step 3: Choose the "Enable Safe Mode" option and your computer will troubleshoot in Safe Mode.
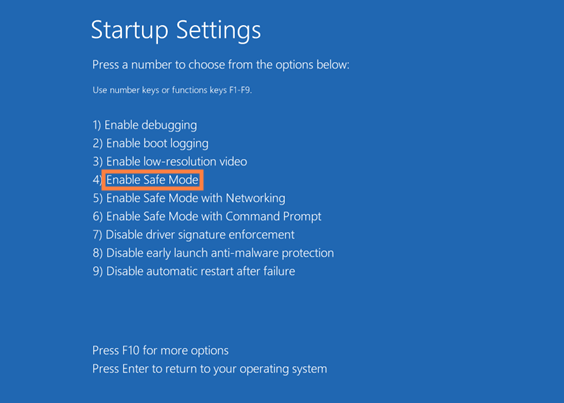
Solution 4. Disable Automatic Repair
Since your problem is with automatic repair itself, you can disable the Automatic Repair feature and see whether the problem disappears. To disable the Automatic Repair, follow the steps below.
Step 1: Turn on your computer and wait for the boot options to display. Go to Troubleshoot > Advanced options > Command Prompt.
Step 2: In the CMD, type the "bcdedit / set {current} recoveryenabled No" command and hit the Enter key on your keyboard to run it.
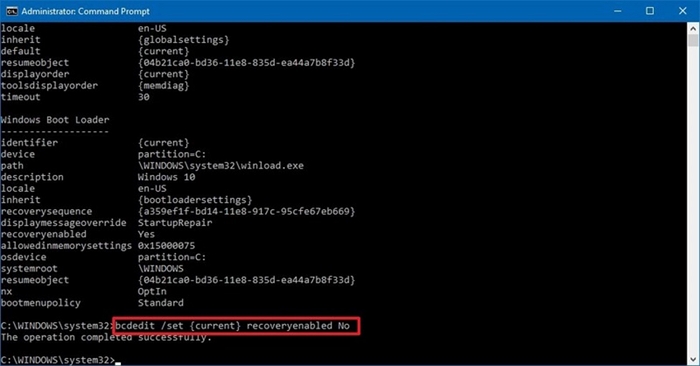
Step 3: After this command take effect, the Automatic Repair feature should be successfully disabled. Restart the computer and check whether the problem is gone.
Solution 5. Restore Windows Registry
Windows registry is basically a collection of configuration settings databases for Microsoft Windows operating system. If the Windows registry is corrupted, it can trigger the Automatic Repair loop issue. Just like the disabling of the Automatic Repair feature, we are going to use the Command Prompt to restore the Windows registry.
Step 1: Turn on your computer and wait for the boot options to display on the screen. Navigate to the Troubleshoot > Advanced options > Command Prompt.
Step 2: When the CMD opens, enter the following command and hit the Enter button to run it: "copy c:\windows\system32\config\RegBack* c:\windows\system32\config".
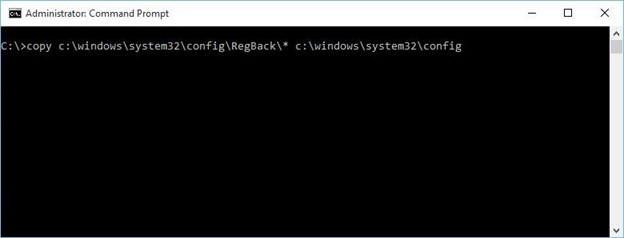
Step 3: When prompted to overwrite files, choose all and press the Enter key on your keyboard.
Step 4: Again type the "exit" command and press the Enter key to exit CMD.
Step 5: Restart your PC and check whether the problem has been fixed.
Solution 6. Perform Refreshing or Resetting
If the problem persists, perhaps you will have to refresh or reset your computer. Unfortunately, this process will wipe out your personal files. The "Refresh your PC" option will wipe out the installed applications but will spare the installed universal apps and settings. If you choose the"Reset your PC"option, however, all installed apps, settings, and files will be deleted. So it is important that you backup/retrieve these files before pulling the trigger. To perform refreshing or resetting, follow the steps below.
Step 1: Turn on your computer and wait for the boot menu to display.
Step 2: Click the "Troubleshoot" option and then choose either the "Refresh your PC" option or "Reset your PC".
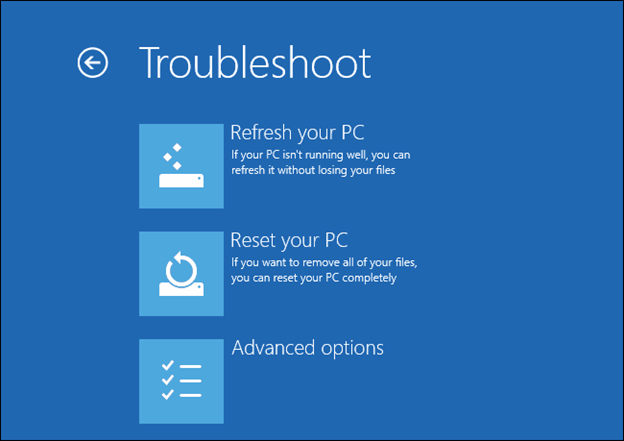
Step 3: Follow the on-screen instructions to complete the process.
Part 2: Retrieve Data From Crashed Computer With Anyrecover Before Resetting
Just as what we've mentioned before, if you have to reset your computer, you need to retrieve your files first because resetting will wipe them. But as you cannot access your computer normally in this situation, you need a professional data recovery tool to help you perform this data recovery activity. Fortunately, AnyRecover is here for you.
This is an amazing data recovery program designed to solve a wide variety of data loss issues. The ease of use, incredible success rate, fast running speed, and wide compatibility are some of the few highlights of AnyRecover. By using it, you can recover your files a lot easier than you can imagine.
Key Features:
Perform data recovery in all kinds of scenarios: computer crash recovery, deleted file recovery and lost partition recovery.
Recovers 1000+ file types including audio, video, and archive.
Extremely high recovery rate and fast running speed empowered by deep scan feature as well as unique algorithms.
Supports preview before recovery.
Easy opearting steps. No technical knowledge is required.
Free trial is available and every user can scan, preview and recover 3 files for free.
Now follow the steps to extract data from the crashed computer:
Step 1: Prepare for Computer Crash Recovery
Prepare another working computer and a blank USB drive or CD/DVD for this.
Step 2: Create a Bootable Drive
1. Download, install and launch AnyRecover on the working computer. Choose "Recover from crashed computer" and click on "Start".
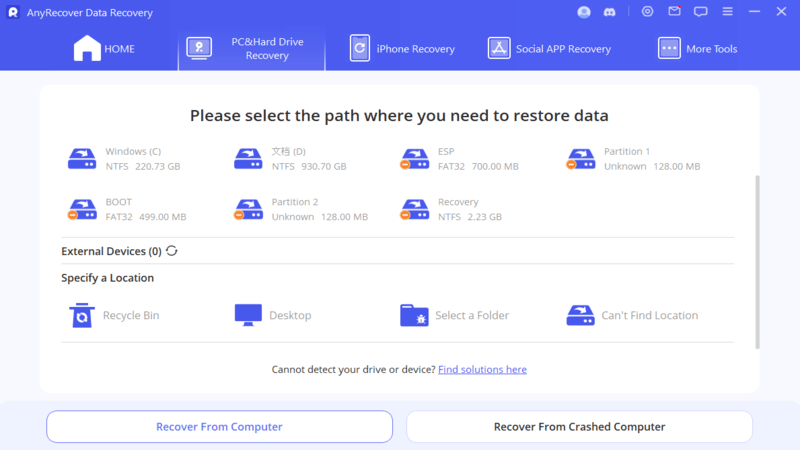
When you get a message saying "create a bootable drive to recover data when Windows system is unable to launch", make sure the USB drive or CD/DVD is connected to the working computer. Hit "Start" then.
2. From the two options available for creating a bootable drive, select one and click "Create".

3. A message will appear and alert that this operation will format your USB drive. Click "Format", then this program will start to download firmware and format the USB drive or CD/DVD.

4. When the formatting is completed, it will start to create bootable drive. Once done, you can move on to restart your crashed computer following the instructions shown on the interface.
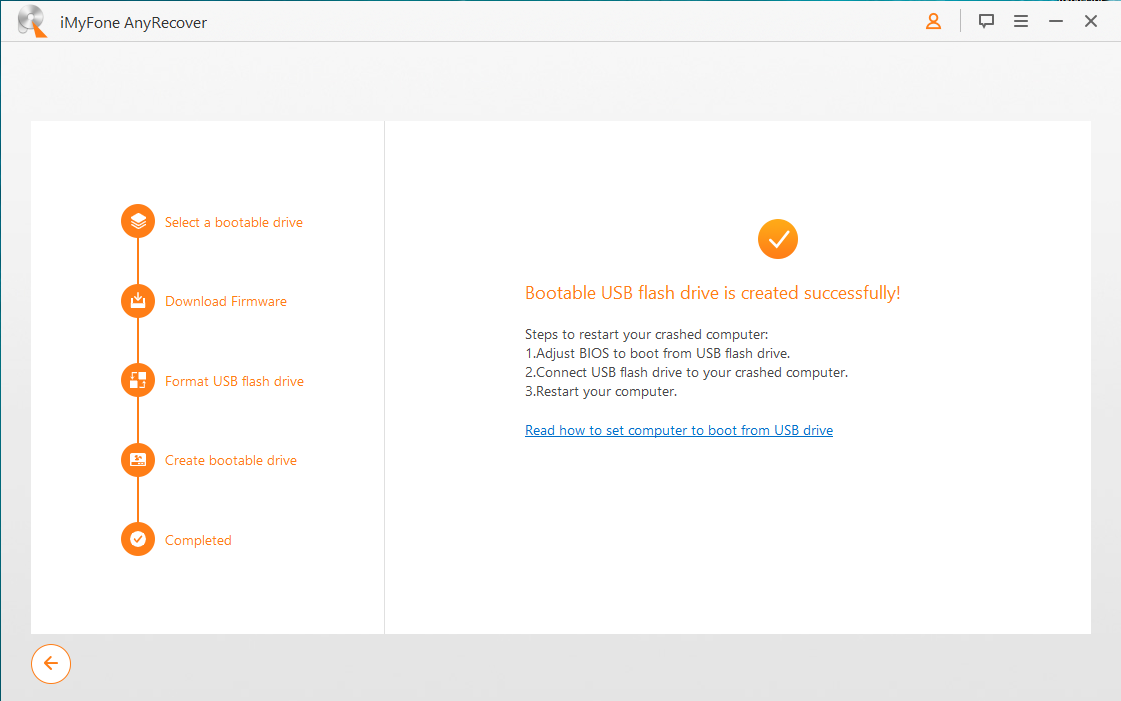
Step 3: Extract Data from Crashed Computer
1. Select a location where you want to get back your data, and click on the "Start" button.

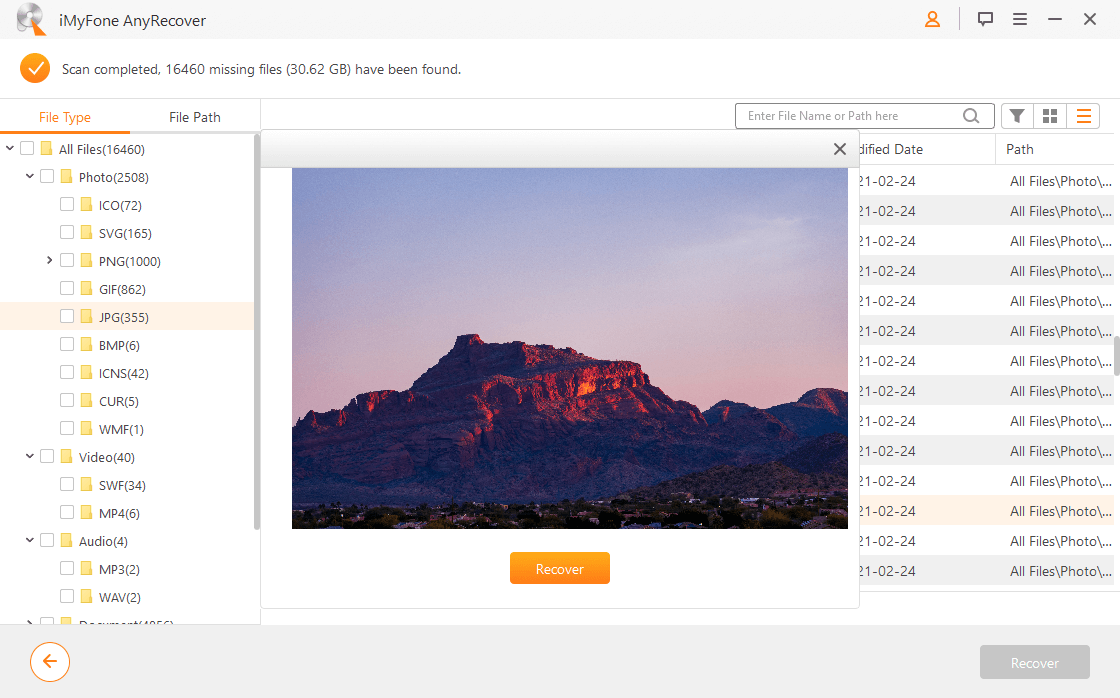
2. AnyRecover will then begin to scan the location for all data recoverable.
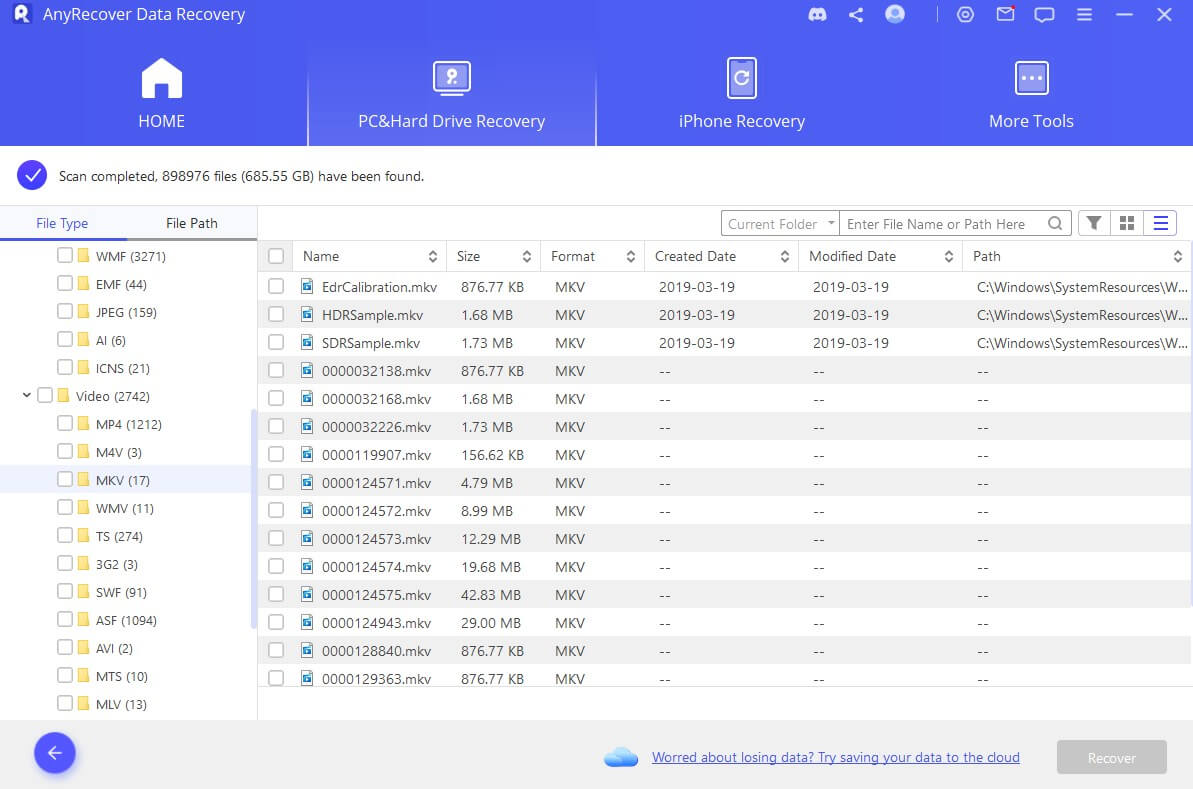
3. As soon as it is done, preview the files and select what you want to recover.
Conclusion
In this guide, we've given a complete and detailed guide on how to solve the problem when Automatic Repair fails. Be sure to try each method one by one and in case you have to adopt the last resort – resetting your PC, don't panic because AnyRecover will protect the data for you. With this powerful data recovery tool, all your valuable files stored in your computer will be safe and sound.
Time Limited Offer
for All Products
Not valid with other discount *

 Hard Drive Recovery
 Deleted Files Recovery
