How to Fix Corrupted Recycle Bin Error in Windows 11/10/8/7
![]() Anonymous
Anonymous
My computer recently started displaying an error telling me that the recycle bin is corrupt and asking me to empty it. I click “Yes” but this still won’t fix corrupted recycle bin in Windows 11/10/8/7!
The great thing about Windows’ Recycle Bin is that if you accidentally delete a file, one click will retrieve it. Unfortunately, there has recently been an increase in reports of the Recycle Bin not functioning properly. Due to this problem, users see a “Corrupted” warning and can’t access it or retrieve the files in the Recycle Bin at all. It’s not too difficult to fix corrupted Recycle Bin in Windows 11/10/8/7 though. Moreover, recovering lost files from the recycle bin corrupted is possible with the right data recovery tool.
Possible Reasons for Recycle Bin Corrupted
It can be confusing to the everyday computer user and a lot of people don’t just want to fix “Recycle Bin is corrupted” error in Windows 11/10/8/7, they want to understand why it happened. There’s no definitive reason but it’s safe to speculate some reasons why:
- Corrupt DLL File. DLL files are used by various components of the Windows operating system and if one DLL which the Recycle Bin users has corrupted, it could corrupt the bin too.
- Unexpected System Shutdown. Forcibly shutting down your computer is never recommended. It often impacts files that are open and can result in widespread corruption.
- $Recycle.bin Folder Error. The Recycle Bin on your desktop is a shortcut to the $Recycle.bin folder – the real Recycle Bin. Errors within this destination will corrupt the bin.
- System Corruption. Viruses, malware, or problems with the computer’s operating system can contribute to system corruption which prevents features from functioning properly.
The list goes on and on: software errors, users accidentally deleting the wrong system file, and improperly factory resetting. All of these and more can contribute to Recycle Bin corrupted.
How to Fix Corrupted Recycle Bin in Windows 11/10/8/7
To fix “Recycle Bin is corrupted” error in Windows 11/10/8/7, there are two methods to consider trying. The simplest is by using a basic Command Prompt process that scans and repairs the Recycle Bin. Whereas the more complex solution involves deleting the Recycle Bin folder, as well as the user permissions to go with the folder, and installing it on the system again.
1Use Command Prompt to Fix Corrupted Recycle Bin
It’s understandable that some people are intimated by the Command Prompt. After all, there are a list of commands which can do a lot of harm to the system if used wrongly by users. That isn’t the case with fixing a corrupt Recycle Bin and as long as you follow our steps very closely, there’s no risk of damaging your system.
Step 1. Search “Command Prompt” in the taskbar search box, right-click on the top result, and select “Run as Administrator” from the list of options. Confirm this action by clicking “Yes” on the notification that appears.
Step 2. On the command line type “rd /s /q C:\$Recycle.bin”, then press the Enter key.
Step 3. Type a second command into the prompt, “rd /s /q D:\ $Recycle.bin”, and press the Enter key.
Step 4. Repeat these commands for all the other hard drives/solid state drives which you currently have connected to the computer.
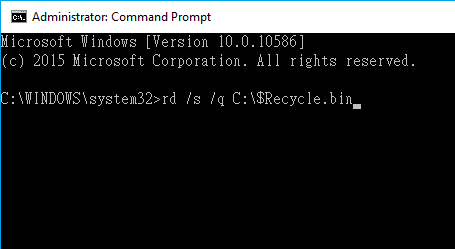
If you’re wondering why this has to be repeated, it’s simply because of how Windows manages the Recycle Bin and partitions. Although most users will recognise the Recycle Bin as a single folder on their desktop, this is actually a combination of each partition’s separate Recycle Bin.
With that in mind, to make sure they all work perfectly, we must repair each drive’s bin individually.
2Delete & Reinstall Recycle Bin in Windows
Another method to fix corrupted Recycle Bin in Windows 11/10/8/7 is by completely reinstalling this Windows feature. Admittedly this is a tricky solution and it involves user permissions and reconfiguring the Recycle Bin from scratch. Rest assured if this is unfamiliar territory for you, we’ll walk you through every step.
Step 1. Search for “Control Panel” using the Windows search bar and open the top result.
Step 2. Click on “Appearance and Personalisation” from this menu and on the following page select “File Explorer Options”.
Step 3. Click the “View” tab and in the “Advanced settings” box, scroll through the list to find “Hide protected operating system files”.
Step 4. Uncheck the box next to this setting, click “Apply” to confirm the change, and then “OK”.
-
Step 5. In each drive’s root folder, you can find two Recycle.bin folders and the relevant permissions for them. Delete the Recycle.bin folders and the permissions to go with them.
Step 6. Once you have deleted these files, restart your computer and wait for it to load up.
Step 7. After the PC restarts, go to your desktop and right-click on the blank space. Click “Personalise” on the options list.
Step 8. Using the sidebar menu on the left, go to “Themes” and from the “Related Settings” list on the right, click “Desktop icon settings”.
Step 9. Check the “Recycle Bin” option and click “Apply > OK” to conclude this process.
Whether it’s by running a few commands through Command Prompt or totally reinstalling this built-in Windows feature, be assured that you can fix a Recycle Bin corrupted with one of these methods.
How to Restore Lost Data After Fixing Corrupted Recycle Bin in Windows 11/10/8/7
These fixes should be useful for Recycle Bin corrupted and with some hope, there won’t be any more corruption. However, those don’t help us get back the lost files that were corrupted – AnyRecover is a grade-A data recovery software that can solve this problem though.
![]()
2,061,704 Downloads
Features of AnyRecover:
-
Recover videos, music, documents, and hundreds of other files from Recycle Bin.
-
AnyRecover can recover corrupted, deleted, formatted, damaged, and infected data.
-
If corrupted Recycle Bin files aren’t found, a more intense deep scan can be run.
-
Preview the Recycle Bin scan results and select individuals to be recovered.
-
Scan absolutely any file location on your computer as well as the Recycle Bin.
-
Compatible with Windows versions 11, 10, 8, and 7 for various data recovery needs.
Steps to Restore Lost Data from Corrupt Recycle Bin with AnyRecover:
Step 1. Download, install, and launch AnyRecover data recovery. Then on the program’s first screen, select “Recycle Bin” which can be found under “Common Location”, and click “Start”.
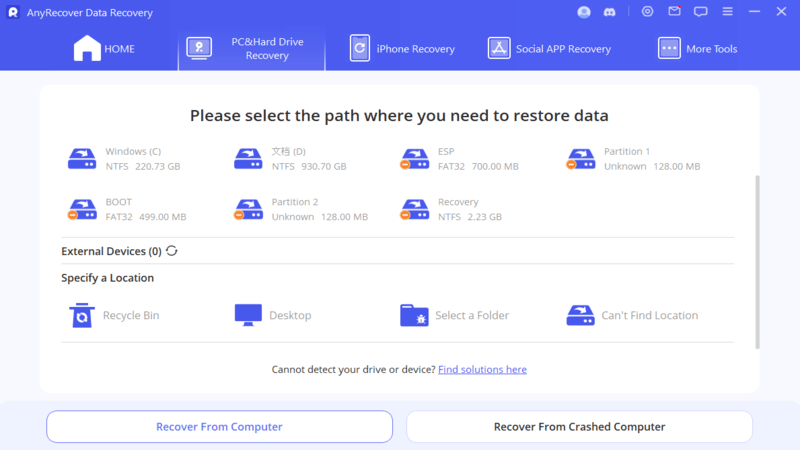
Step 2. After selecting the location, AnyRecover will begin all-round scan for your lost data from recycle bin.
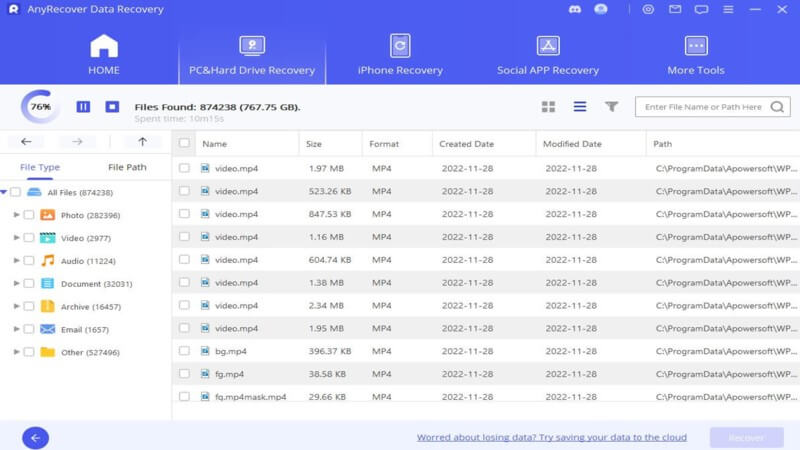
Step 3. After an all-round scan has finished examining your Recycle Bin, all of the found files will be displayed. Go through the results using the sidebar on the left and select what you want to recover from the corrupt Recycle Bin. Finish the AnyRecover process by clicking “Recover”, choosing a folder which isn’t the same as your corrupted Recycle Bin, and you’re done!
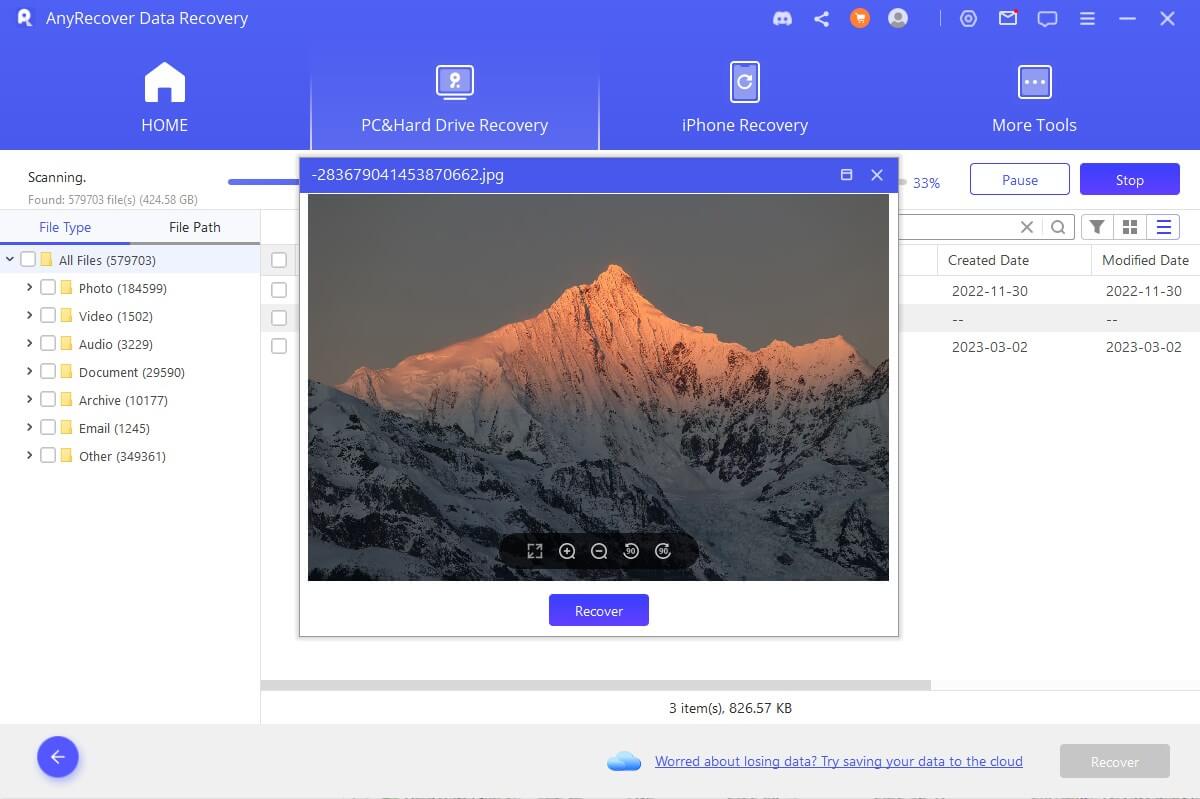
Isn’t that easy? After you had the success to fix “Recycle Bin is corrupted” error in Windows 11/10/8/7, AnyRecover is right there to pick up the pieces and retrieve whatever data was lost.
Bonus: Frequently Asked Questions About Recycle Bin
Are all deleted files moved to the Recycle Bin?
Most files that are deleted get moved to the Recycle Bin, but not all. When you deleted a file with a huge file size, you’ll be prompted to permanently delete it.
Can I recover files after emptying the Recycle Bin?
Yes! With data recovery tools, like AnyRecover, even after you’ve emptied your computer’s Recycle Bin you will be able to recover files.
How do I recover from my Recycle Bin?
You can find the Recycle Bin on your desktop. Inside of it you will find everything you recently deleted. Note that a feature can be set to automatically delete files from the Recycle Bin and if this is enabled, AnyRecover is required for recovering the files.
Conclusion
That brings our guide to an end and with luck, you won’t have Recycle Bin corrupted anymore. To avoid losing data to an error like this you should always double-check that you’re deleting the correct files. On the other hand, if it was an accidental delete or because of a system, AnyRecover can be used to restore those corrupt files in a quick, seamless, and effortless manner.
Start a deep scan for free right now!
Time Limited Offer
for All Products
Not valid with other discount *

 Hard Drive Recovery
 Deleted Files Recovery

