10 Best Methods to Fix Broken Images: Reviving Your Cherished Visuals
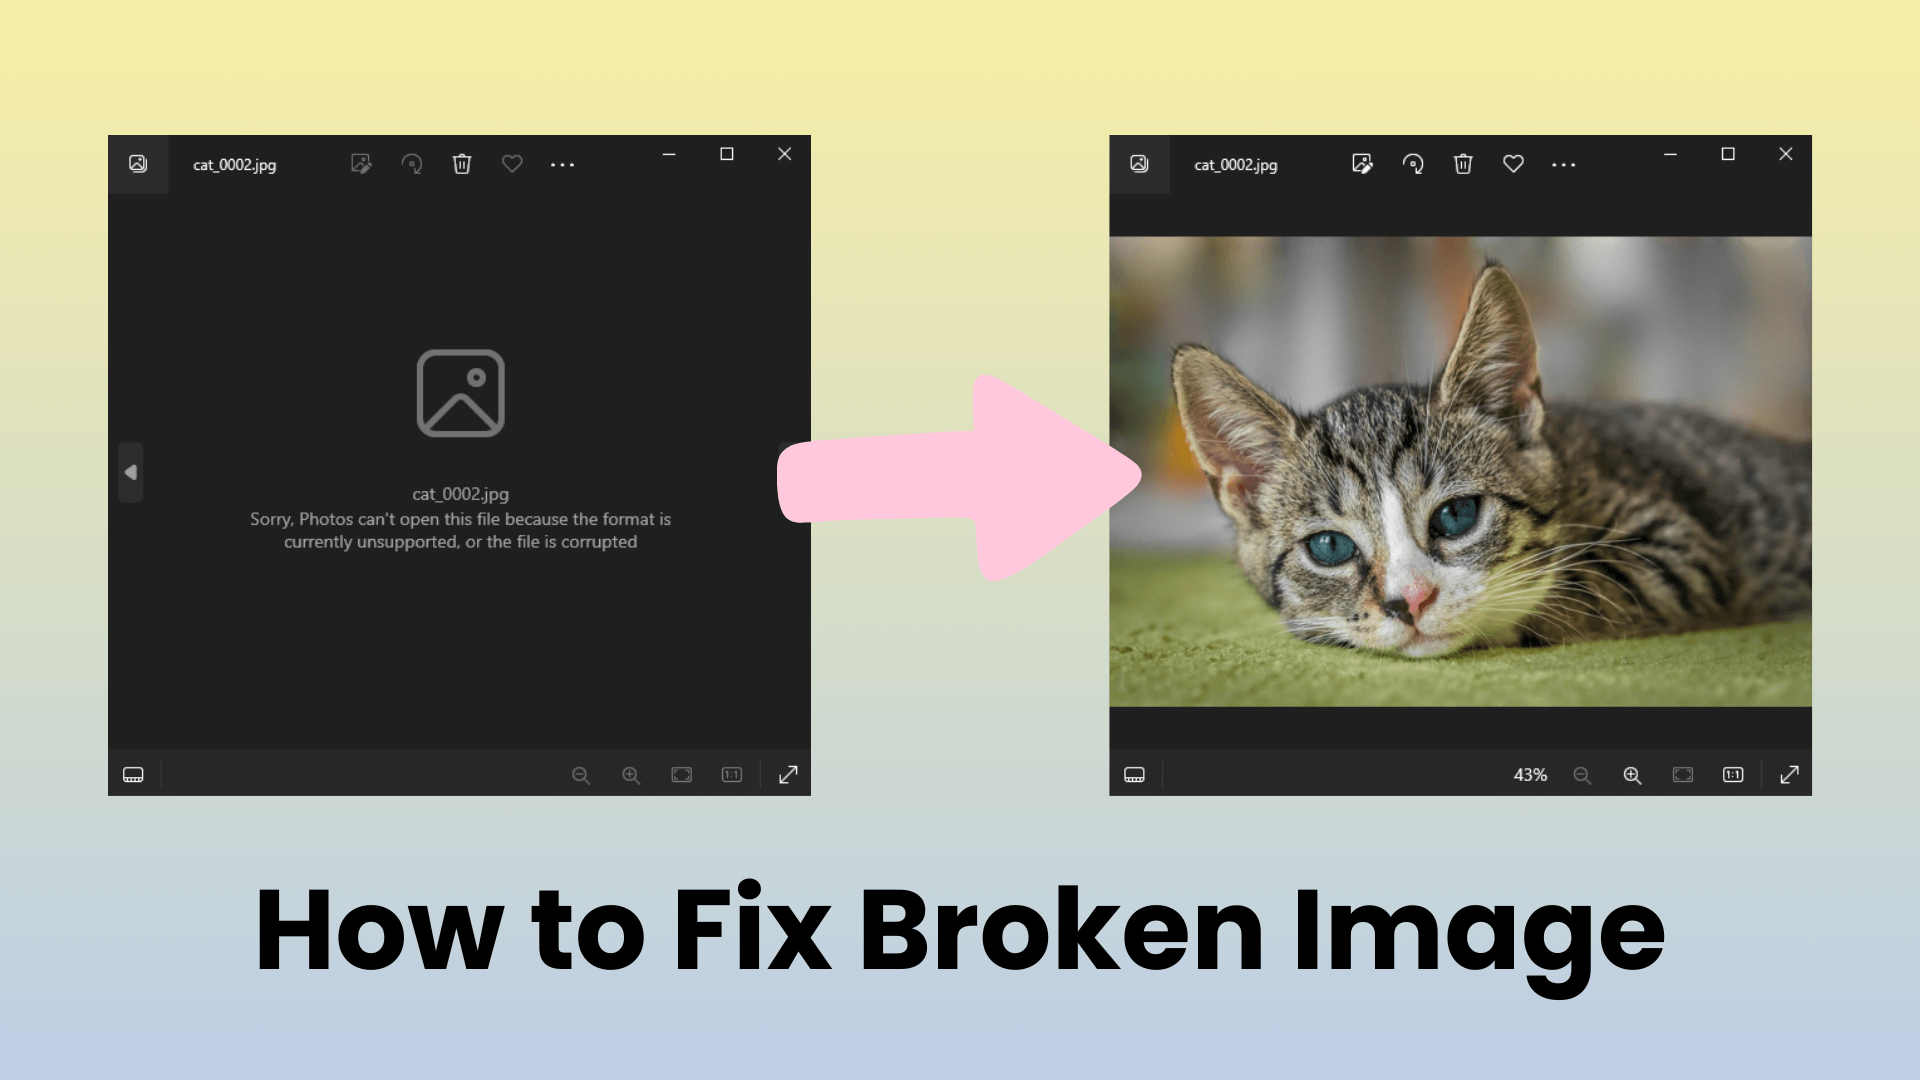
Everyone can be frustrated when encountering a broken image – a distorted, incomplete, or unreadable visual. Whether it's a treasured family photograph, a crucial website graphic, or a meticulously crafted digital artwork, a broken image can leave us feeling helpless and frustrated.
Fortunately, there are multiple methods to fix these broken images to revive them into new life. In this comprehensive guide, we will introduce you to 10 ways of how to fix broken images. From manual techniques to advanced software solutions, we've got you covered.
Part 1. How to Fix Broken Images? – 10 Fixes
Now that we've understood what is a broken image and the possible causes of it. To fix broken images on website, here are ten fixes to achieve it:
- Fix 1 Fix Broken Images with a Third-Party Tool
- Fix 2 Perform a CHKDSK Scan
- Fix 3 Utilize the Error-Checking Utility in Windows
- Fix 4 Recover Broken Images on Mac
- Fix 5 Repair Corrupted Pictures on Android Smartphones
- Fix 6 Restore Damaged Pictures from iCloud Backup
- Fix 7 Convert to Another Format
- Fix 8 Rename the Image Files
- Fix 9 Open with an Image Editor
- Fix 10 Re-download the Image Files
Fix 1. Fix Broken Images with a Third-Party Tool
AnyRecover AIRepair is a professional photo restoration tool that allows you to repair corrupted pictures, and enhance your image quality in the meantime. Whether your pictures are displayed in error, distorted, or greyed-out, this tool can fix these issues.
This tool also supports various formats of images, including JPG, JPEG, PNG, GIF, etc. It has built-in AI technology to help you enhance picture quality, colorize the black-and-white images, remove the scratches on pictures, and sharpen the low-resolution photos. These powerful features make it a go-to choice when fixing broken photos.
AnyRecover AIRepair – Professional Photo Restoration
- Supports a wide range of image formats, including JPEG, PNG, BMP, TIFF, and RAW files.
- Utilizes cutting-edge AI technology to analyze and repair corrupted image data, enhancing image quality.
- Offers batch processing capabilities, allowing you to repair multiple images simultaneously.
- Provides a user-friendly interface for seamless navigation and operation.
How to Fix Corrupted Images with AIRepair?
Step 1. Go to the AIRepair website and download it on your computer.
Step 2. Launch this app and choose the "Photo Repair" section to import the broken images you wish to fix.
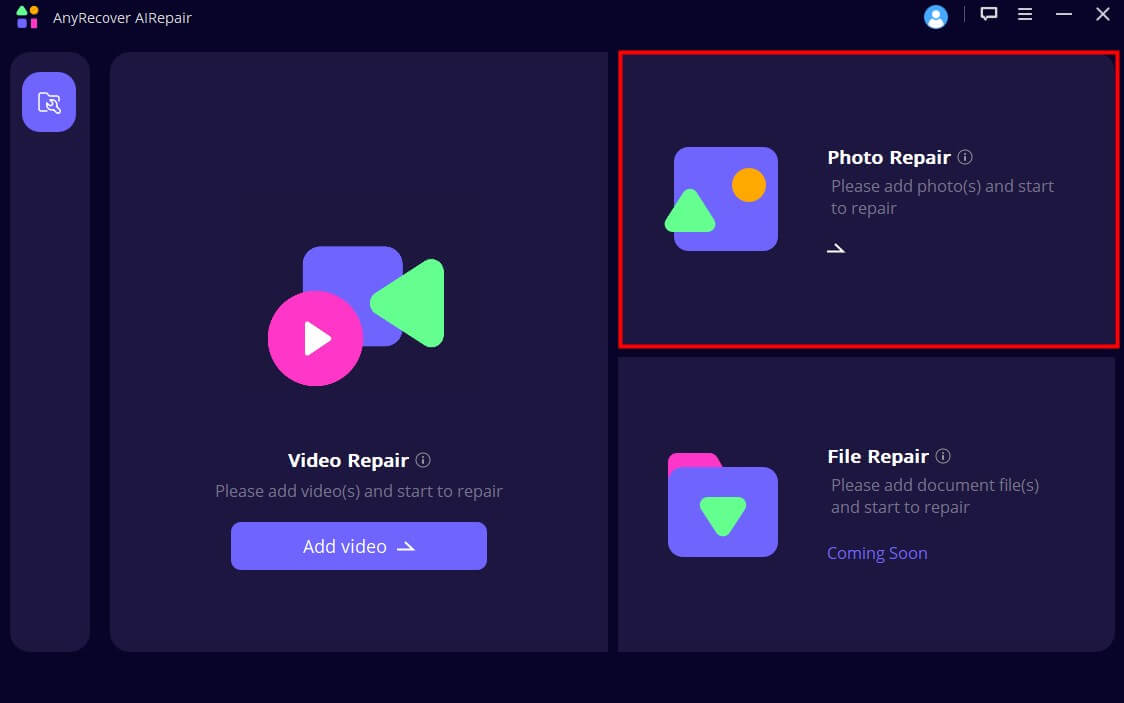
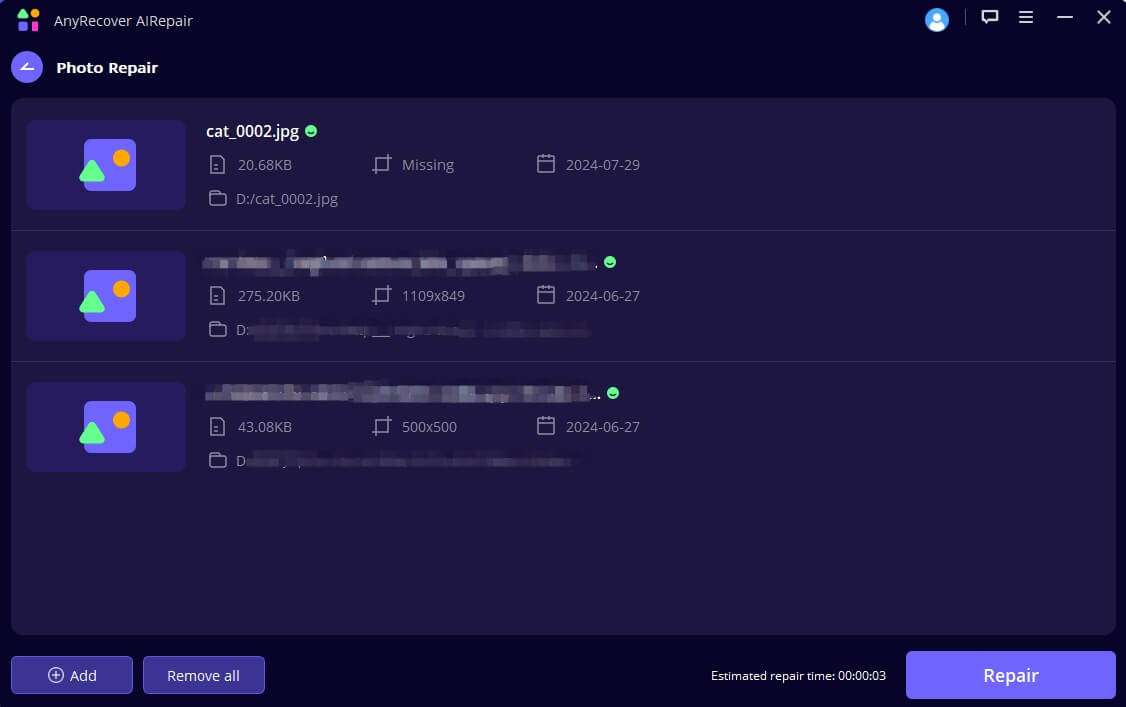
Step 3. Once the broken images are imported, click on "Repair" to start repairing.
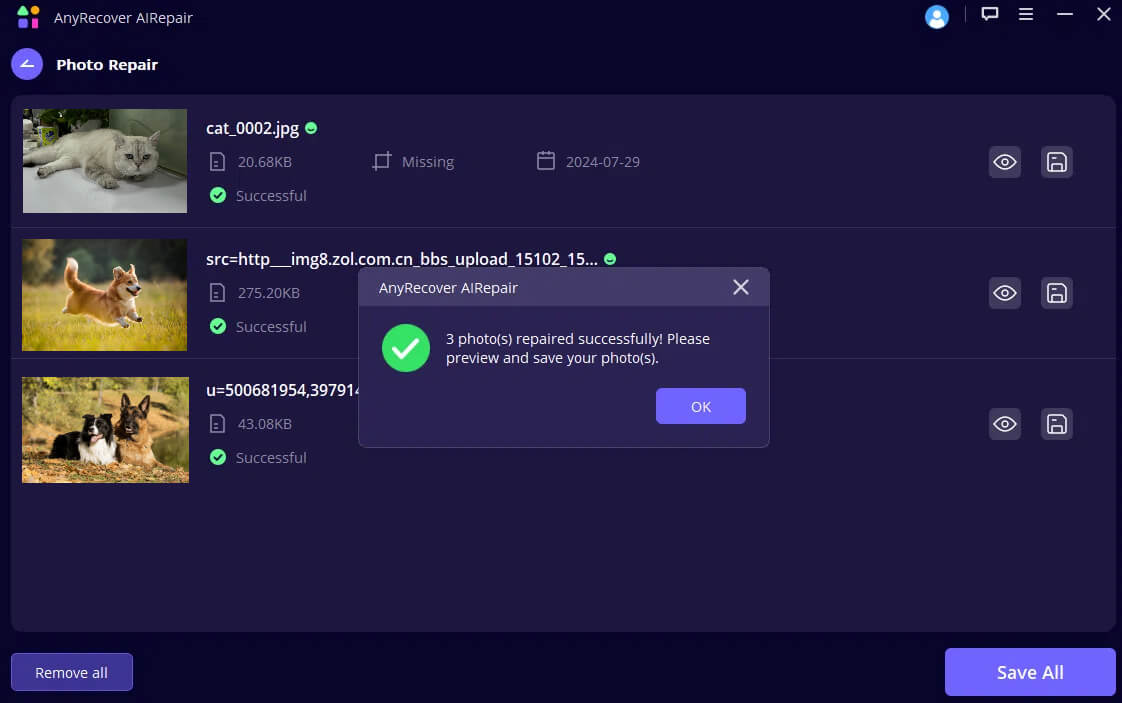
Step 4. After repairing, you can click the eye icon next to each image to preview the fixed images. If you're satisfied with these repaired pictures, click "Save All" to save these photos on your computer.
Fix 2. Perform a CHKDSK Scan
If your broken images are stored on an external storage device, such as a USB drive or an external hard disk, performing a CHKDSK (Check Disk) scan can be an effective solution. This built-in Windows utility checks for file system errors and attempts to repair them, potentially resolving issues with corrupted or inaccessible image files.
Here's how to perform a CHKDSK scan:
Connect the storage media containing the damaged image files to your computer.
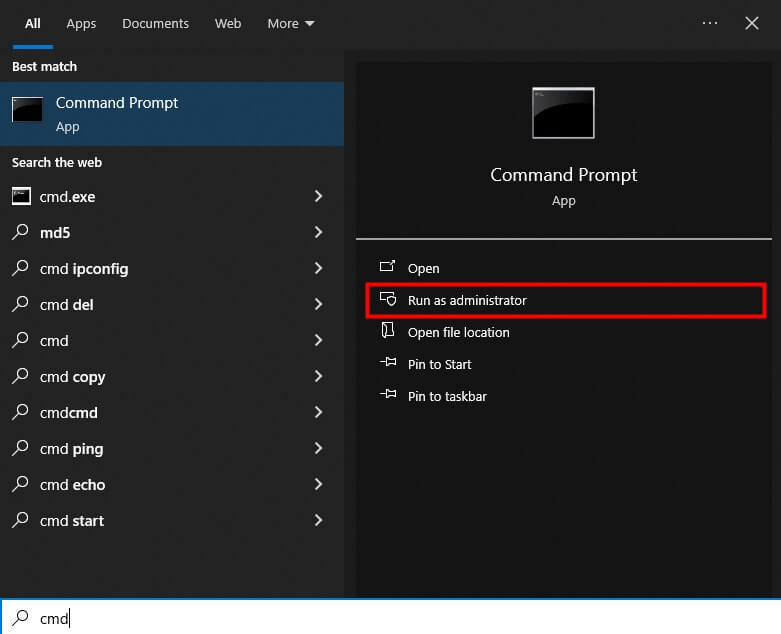
Press the "Windows + S" keys and type "cmd" to open the Command Prompt.
In the "Command Prompt" menu, select "Run as administrator".
Type "chkdsk /r /f X:" (replace "X" with the drive letter of the connected storage media) and press Enter.
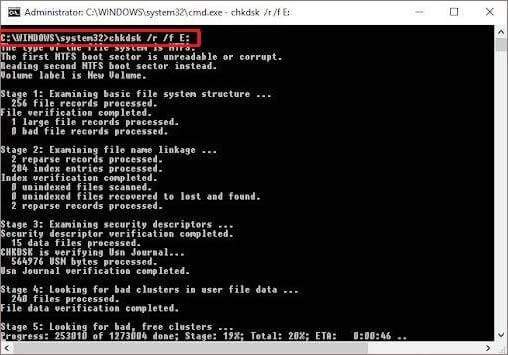
Allow the scan to complete, and follow any prompts or instructions provided.
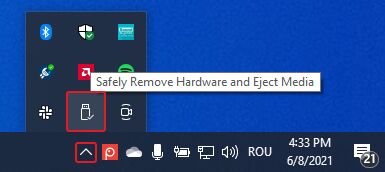
Once the scan is finished, safely remove the storage media and reconnect it to access the repaired image files.
Fix 3. Utilize the Error-Checking Utility in Windows
Windows operating systems come equipped with a built-in error-checking utility that can help identify and resolve issues with corrupted or inaccessible files, including broken images. This utility scans the selected drive for errors and attempts to repair them, potentially fixing any underlying issues that may be causing your images to appear broken.
To access the error-checking utility, follow these steps:
Open File Explorer and locate the drive or storage media containing the damaged image files.
Right-click on the drive or storage media and select "Properties".
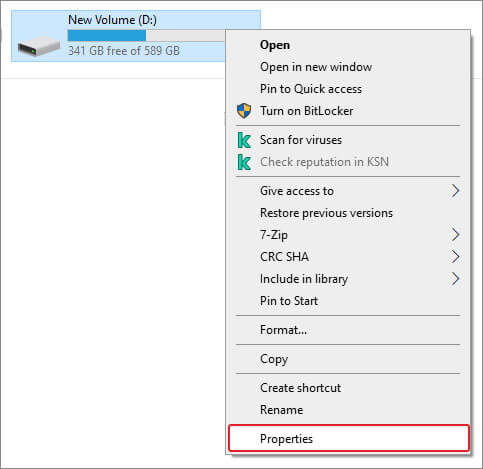
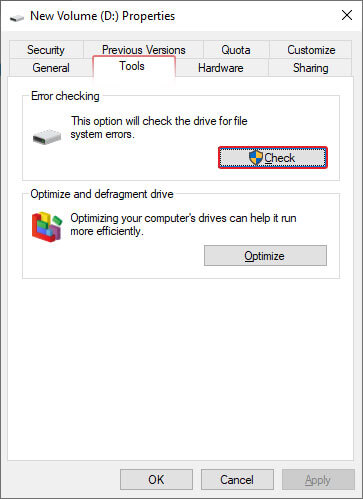
Navigate to the "Tools" tab and click the "Check" button under the "Error checking" section.
Select the "Scan drive" option and allow the scan to complete.
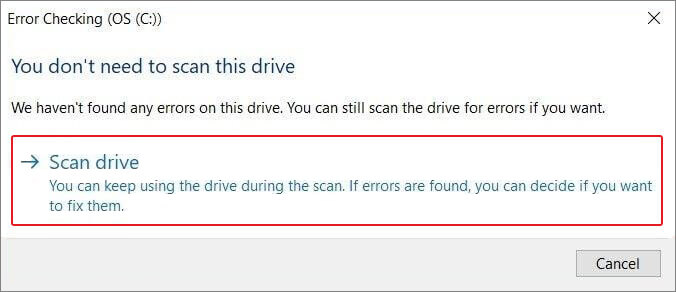
If any errors are detected, the utility will provide options to attempt repairs or take further action.
Fix 4. Recover Broken Images on Mac
For Mac users, the Photo Library repair utility can be a valuable tool for addressing corrupted or broken image files.
Here's how to use the Photo Library repair utility:
Open the Photos app on your Mac.
Press and hold the "Command + Option" keys while the Photos app is launching.
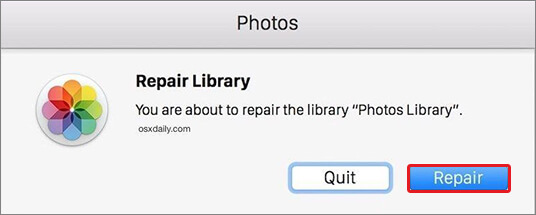
In the dialog box that appears, click the "Repair" option to initiate the repair process.
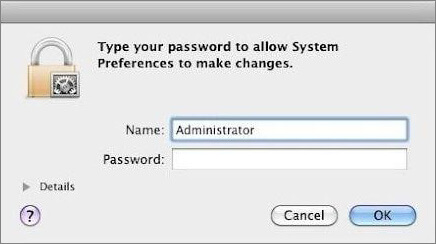
Enter your user account password when prompted to allow the repair process to proceed.
Be patient, as the repair process may take some time to complete, depending on the size of your Photo Library.
Fix 5. Repair Corrupted Pictures on Android Smartphones
In today's mobile-centric world, many of our cherished memories and visuals are captured and stored on our smartphones. However, issues such as insufficient storage space, improper handling of SD cards, or malware infections can lead to corrupted or broken images on Android devices.
To address this problem, you can try the following solutions:
Perform a CHKDSK Scan: If your Android device supports external storage, you can connect the SD card or storage media to a computer and perform a CHKDSK scan, as described in Fix 2.
Connect to Other Devices: Sometimes, the issue may lie with compatibility between your Android device and the storage media. Try connecting the SD card or storage media to another device to see if the images are accessible.
Clear Storage Space: Insufficient storage space can cause issues with image files. Free up space on your Android device by deleting unnecessary files or moving data to an external storage device.
Update Android OS: Outdated versions of the Android operating system can contribute to image corruption. Keep your device updated to the latest version to ensure optimal performance and stability.
Fix 6. Restore Damaged Pictures from iCloud Backup
For iPhone users, the iCloud backup service can be a lifesaver when it comes to recovering damaged or corrupted image files. By regularly backing up your device's data to iCloud, you can easily restore your pictures in the event of corruption or other issues.
Here's how to restore damaged pictures from an iCloud backup:
Connect to a stable network and sign into your iCloud account on your iPhone.
Go to "Settings" > tap on your Apple profile > select "iCloud," and enable the toggle switches for the data you want to back up under "iCloud Backup".
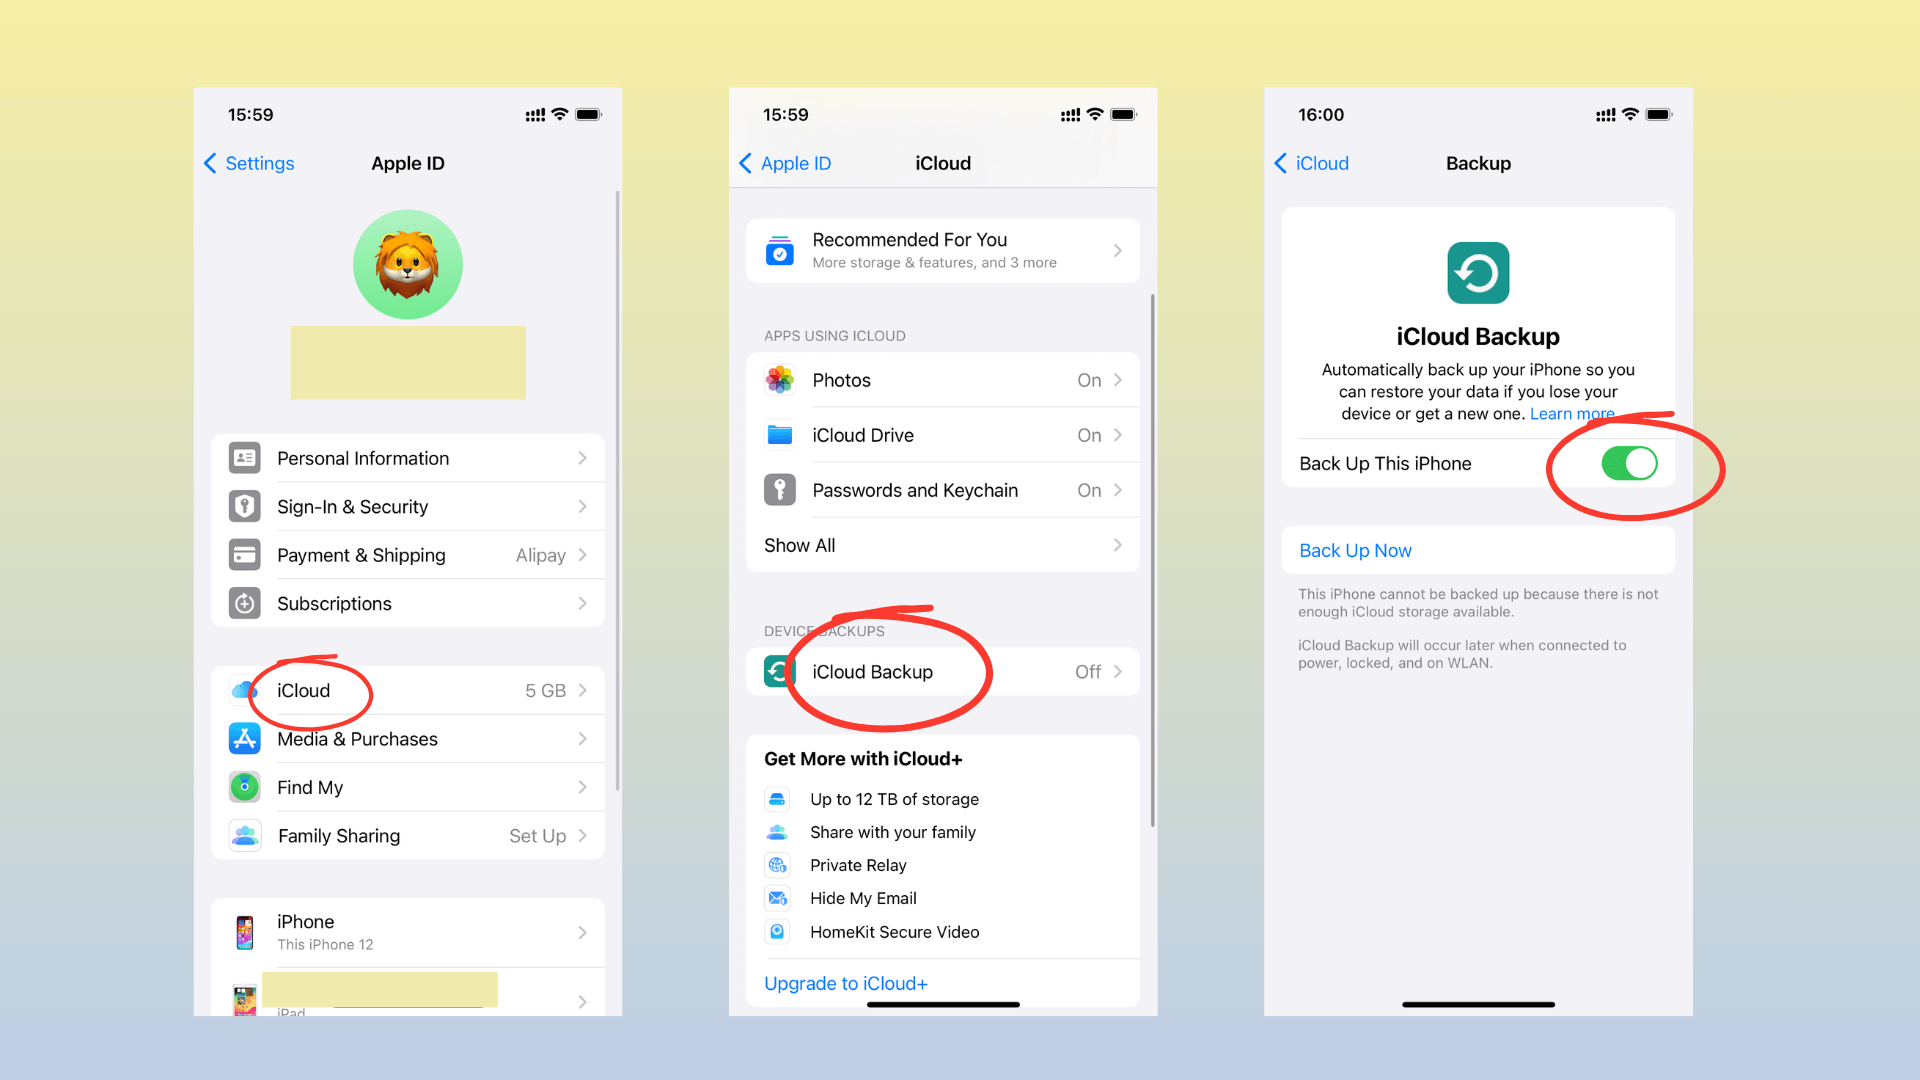
Then, tap "Back Up Now" to initiate a backup of your device's data to iCloud.
Wait for the backup to be finished, go to "Settings" > "General" > "Transfer or Reset iPhone" and select "Erase All Content and Settings".
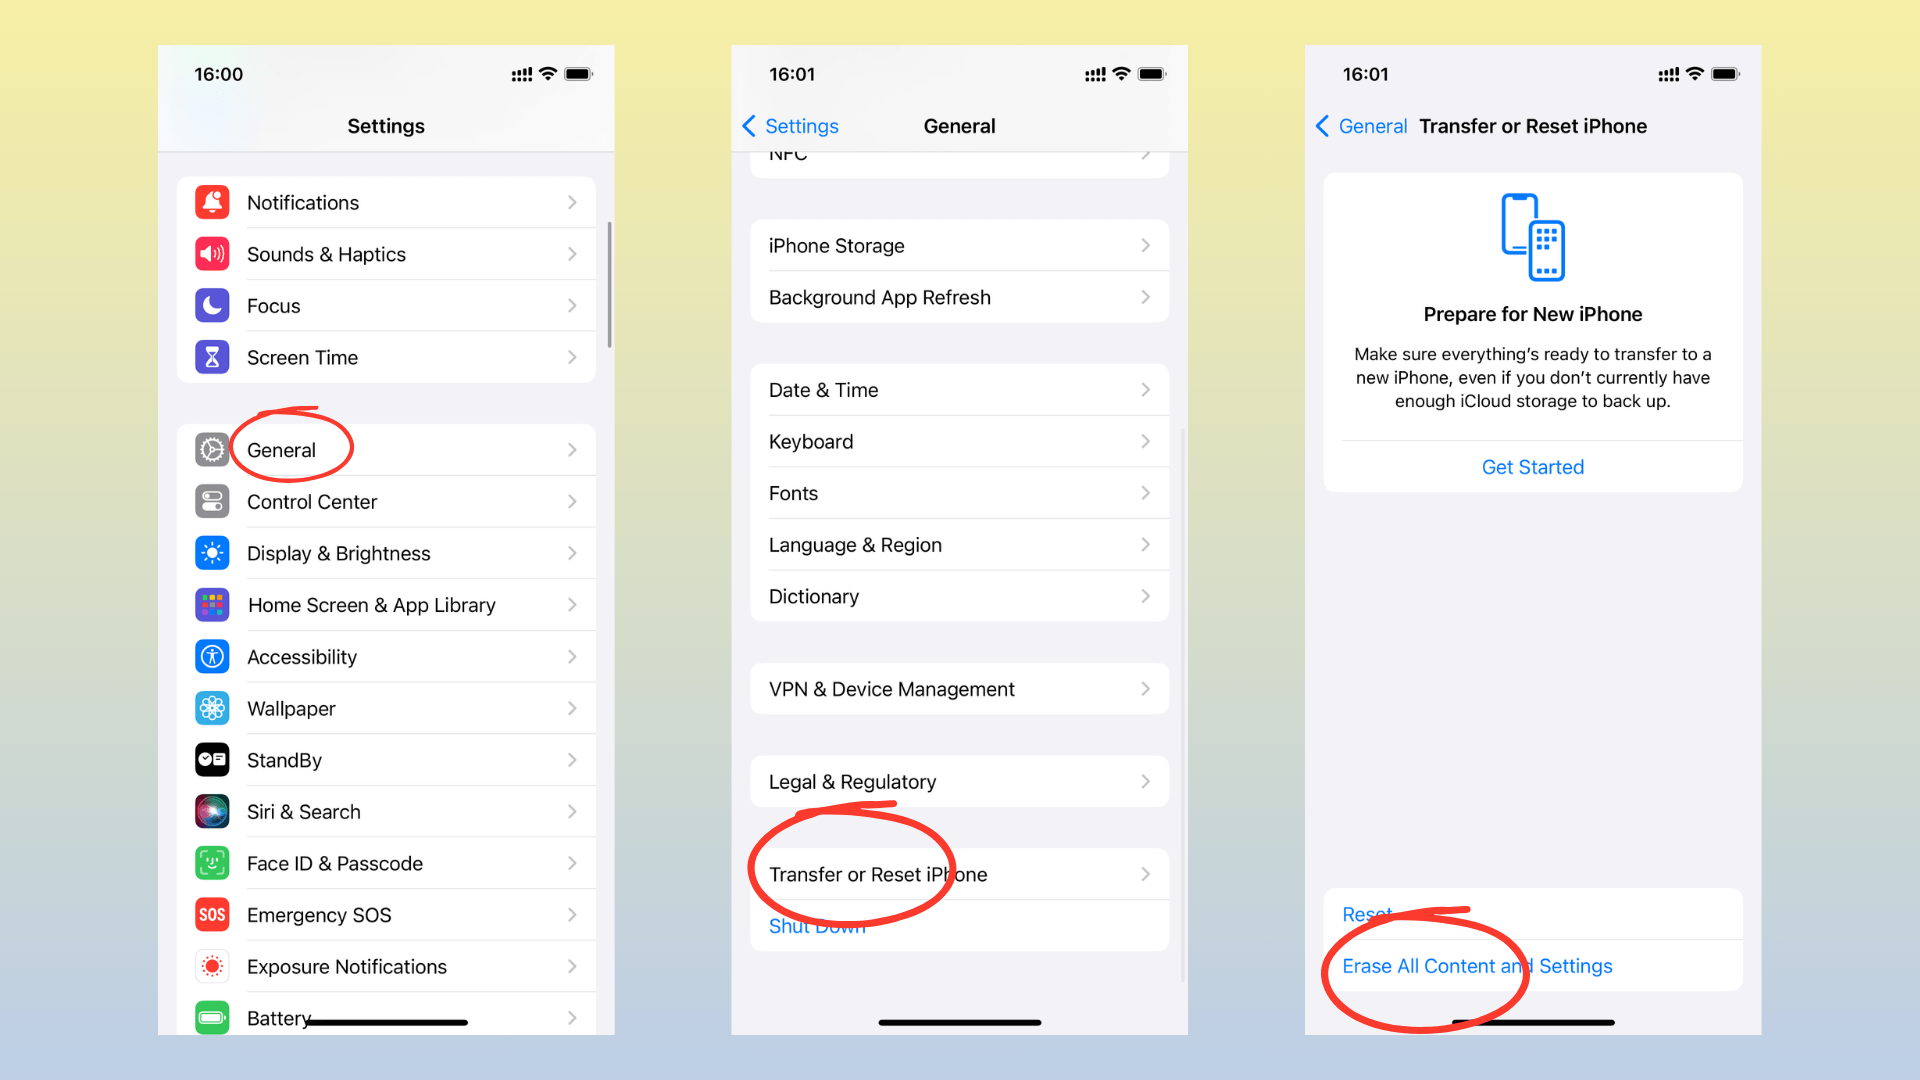
After the reset process is complete, choose the option to "Restore from iCloud Backup" and sign in with your Apple ID.
Select the most recent backup file containing your damaged pictures and let your iPhone automatically restore them.
Fix 7. Convert to Another Format
In some cases, you can try to convert your damaged image to a different file format. This solution can be particularly useful when dealing with unsupported or outdated file formats, or when the original format has become corrupted.
To convert your broken image files to another format, you can utilize free online file converter tools or dedicated image conversion software. Simply upload or select the broken image file, choose the desired output format (such as JPEG, PNG, or TIFF), and initiate the conversion process.
Once the conversion is complete, try opening the newly converted image file. If it opens successfully, you can save the file in the new format, effectively resolving the issue with the broken image.
Fix 8. Rename the Image Files
Sometimes, when you've tried multiple methods to repair the broken images but failed, you may just need a simple renaming of this image file (without changing the file extension) and you can resolve issues with broken or inaccessible visuals.
Fix 9. Open with an Image Editor
If your image files are corrupted or broken, attempting to open them with a dedicated picture editor can sometimes resolve the issue. If the image opens successfully within the picture editor, you can then save it and try to view it again.
Fix 10. Re-download the Image Files
In some cases, the issue with broken images may stem from an incomplete or interrupted download process. If the image file is not fully downloaded or transferred, it can result in corruption or missing data, leading to a broken or inaccessible visual.
To address this issue, you can try re-downloading the image files from their original source. Once you have successfully re-downloaded the image files, try opening them again.
Part 2. What are Broken Images?
Broken images are pictures that can't be readable, accessible, or displayed properly due to various factors. These images may appear distorted, incomplete, or display error icons or placeholders instead of the intended visual content.
Here are the common indicators of broken images:
Distorted or garbled visuals
Missing portions or incomplete display
Error icons or placeholder graphics
Incorrect color representation
Failure to load or display the image
The grey box in the picture
Part 3. Reasons for Broken Images
Several factors can contribute to corrupted or broken images, here are some common reasons for broken images:
File Corruption: Images can become corrupted during transfer, download, or due to disk errors, making them unusable or distorted.
Unsupported File Format: Your image's file format may not be supported by the viewing software, causing it to appear broken or fail to display correctly.
Incorrect File Extension: If the file extension doesn't match the actual format, the image may not display correctly or be recognized by the viewing software.
Partial Download or Upload: Incomplete transfers can result in broken images that don't display fully or are missing crucial data.
Damage During Editing: If you edited or saved your images improperly, that can also cause them to be broken, degraded, damaged, or become inaccessible.
Corrupted Metadata: Inconsistent or damaged metadata (information about the image file) can prevent images from displaying correctly or cause rendering issues.
Incompatible Compression: Using a compression method not supported by viewing software can lead to broken images or visual artifacts.
Virus or Malware Infection: Malicious software can corrupt image files, causing them to become inaccessible or distorted.
Insufficient Storage Space: Lack of storage space can interrupt saving processes, resulting in incomplete or broken image files.
Software Glitches: Bugs in image editing or viewing software can cause images to appear broken, distorted, or fail to load properly.
Part 4. Frequently Asked Questions about Broken Images
Q1. How to fix a corrupted JPG?
Corrupted JPG files can be challenging to repair, but several solutions exist. You can try using a third-party tool like AnyRecover AIRepair, which is designed to repair corrupted image files, including JPGs. Alternatively, you can attempt to convert the corrupted JPG to a different format, such as PNG or TIFF, using an online file converter or image editing software. In some cases, simply renaming the JPG file or opening it with a dedicated picture editor may resolve the issue.
Q2. How to fix corrupted pictures on an SD card?
If you're dealing with corrupted pictures stored on an SD card, the first step is to perform a CHKDSK scan on the SD card to check for and repair any file system errors. You can also try connecting the SD card to a different device to see if the issue is related to compatibility. If the problem persists, consider using a third-party tool like AnyRecover AIRepair to attempt to repair the corrupted image files directly.
Conclusion
Broken images can be a frustrating and disheartening experience, but there are useful strategies and tools available, you can fix the broken or damaged pictures. Additionally, if you want a more comprehensive photo repair solution, AnyRecover AIRepair can give you a satisfactory answer on how to fix broken images. It supports repairing various image file formats, and can also repair videos and other text files.
Related Articles:
- Best Way to Recover Deleted Files from External Hard Drive
- How to Create and Delete EFI System Partition in Windows 11/10/8/7
- 4 Tested Solutions to "Windows can't access the disk" Issue
- Top 5 SD Card Data Recovery Software Free Download Full Version
- How to Deal With Current Pending Sector Count Caution?
- How to Fix “Location is Not Available” Windows 10/11 in 2024?
- Top 6 Free Download Hard Drive Recovery Software
- How to Recover Photos After Factory Reset [With/Without Backup]
- How to Fix Error code 0x80004005 in Windows 10/11?
- How to Fix BSOD PFN_LIST_CORRUPT in Windows 10/11 [12 Solutions]
- Fix Hard Drive not Showing Up in Disk Managemnet
- 3 Ways to Recover Deleted Files from SharePoint?
Time Limited Offer
for All Products
Not valid with other discount *

 Hard Drive Recovery
 Deleted Files Recovery
