- Data Repair
- Data Recovery
-
Tips
-
 Hard Drive Recovery
-
Photo/Video Restoration
-
 Deleted Files Recovery
- Guide
- Support
- Shop
-
Search
- Store
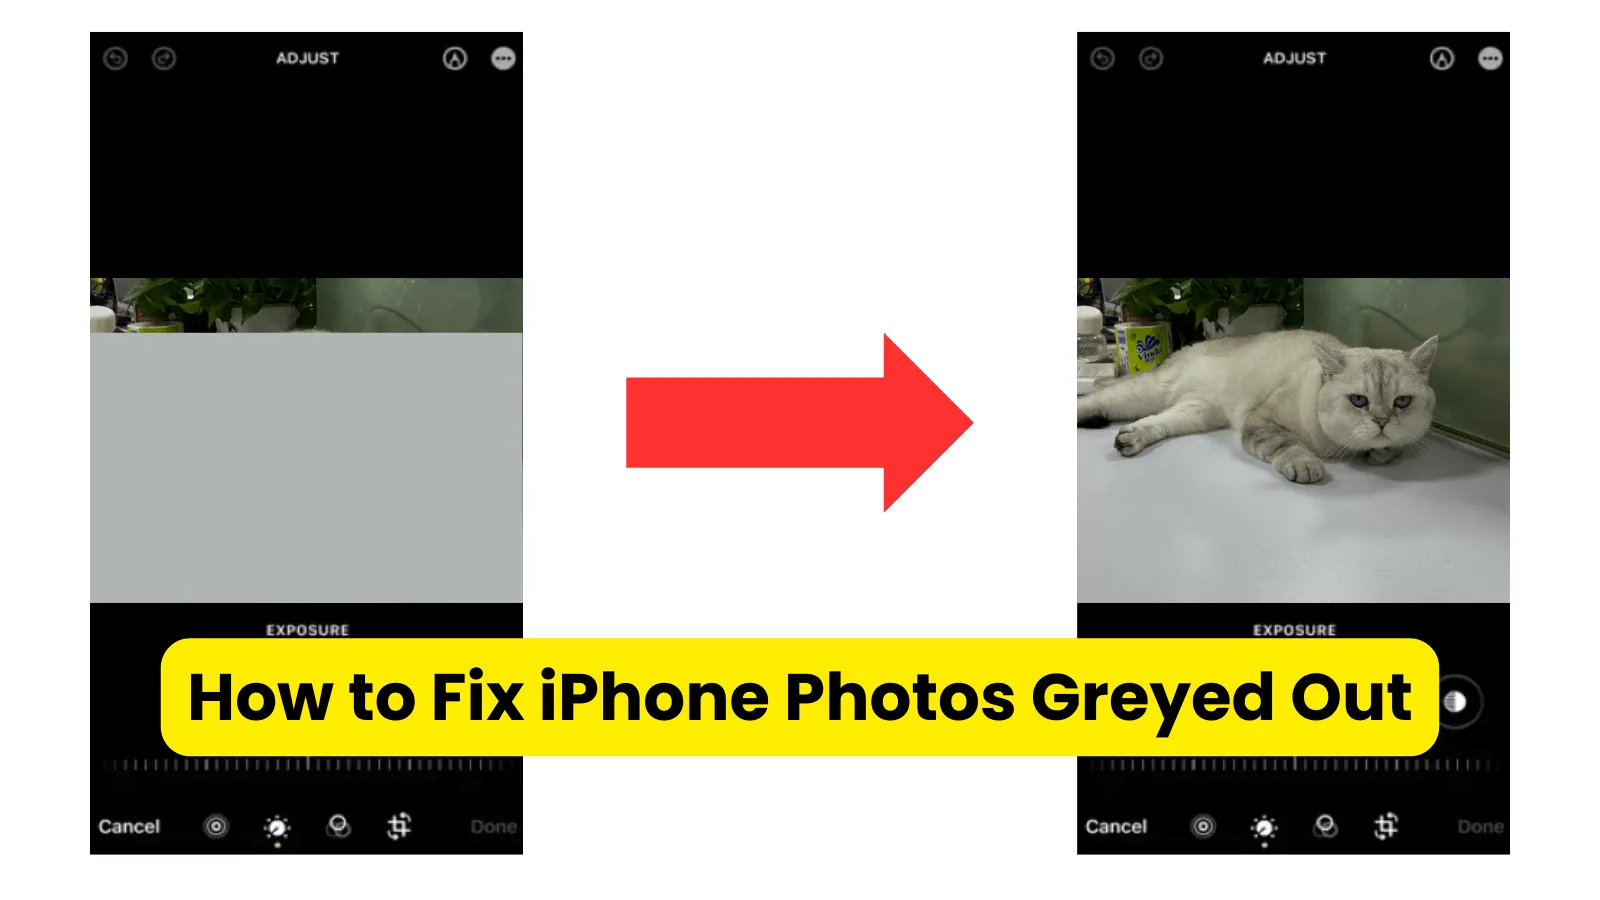
7 Methods - Fix iPhone Photos Greyed Out

However, you must have come across the time when you open those photos ready to enjoy them, and find that they have all turned gray and have waited for a long time without becoming normal. This is usually disappointing and frustrating. But don't worry, in today's article, we will explain to you why this happens and focus on how to fix the iPhone photos greyed out and how to prevent this.
Part 1: Why Are iPhone Photos Greyed Out?
Before we learn about the solutions, it's essential to understand the potential causes behind iPhone photos greyed out. By understanding the following underlying reasons, you'll be better equipped to handle this problem head-on.

Corrupted or Damaged Files: If your photos are corrupted or damaged, the photos may be shown in unreadable formats such as greyed out.
Incomplete Photo Transfers: When you download the photos from an external source or transfer these photos from another device, incomplete or interrupted file transferring can lead to the grey box issue of your photos.
Insufficient Storage Space: If there is not enough storage space in your iPhone device, it can affect the ability to display photos, resulting in greyed-out photos.
Rapid Photo Capture: It's possible when you capture pictures too quickly one after another without giving your iPhone's camera sufficient time to process each shot, it can result in images becoming corrupted or failing to save properly, leading to the grey boxes of your photos.
Part 2: How Do I Fix Greyed-Out Photos on My iPhone?
Now that you have a better understanding of the potential causes, here are the various solutions to restore your greyed-out photos on iPhone.
1. Fix Greyed Out Photos with Ease (Zero Data Loss)
If your iPhone photos turn greyed out because they are corrupted and you're looking for a reliable and user-friendly solution to fix them without risking any data loss, consider using a specialized iOS system repair tool. AnyRecover Data Repair is the best method to fix greyed-out photos on iPhone. This powerful software is designed to identify and resolve a wide range of iOS system photo issues, including restoring damaged pictures.
With this tool, you can easily recover the greyed-out photos on iPhone with several simple steps. It also supports repairing various picture formats, including JPG, PNG, JPEG, HEIC, etc. There will be no data loss and it will enhance your low-resolution photos quality with AI. Here is how to fix the iPhone photo greyed out with AnyRecover Data Repair:
Step 1: At first, you need to transfer the greyed-out photos to your Windows. Download the software and launch it on your Windows.
iPhone Photo Repair Tool
Support to repair various photo issues, including iPhone photos greyed out.
Step 2: Navigate to the Photo Repair section and click on it, choose the greyed-out photos. You can repair multiple photos simultaneously.

Step 3: After you upload the photos you wish to restore, click on the Repair button to start the repair process.

Step 4: Wait for the process to be finished, and you can preview the repaired photos and save them. Now these greyed-out photos can be displayed normally.

- Though the possibility of it happening is lower, if the repair fails, click on the "Advanced Repair" button, update a viewable image of the same device as the damaged image, and then repair it again, you can repair it successfully.
AnyRecover Data Repair – Top Photo Repair Software
- Restore corrupted and damaged photos, including the greyed-out photos on iPhone.
- Repair various formats of pictures such as JPG, JPEG, PNG, etc.
- Fix various files like corrupted videos, unreadable files, and damaged pictures.
- Enhance the quality of your videos and photos during repair.
- Clear interfaces and easy-for-use steps.
2. Re-Download Photos
If the greyed-out photos exist due to the incomplete or interrupted transfer from an external source, such as a website or another device, you can try to re-download them. Change to a stable internet connection and download these photos with sufficient time, ensuring a complete and uninterrupted transfer, and you may gain photos display completely.
3. Ensure Sufficient Storage Space
As mentioned earlier, insufficient storage space on your iPhone can contribute to the greyed-out photo issue. To address this, you should ensure there is enough storage space on your iPhone, if not, then you need to free up some space on your device, here is how:
Step 1: Open the "Settings" app on your iPhone.
Step 2: Tap on "General" > "iPhone Storage".
Step 3: This section will display details of how much storage space each app is using on your device.

Step 4: Identify apps that you no longer use or that are consuming a significant amount of storage space, and consider offloading or deleting them to free up space.
4. Force Reboot iPhone
Sometimes, a simple force reboot can solve most easy issues in smartphones, including the greyed-out photo on iPhone. To do this, you need to simultaneously press and hold the Volume Down button and the Power button until the prompt appears, and slide right to Power Off your iPhone. Then long-press the Power button until the Apple logo appears to restart your iPhone.
5. Repair Corrupted Storage Device
In some cases, the issue with greyed-out photos may stem from a corrupted or damaged storage device, such as an SD card or external hard drive. To repair a corrupted storage device, follow these steps:
Step 1: Connect the SD card or external storage device to your computer with a compatible card reader or USB cable.
Step 2: Press the Win key + R to enter the Run window, type "cmd" in the bar, and press Enter to run it as an administrator.

Step 3: In the Command Prompt window, type the following command and press Enter: chkdsk [drive letter]: /f (replace "[drive letter]" with the actual drive letter assigned to your storage device).
Step 4: The command will initiate a check and repair process for the specified storage device. Be patient and allow the process to complete without interruption.
6. Recover Photos with iPhone Data Restore
If the greyed-out photos are still present on your iPhone but are simply not displaying correctly, you can try recovering them using a reliable iPhone data recovery tool. These tools can scan your device and retrieve your lost and inaccessible data, including photos.
You can download an iPhone data recovery tool and try to use it to recover your lost photos.
7. Restore iPhone Photos with iTunes
In addition to third-party tools, you can also consider restoring your iPhone using iTunes as a last resort. However, it's important to note that this method will erase all data and settings on your device, so it's crucial to create a backup beforehand.
Here's how to restore your iPhone using iTunes:
Step 1: Connect your iPhone to your computer with a compatible cable.
Step 2: Open iTunes on your computer and put your iPhone into Recovery Mode by following the appropriate steps for your device model.

Step 3: You can see a prompt to restore your iPhone in iTunes, and click on "Restore" to start the restoring process. Don't disconnect your device until the process is complete.
Part 3: How to Prevent iPhone Photos from Being Greyed Out?
While the solutions mentioned above can help you fix greyed-out photos on your iPhone, it's also essential to take preventive measures to avoid encountering this issue in the future. Here are some tips to help you prevent your iPhone photos from being greyed out:
1. Take Photos Slowly: Try to slow down your photo-taking process. Give your iPhone a few seconds between each shot to ensure that the camera has enough time to properly save and process the images.
2. Regularly Free Up Storage Space: It's a good habit to ensure your iPhone’s storage space is enough regularly. This can prevent your device from causing more issues like photo display greyed out.
3. Update to the Latest iOS Version: Keeping your iPhone system updated to the latest iOS version can also help you prevent various issues, including greyed-out photos on iPhone. This method may be useful when you’ve tried many available methods. Additionally, you should back up your data before updating.
4. Avoid Abrupt Shutdowns or Disconnections: It's essential to keep the connection not shutting down when you transfer photos or other files. Ensuring a stable connection when downloading or transferring can minimize the risk of greyed-out photos.
5. Use Reliable Data Transfer and Recovery Tools: If you don't trust the built-in data transfer and recovery functionality on your device. You can try a reliable and trusted software like AnyRecover Data Repair to restore your greyed-out photos on iPhone when necessary.
Part 4: FAQs About iPhone Photos Greyed Out
Q1: What should I do if iPhone photos are still greyed out?
If you've tried all the solutions mentioned in this guide and your iPhone photos are still greyed out, it's recommended to seek professional assistance. Contact Apple Support or visit an Apple Store for further troubleshooting and guidance. In some cases, hardware issues or more complex software problems may require expert intervention.
Q2: Should I update my iOS system to fix greyed-out photos on my iPhone?
Updating to the latest iOS version can sometimes resolve issues like greyed-out photos, as Apple often includes bug fixes and performance improvements in their software updates. However, it's essential to back up your data before updating to prevent any potential data loss or complications during the update process.
Q3: What if iPhone photos still greyed out when I open them later?
If you've successfully resolved the greyed-out photo issue but encounter the same problem again when opening the same photos at a later time, it's possible that the underlying cause has not been fully addressed. In such cases, you may need to try a different solution or seek professional assistance to identify and resolve the root cause of the problem.
Conclusion
By understanding the potential causes and exploring the various methods to fix greyed out photos on iPhone, you can confidently handle this issue and recover your cherished memories.
Additionally, if the photos still display greyed-out, then they can be corrupted, you can try the top photo repair tool, AnyRecover Data Repair, to resolve the issue of iPhone photos greyed out.
Related Articles:
- How to Create and Delete EFI System Partition in Windows 11/10/8/7
- 4 Tested Solutions to "Windows can't access the disk" Issue
- Top 5 SD Card Data Recovery Software Free Download Full Version
- How to Deal With Current Pending Sector Count Caution?
- Mac Keeps Crashing? This Is Why and How to Fix It!
- Fixed: Blue Screen When Playing Games in Windows 7/8/10/11
- How to Fix “Location is Not Available” Windows 10/11 in 2024?
- Top 6 Free Download Hard Drive Recovery Software
- How to Recover Photos/Data After Factory Reset on Android [With/Without Backup]
- How to Fix Error code 0x80004005 in Windows 10/11?
- How to Fix BSOD PFN_LIST_CORRUPT in Windows 10/11 [12 Solutions]
- 3 Ways to Recover Deleted Files from SharePoint?
Rated successfully!
You have already rated this article, please do not repeat scoring!
![]()
![]()
![]()
![]()
![]()
![]()
![]()
![]()
![]()
![]()
![]()
![]()
Copyright © 2026 AnyRecover. All rights reserved.
Time Limited Offer
for All Products
Not valid with other discount *