Fixed: Blue Screen When Playing Games in Windows 7/8/10/11
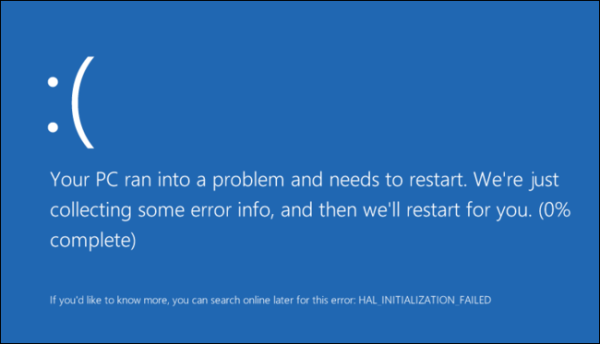
A lot of Windows users may face various different problems, one such problem among these is blue screen of death when playing games. This issue usually occurs when playing graphic intensive games. It is common in Windows 10 but it can also occur in Windows 7/8/11. If you are looking for how to fix blue screen in Windows 10 while playing games, then you are at the right place. This guide lists some effective solutions that you can try. Although it is focused on fixing blue screen while playing games Windows 10, you can still benefit from it if you are a Windows 7/8/11 user.
- Part 1: Fix Blue Screen Error When Playing Games in Windows 10 Manually
- Part 2: Advanced Fixes to Blue Screen Error When Launching/Playing Games
- 1. Uninstall & Reinstall the Graphics/Display Drivers
- 2. Change Power Settings
- 3. Run Clean Boot
- 4. Enable UEFI Boot
- Part 3: Recover Data After Solving Blue Screen Error in Windows 7/8/10/11
Part 1: Fix Blue Screen Error When Playing Games in Windows 10 Manually
There are some quick fixes you can try when you encounter a blue screen error while playing or launching games. These solutions are simple and often work. These include:
- Restarting the computer.
- Unplugging and re-plugging the graphics card/memory card. Sometimes replacing them is the only solution.
Part 2: Advanced Fixes to Blue Screen Error When Launching/Playing Games
The solutions listed above, as mentioned, are quick fixes. Depending on the cause behind the problem, they can help you quickly resolve the issue. However, if the problem occurs due to some technical error or other similar issue, then it will require a more advanced approach to resolve. That’s where these advanced solutions prove to be beneficial. Following are some recommendations:
1Uninstall & Reinstall the Graphics/Display Drivers
Blue screen while playing games can occur due to corrupted/outdated display/graphics drivers. So, it is highly recommended that you uninstall these drivers and then install their latest version via Device Manager.
Step 1. Launch Device Manager on your Windows PC.
Step 2. Navigate to device list and find the graphics/display driver, right click on it, and then click on the Uninstall option. If you see a prompt, choose the Delete the driver software for this device option.
Step 3. Once the drivers are uninstalled, restart your computer.
Step 4. After the restart, launch Device Manager and click on the Scan for hardware changes button. Windows will automatically detect and install the missing drivers. Internet access will be required.
2Change Power Settings
Another advanced solution that many users have reported to be successful is changing certain Power settings in the Control Panel. This may or may not fix the problem for you but the method is easy to follow and it is definitely worth a try.
Step 1. Launch Control Panel on your computer.
Step 2. Navigate to Power Options and choose the Change plan settings option.
Step 3. Next, click on the Change Advanced power settings option to proceed.
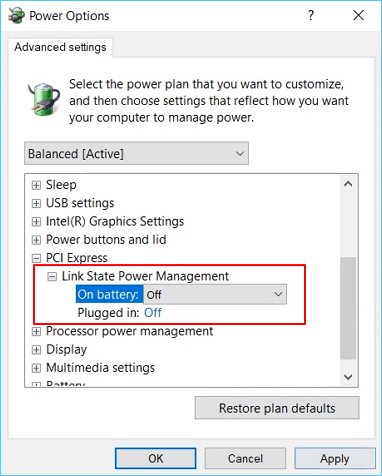
Step 4. In the next window, find and switch off the Link State Power Management option in both On battery and Plugged in sections under PCI Express.
3Run Clean Boot
Clean Boot refers to starting the computer with only the necessary Windows services and programs, disabling all third-party apps and services. Clean Boot is great for troubleshooting purposes and it can help fix the blue screen when playing games issues in Windows 7/8/10/11. If you are not familiar with Clean Boot, then this method might seem a bit complicated at first but following these steps will help you use it to solve your problem without much hassle. Follow these instruction to perform a clean boot in Windows 7/8/10/11:
Step 1. First, make sure you are signed in as an administer to the computer. If you don’t have an administrator account, create one in your Windows PC and sign in using its credentials.
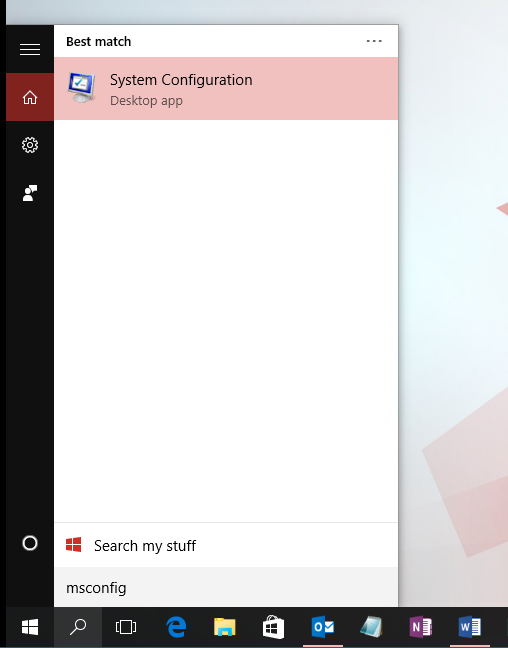
Step 2. Launch System Configuration. You can launch by typing msconfig in the search box on the taskbar.
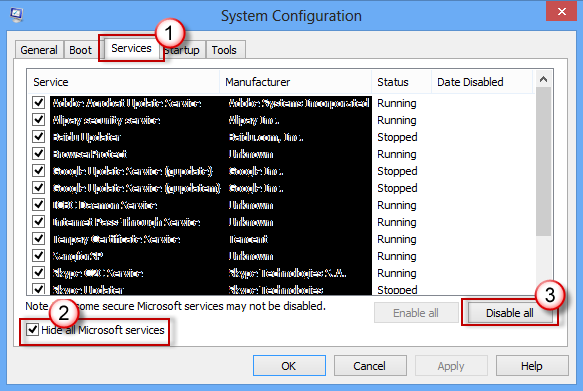
Step 3. Once System Configuration window appears, navigate to the Services tab, select Hide all Microsoft services option, and then choose the Disable all option.
Step 4. Now navigate to the Startup tab of System Configuration and click on the Open Task Manager option.

Step 5. Once Task Manager is launched, navigate to its Startup tab and select each startup items one by one and click on the Disable button. Close Task Manager.
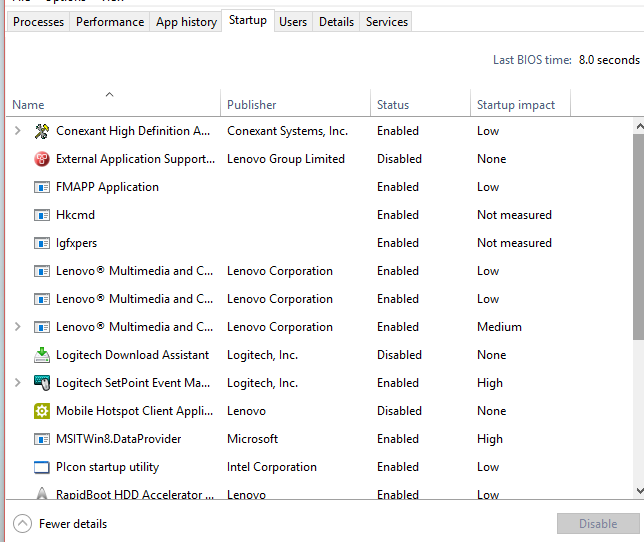
Step 6. Now back on the System Configuration window, click on OK. When your computer is restarted, it will be in a Clean Boot environment. Use troubleshooting steps to run the game or install/uninstall applications that you think might be causing the blue screen issue. After troubleshooting, simply restart your computer to exit Clean Boot mode and resume functionality.
4Enable UEFI Boot
If UEFI Boot is disabled on your PC, it might cause certain compatibility issues, leading to errors like blue screen when playing games. So, you should enable it as it can actually help solve this problem. While enabling UEFI Boot is simply a matter of going to the BIOS, there are certain additional steps you should perform to avoid issues.
Step 1. Open This PC on your Windows 7/8/10/11 computer and navigate to C: > Windows > Software Distribution > Download. Once there, delete everything in that directory. It is also recommended that you delete the $Windows.~BT folder. It is located in the root directory of ‘C:’.
Step 2. Once all of these files are deleted, restart your computer. When the computer is restarting, choose the option to go to the BIOS. You can do this by pressing F2 or F12 depending on your PC. Once the BIOS window appears, find and enable UEFI Boot.
Step 3. It is also recommended that you reset the overclocking options for your processor. Finally, save and exit BIOS. The problem should be solved now.
Part 3: Recover Data After Solving Blue Screen Error in Windows 7/8/10/11
Above methods may lead to data loss. If it happens, then you will need to use a reliable data recovery tool to recover any of the erased data.
iMyFone AnyRecover is professional data recovery tool that you can use for this purpose. This user-friendly tool is capable of recovering data erased due to system crash, OS reinstall, virus/malware, attack, hardware failure, and more. It is suitable for beginners so even if you have not performed data recovery before, you will be able to recover your data with ease.

Key Features:
- Recover data that is lost/deleted due to system crash, OS reinstall, blue screen error, black screen, hardware malfunction, virus/malware attack, and more.
- Powerful scanning capability. AnyRecover can even scan the disk/partition that has been corrupted due to an issue.
- All-in-one data recovery software supports recovering from iPhone,Windows 11/10/8.1/8/7 as well as various Mac OS.
- All types of files are recoverable, including documents, videos, images, archives, etc.
- User-friendly interface and extremely high successful data recovery rate.
Steps to Recover Files After Fixing Blue Screen When Playing Games on PC:
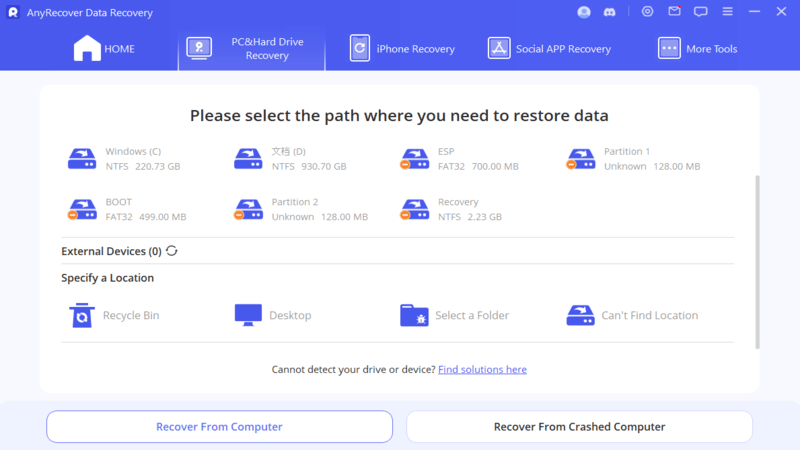
Step 1. Download, install, and launch AnyRecover on your Windows PC. Once the tool is launched, choose the location that you want to scan and then click on the Start button.
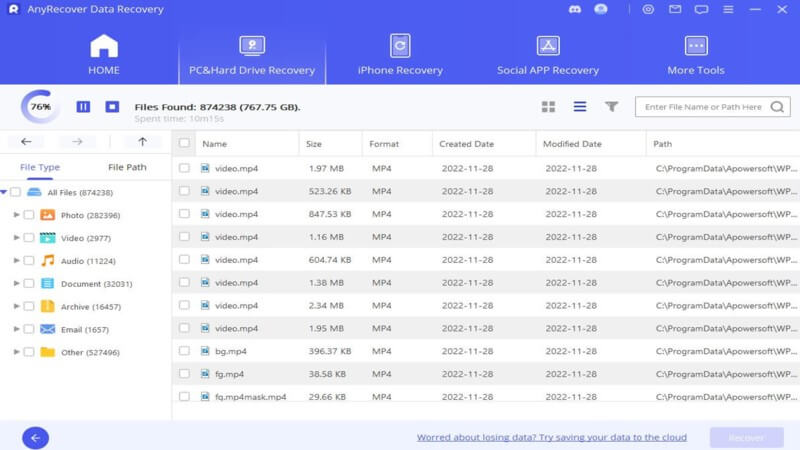
Step 2. The data scanning will begin. AnyRecover will perform an all-round scanning which can take a while so be patient.
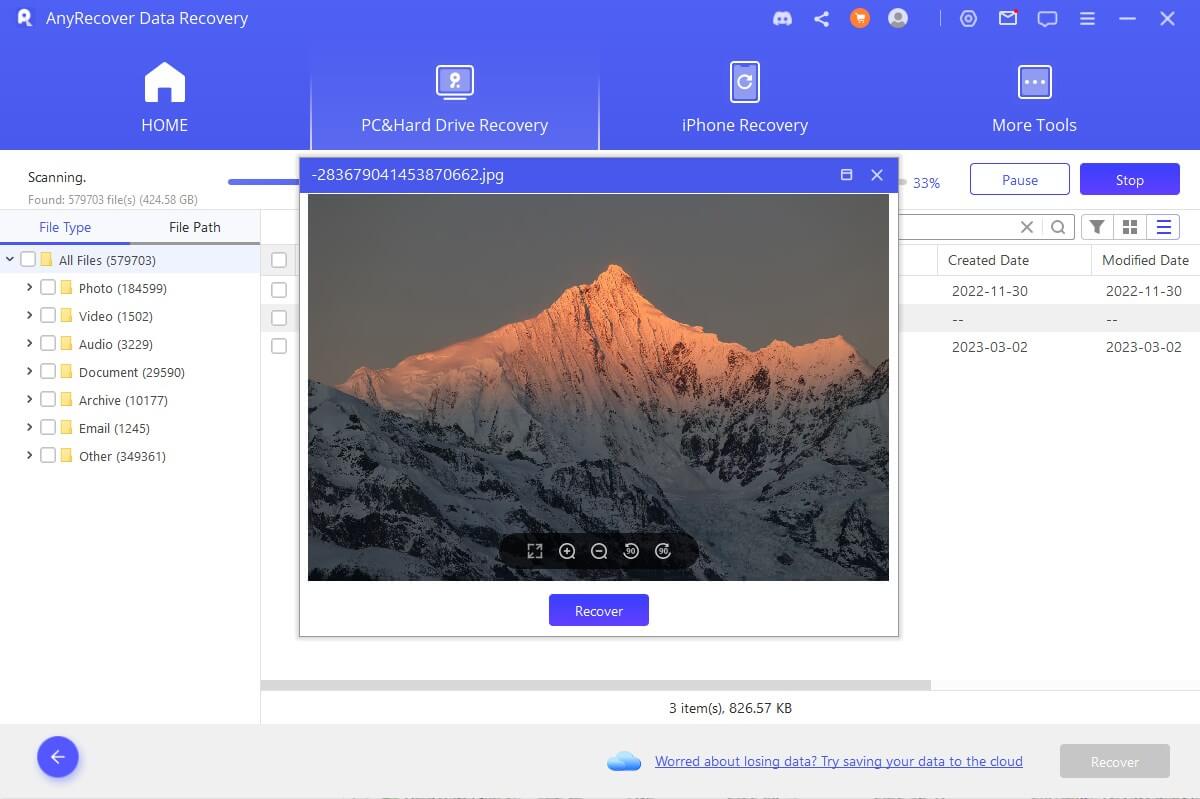
Step 3. Once the scan is completed, you will see a list of files sorted in folders and file types. On that list, you can select and preview any item you wish. To recover an item, simply select it and click on the Recover button.
Conclusion
There are a number of solutions available for fixing the blue screen when playing games in Windows 7/8/10/11 issue. Some of them are quick fixes while others are advanced methods to solve the problem. It is recommended that you try the quick fixes first and see if you can get rid of the problem in a timely manner. If they don’t work, then use the advanced solutions one by one. Don’t forget to use AnyRecover to recover your data if it gets lost/erased in the process.
Related Articles:
Time Limited Offer
for All Products
Not valid with other discount *

 Hard Drive Recovery
 Deleted Files Recovery


