10 Quick Fixes for M.2 SSD Not Showing Up Issue!
Are you facing the "M.2 not showing up" issue and don't know what to do? It is one of the most frustrating issues that most people tend to face while upgrading the M.2 SSDs or installing the SSDs.
Whether you're aiming to add storage to an existing PC or would love to build a new computer, if the M.2 fails and appears as it is in the Disk Management or BIOS, it could be discouraging. If you're also struggling with the "M.2 drive not showing up", dive into this post to explore the brilliant ways to fix the issue.
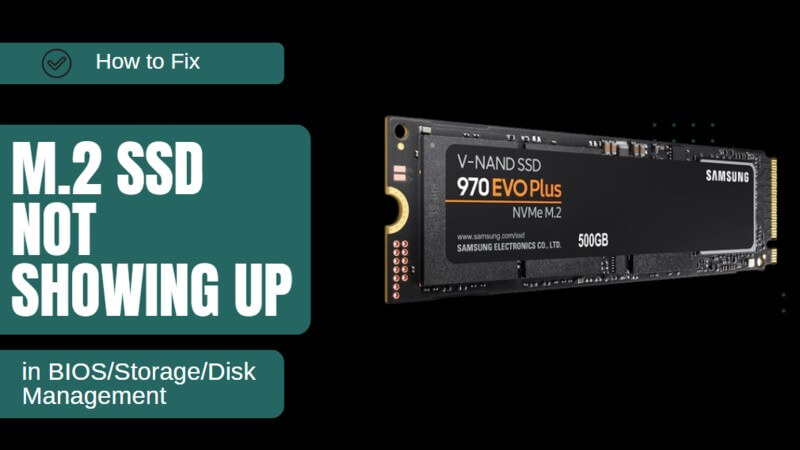
Part 1. Why is M.2 SSD Not Showing Up?
You may face the "M.2 drive not showing up" issue due to the following reasons.
Part 2. Fixes For M.2 SSD Not Showing Up in BIOS
- Fix 1: Ensure that the M.2 SSD is installed appropriately
- Fix 2: Configure the M.2 SSD drive
- Fix 3: Check the M.2 setting in BIOS
- Fix 4: Update BIOS
Fix 1: Ensure that the M.2 SSD is installed appropriately
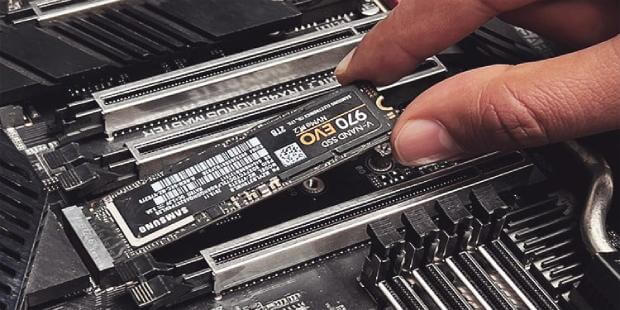
If the M.2 not showing up in BIOS, before making any changes to the system, you'll need to ensure that the M.2 SSD is accurately installed in your M.2 slot. You'll need to reseat the M.2 SSD into your slot, ensuring it is connected firmly.
You are recommended to pay attention to the orientation and alignment of the drive. Despite installing the M.2 SSD, you can go to the next solution if the ''M.2 not showing up'' issue remains.
Fix 2: Configure the M.2 SSD drive
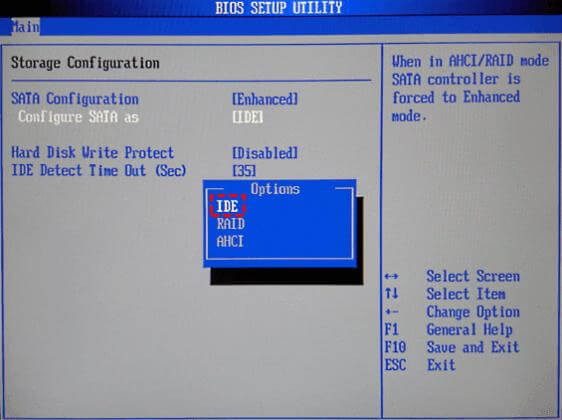
Since a configuration error can also cause the ''M.2 SSD not showing up'' issue, configuring the M.2 SSD Drive appropriately will help you with the issue.
Step 1. Enter into the BIOS/ UEFI after booting the computer.
Step 2.Visit the SATA Configuration and choose the ''Configure SATA Configuration as IDE to turn on the M.2 SSD.
Step 3. Press the F8 to save the changes before quitting the BIOS.
Fix 3: Check the M.2 setting in BIOS
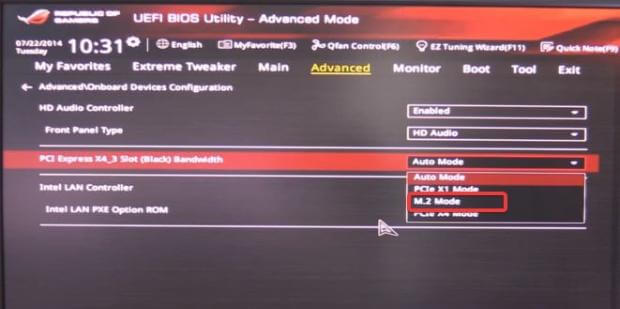
Despite the correct configuration, if the "M2 drive not showing up" issue remains, there might be some issues with the BIOS setting. You can verify the M.2 settings in the BIOS to see how it all shapes up.
Step 1. Restart the PC and press the F2 or F12 to access the BIOS.
Step 2. Jump into the Advanced settings and choose the "Onboard Devices configuration" button.
Step 3. Find the menu next to your PCI Express X4_3 slot Bandwidth before selecting the M.2 Mode option. Quit the BIOS before saving all the changes. Next, you must restart the PC before entering the BIOS again to confirm that the M.2 drive is detected.
Fix 4: Update BIOS
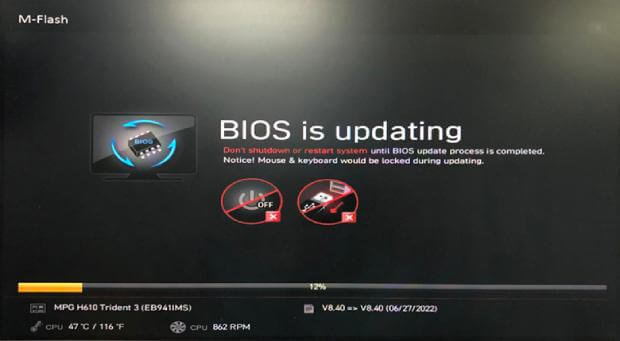
BIOS compatibility issues might also become the main culprit behind the ''M2 drive not showing up'' issue, so updating the BIOS could assist you in fixing the issue.
Step 1. Navigate to the manufacturer's website and the motherboard before finding the latest BIOS version for the specific motherboard model.
Step 2. Transfer the files to the USB flash drive before rebooting the computer and connecting the USB drive to it.
Step 3. Enter the BIOS interface before finding the ''Update BIOS From Drive'' button. Click on the option and select the BIOS update you downloaded from the USB drive. Confirm the operation, and that's all you need to do to update the BIOS.
Part 3. How to Fix M.2 Drive Not Showing Up in Storage
Fix 1: Update Storage Controller Drivers
Updating the Storage Controller Drivers can help you fix the ''M.2 not showing up'' issue.
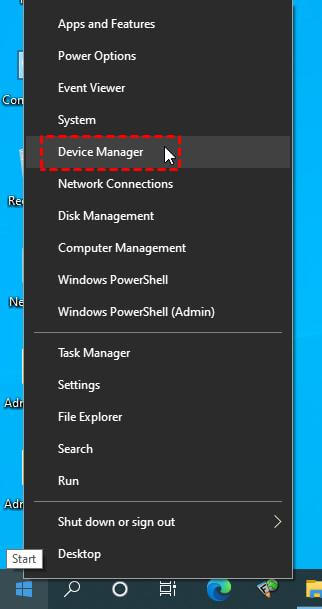
Step 1. Press the Windows and hit the Device Manager button.
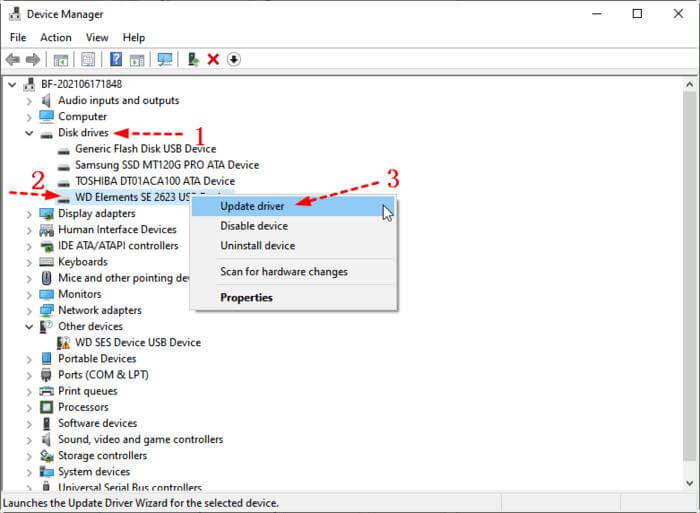
Step 2. Expand the Storage Controller after finding it. Right-press on the Entry and choose the Properties icon.
Step 3. Navigate to the Driver and choose the Update Driver icon. Restart the computer to proceed ahead.
Fix 2: Set the M.2 SSD as Boot Drive
If the "M2 drive not showing up" issue remains despite trying multiple things, you can set the M.2 SSD as Boot Drive.
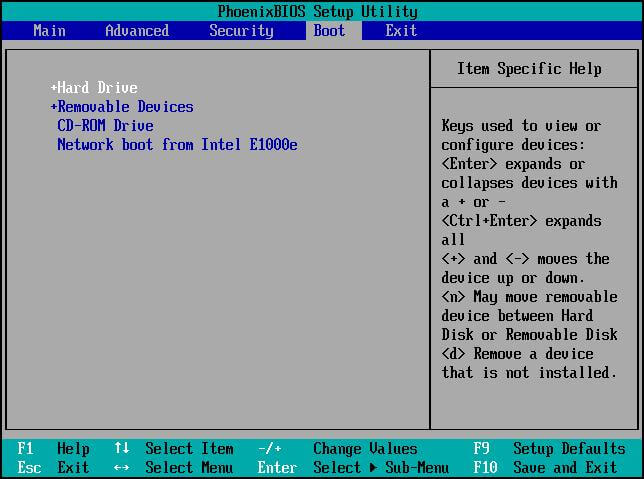
Step 1. Restart your computer before pressing the F2/F8/F11 enter the BIOS.
Step 2. Navigate to the Boot menu and hiss the boot priority section. Next, you'll need to select the M.2 SSD as your boot drive.
Part 4. Fixes For M.2 SSD Not Showing Up in Disk Management
Fix 1: Assign a drive letter to the M.2 drive
Assigning the new drive to the M.2 drive could be helpful in fixing the "M.2 not showing up" issue.
Step 1. Connect the M.2 drive to the computer and press the Win+R to launch the run box. Type in the ''diskmgmt.msc'' in the Window and press the Enter icon before hitting the OK to launch the Disk Management.
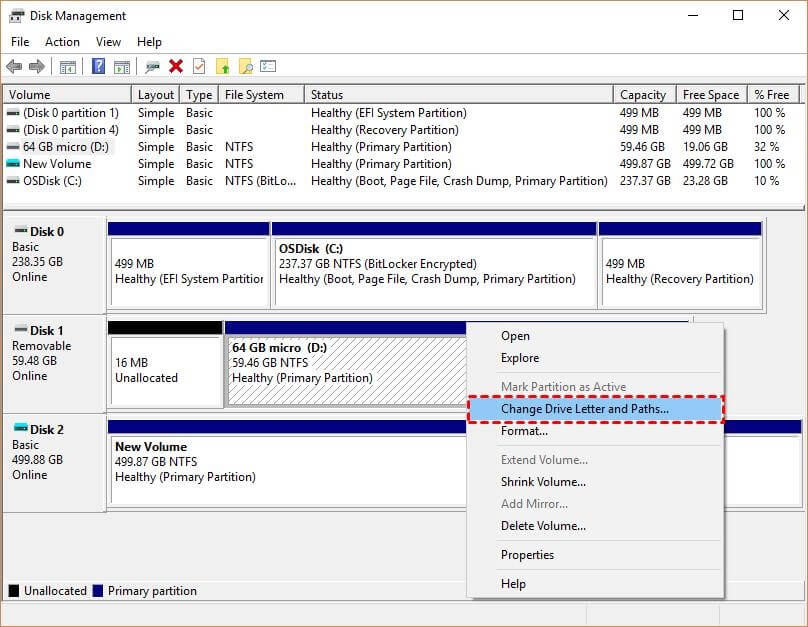
Step 2. After noticing all the partitions, you must right-click on the M.2 SSD drive before choosing the ''Change Drive Letter and Paths'' button.
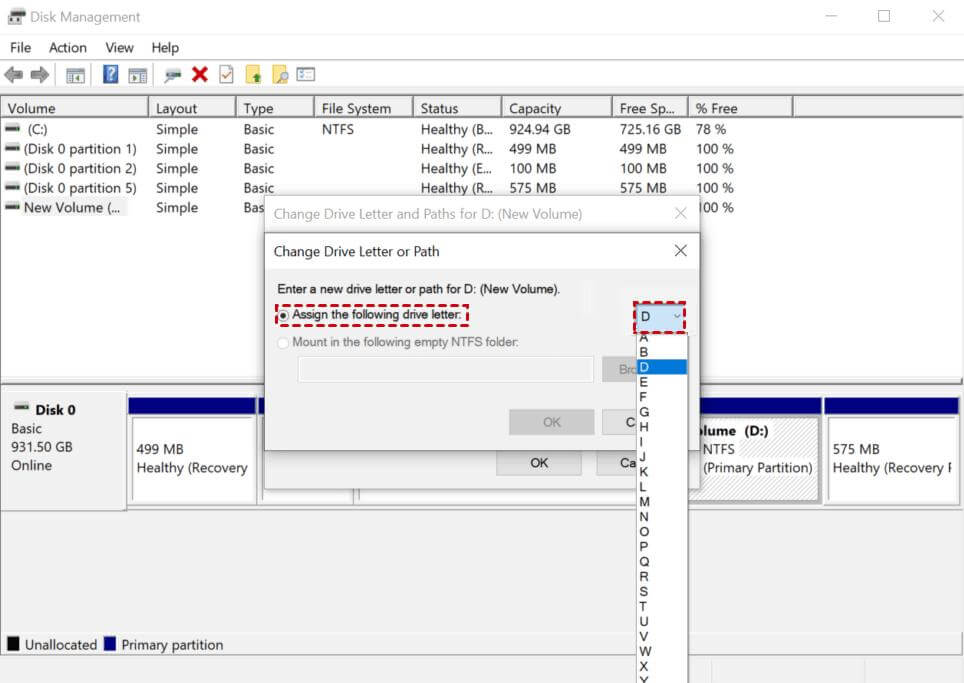
Step 3. Press the Add icon and press the "Assign the following drive" before choosing the appropriate drive letter.
Fix 2: Run the hardware and devices troubleshooter
Running the hardware and devices troubleshooter might also help dismantle the "M.2 not showing up" issue.
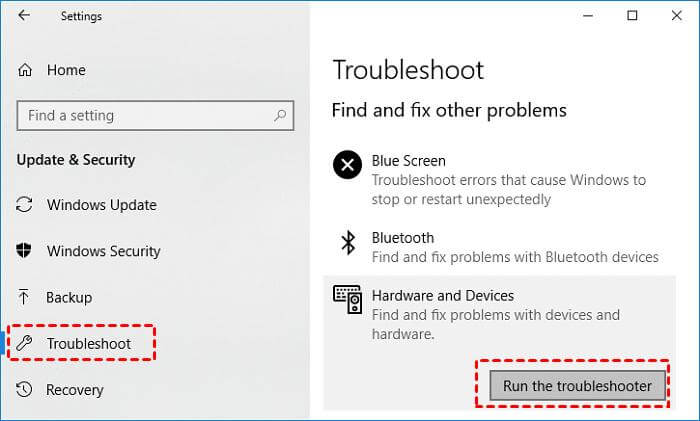
Step 1. Press the Win+I to launch the Windows Settings before selecting the ''Update & Security'' icon. Proceed ahead by selecting the Troubleshoot.
Step 2. Press on the Run the Troubleshooter to get the job done.
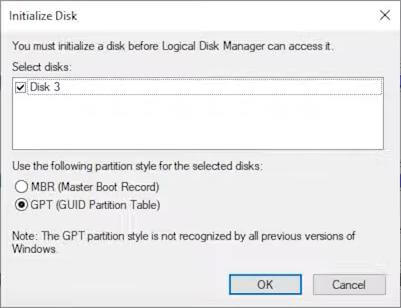
Fix 3: Initialize and Allocate M.2 SSD
Despite trying multiple things, you can initialize and Allocate the M.2 SSD to fix the unwanted problem if the issue persists.
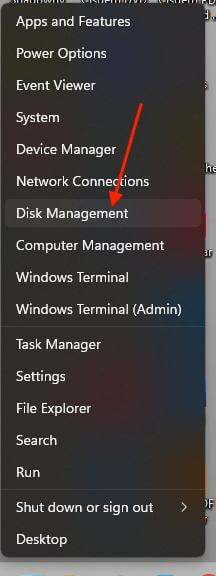
Step 1. Navigate to the Start menu and choose the Disk Management icon.
Step 2. After pressing the M.2 SSD, select the Initialize Disk icon.
Step 3. Choose the partition between the GPT or MBR and press the OK.
Fix 4: Unplug all other drives on your computer
A compatibility issue might pop up upon connecting the new M.2 SSD, provided more hard drives are out there. Hence, it is recommended to disconnect all the other devices from the computer when you opt to plug the M.2 SSD into the computer.
Despite doing so, if you cannot connect the M.2 SSD to the computer, there might be some physical damage to the hard drive, and you can consult the hardware repair shop to fix the issue.
Part 5. Recover Data from SSD That is Not Showing Up
Facing the "M.2 ssd not showing up" issue can cause data loss, so getting the lost data back is a major challenge for you. With AnyRecover, you've found the best way to retrieve lost data supporting multiple storage devices.
The best thing to like about AnyRecover is it doesn't affect the quality of data, allowing you to preview the data before recovering it.
![]()
2,061,704 Downloads
Features of AnyRecover
-
Allows you to recover the data from multiple devices, including M.2 Drive.
-
Lets you preview the data before recovering it
-
Compatible with Mac and Windows
-
Offers the highest recovery rate
Here's how to recover data from SSD that is not showing up through AnyRecover.
Step 1: Navigate to the official webpage of AnyRecover and get the software installed on the PC. Start the program and select the PC/ Hard Drive Recovery button from there.
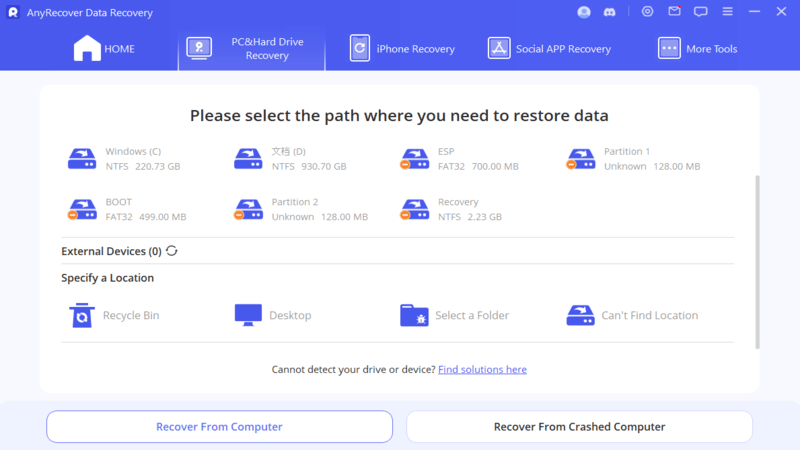
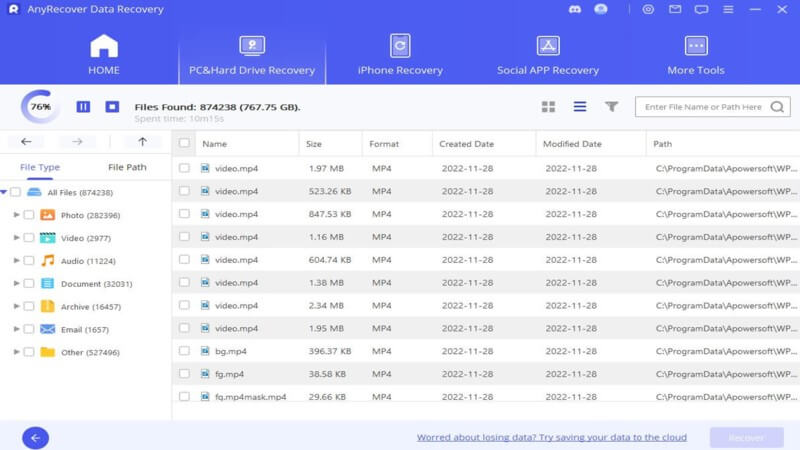
Step 2: After visiting the folder from which you've lost the data, you must press the Scan icon to scan for the lost data. The scanning process only takes a few moments before the job is completed.
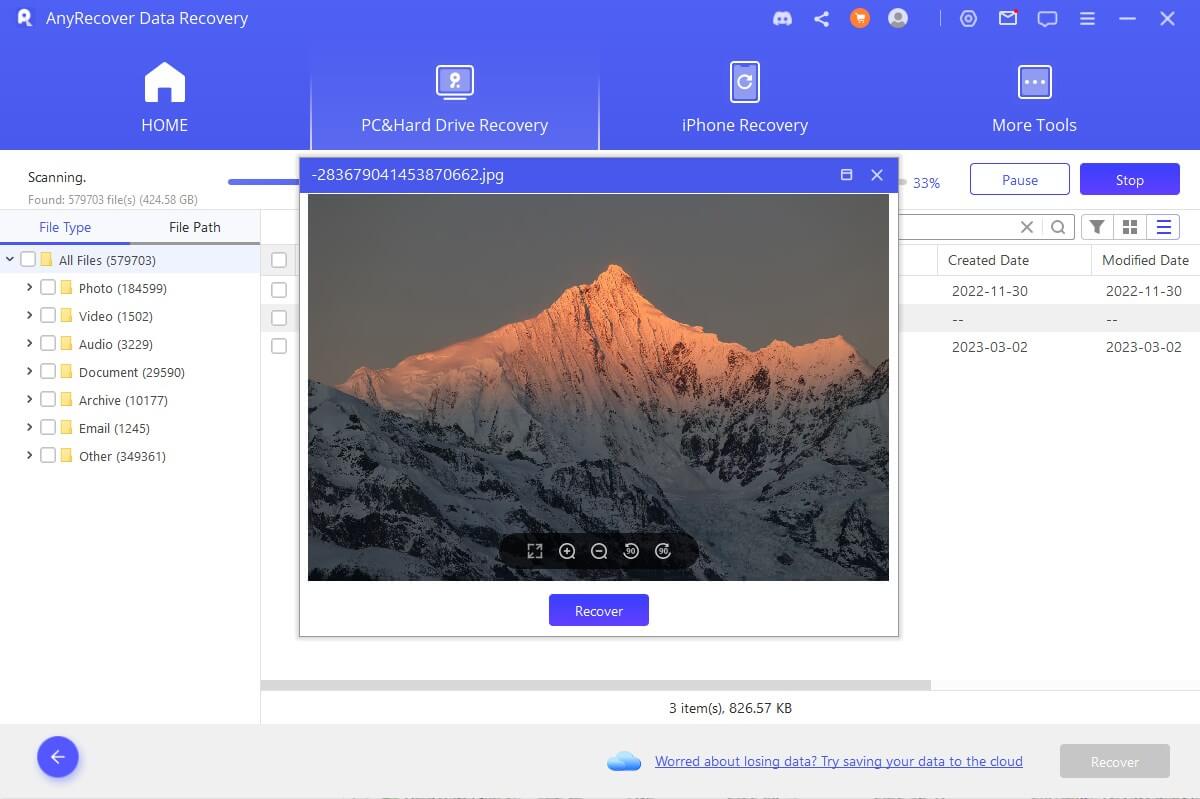
Step 3: Once you're done scanning the lost data, you'll need to preview the data. Next, press the Recover icon to begin retrieving the lost data, as AnyRecover helps you recover the data in a few moments, provided you've maintained a fast internet connection.
Part 6. M.2 Drive Not Showing Up FAQs
1. Why is my m2 disk not showing up?
There could be multiple reasons that can prevent the M.2 SSD from showing up. For instance, if you didn't appropriately format the disk or install the drivers correctly, it could be the primary reason behind the issue.
2. How to enable m2 SSD in BIOS?
Enabling the M.2 SSD in BIOS is quite simple. Launch the BIOS and navigate to the Advanced settings before choosing the Onboard Devices configuration. Click in the PCI Express X4_3 Slot (Black) Bandwidth and enable the M.2 Mode there.
3. How do I get my computer to recognize my m 2 SSD?
If you cannot see the M.2 SSD on the computer, you must first check the BIOS setting. Next, you'll need to make sure that the M2.SSD is enabled in your BIOS, and your boot order is set accurately. Formatting the disk is another way to make the M.2 SSD show up there.
Conclusion
Struggling with issues like "M.2 not showing up" can prevent you from accessing the data stored on the computer or hard drive. Regardless of the reasons behind this issue, we've listed the wonderful ways to fix the "M.2 SSD not showing up" issue.
This way, you can make the M.2 show up on your computer. You can go for the AnyRecover to retrieve the data lost caused by "M.2 SSD not detected Windows 11" issue. It assists you to recover all types of data effortlessly.
AnyRecover Key features include:
- AnyRecover is utterly developed to recover over 1000 different formats of photos, videos, documents and emails, etc.
- You could also preview your data before recovering it.
- This software is developed to recover all the data in its original form without overwriting it.
- It is 100% safe and easy to use.
Time Limited Offer
for All Products
Not valid with other discount *
 Hard Drive Recovery
 Deleted Files Recovery

