8 Ways to Fix File Explorer Keeps Crashing in Windows 10/11 2024
Are you frustrated by the constant Windows 11 File Explorer crashing? Don't worry as you are not alone in this. Dealing with this issue can be frustrating and disruptive to your workflow.
But fear not, as we have compiled 8 fixes that can help you resolve this issue and get your File Explorer back to its smooth operation.
In this article, we will discuss common causes of Windows 11 File Explorer crashing and provide step-by-step solutions to help you troubleshoot and fix the problem.

Why Does File Explorer Keep Crashing?
In order to fix the File Explorer keeps crashing issue on your Windows, it's essential to first understand why does File Explorer keep crashing.
Well, File Explorer crashing can be caused by various reasons, including:
Now let's discuss how you can fix Windows 11 Explorer crashing issue on your own.
8 Ways To Fix File Explorer Crashing on Windows 10/11?
As there are different causes behind Windows 11 Explorer crash issue, there are different fixes you can try.
Fix 1: Reset and Restart File Explorer Options on Task Manager
Fix 2: Run System File Checker (SFC)
Fix 3: Clear File Explorer History & Cache
Fix 5: Run the Memory Diagnostic Tool
Fix 1: Reset and Restart File Explorer Options on Task Manager
If File Explorer is crashing, resetting and restarting it through the Task Manager can often resolve the issue. This method allows you to force-stop File Explorer and restart it, which can clear temporary glitches.
Step 1. Press Ctrl + Shift + Esc to open the Task Manager.
Step 2. In the Task Manager, look for "Windows Explorer" or "File Explorer" in the list of processes.
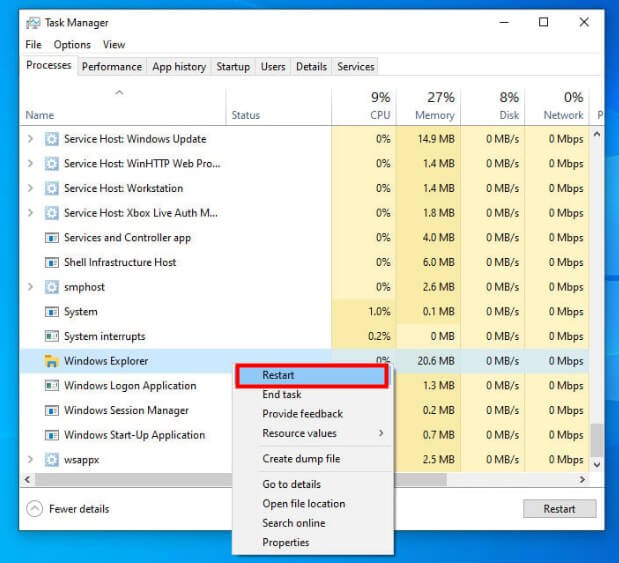
Step 3. Right-click on "Windows Explorer" or "File Explorer" and select "Restart." This will reset and restart File Explorer.
By resetting and restarting File Explorer, you can often resolve crashes and restore normal functionality without the need for a system reboot.
Fix 2: Run System File Checker (SFC)
System File Checker (SFC) is a Windows utility that scans for and repairs corrupted system files. Running SFC can help fix issues with File Explorer crashes caused by corrupted system files.
Step 1. Right-click the Start button and select "Command Prompt (Admin)" or "Windows PowerShell (Admin)."
Step 2. Type sfc /scannow and press Enter. The scan will begin and may take some time to complete.
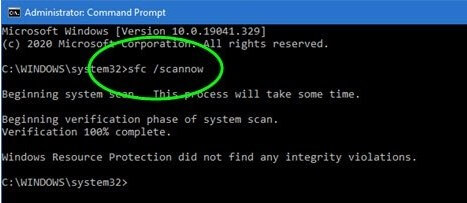
Step 3. Once the scan is complete, restart your computer to apply any fixes.
Fix 3: Clear File Explorer History & Cache
Clearing the history and cache of File Explorer can resolve issues related to outdated or corrupted cache files.
Step 1. Press Windows + R, type control folders, and press Enter.
Step 2. In the General tab, click on "Clear" next to "Clear File Explorer history."
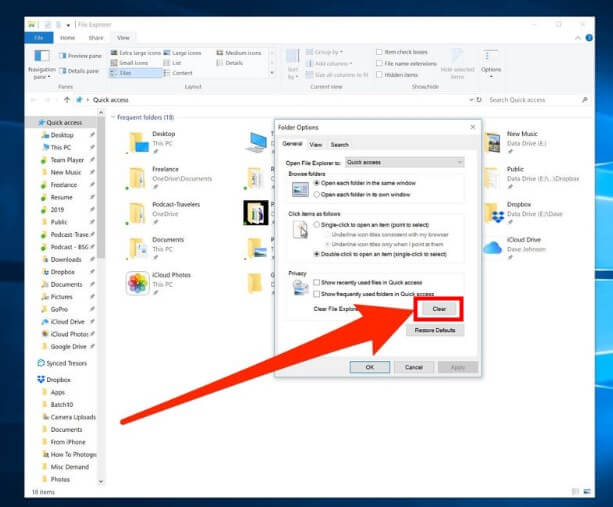
Step 3. Click "Apply" and then "OK" to save the changes.
Fix 4: Revert Windows Updates
If the issue started after a recent Windows update, reverting the update might resolve the problem.
Step 1. Press Windows + I to open Settings.
Step 2. Click on "Update & Security" and then "Windows Update."
Step 3. Click on "View update history" and then "Uninstall updates."
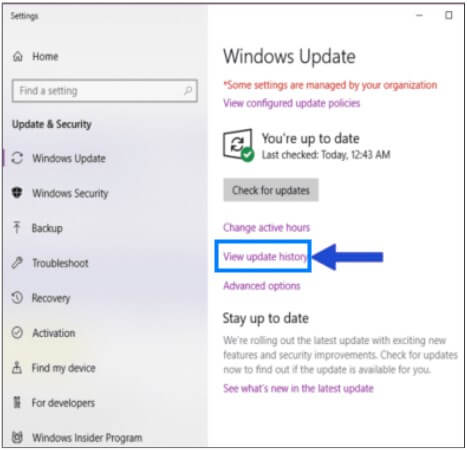
Step 4. Select the most recent update and click "Uninstall."
Fix 5: Run the Memory Diagnostic Tool
Memory issues can cause File Explorer to crash. Running the Memory Diagnostic Tool can help identify and fix memory-related problems.
Step 1. Press Windows + R, type mdsched.exe, and press Enter.
Step 2. Select "Restart now and check for problems." Save any open work as your computer will restart.
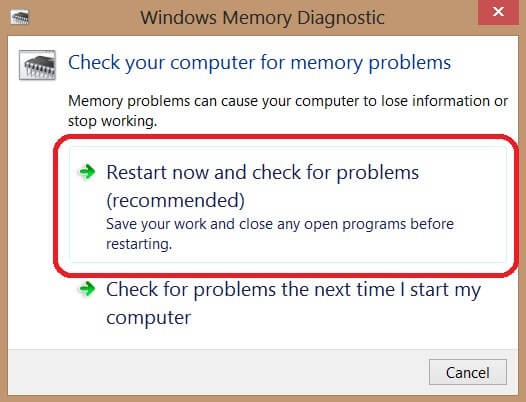
Step 3. The tool will check your memory for errors and attempt to fix them.
Fix 6: Update Graphics Drivers
Outdated or corrupted graphics drivers can cause File Explorer to crash. Updating your graphics drivers can help resolve the issue.
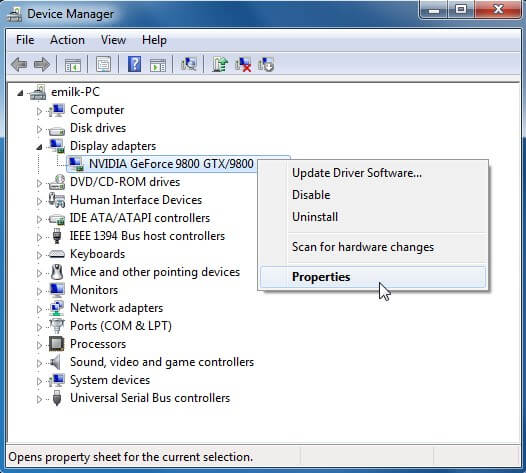
Step 1. Right-click the Start button and select "Device Manager."
Step 2. Find your graphics card under "Display adapters."
Step 3. Right-click your graphics card and select "Update driver." Choose "Search automatically for updated driver software."
Fix 7: Perform a Clean Boot
Performing a clean boot can help identify if third-party applications or services are causing File Explorer to crash.
Step 1. Press Windows + R, type msconfig, and press Enter.
Step 2. In the General tab, select "Selective startup" and uncheck "Load startup items."
Step 3. Go to the Services tab, check "Hide all Microsoft services," and then click "Disable all."
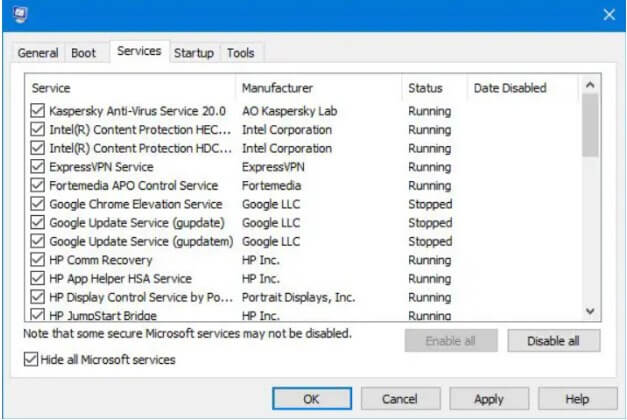
Step 4. Click "Apply," then "OK," and restart your computer.
Fix 8: Reinstall Windows 10/11
If all other methods fail, reinstalling Windows 10/11 can be a final solution to fix File Explorer crashes. This will refresh your system files and resolve any underlying issues.
Step 1. Press Windows + I to open Settings.
Step 2. Click on "Update & Security" and then select "Recovery" from the left-hand menu.
Step 3. Under the "Reset this PC" section, click "Get started."
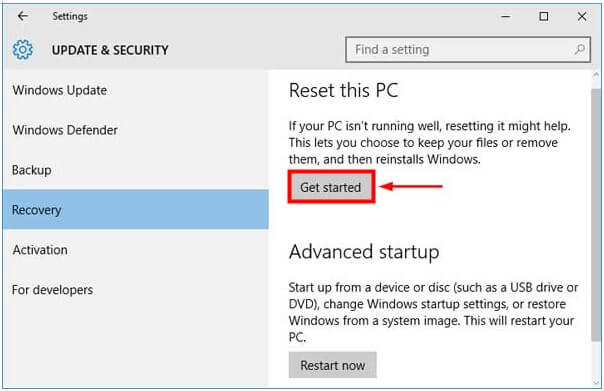
Step 4. Select "Keep my files" to reinstall Windows without losing your personal files, or choose "Remove everything" to perform a clean installation.
Step 5. Follow the on-screen instructions to complete the reinstallation process. Your computer will restart several times during this process.
So, that's how you can get rid of Windows 11 File Explorer crashing issues.
How To Recover Data After File Explorer Crashing?
After experiencing a File Explorer crash, it's crucial to address the potential loss of important files and data. In such situations, using a reliable data recovery tool like AnyRecover can be a lifesaver.
AnyRecover is a comprehensive data recovery software that provides an efficient and user-friendly solution for recovering lost or deleted files.
With its advanced deep scan technology, AnyRecover can retrieve a wide range of file types from various storage devices, including hard drives, USB drives, and memory cards.
![]()
20,000,000 Downloads
Features of AnyRecover
-
Capable of recovering over 1000 file types, including documents, photos, videos, and more.
-
You can restore lost data resulting from accidental deletion, formatting, virus or malware attacks, device corruption, lost partitions, and other scenes.
-
Allows you to preview recoverable files before proceeding with the recovery
-
Performs read-only operations to prevent any further damage to your data during the recovery process.
-
It can work on Wins, Mac, iOS and Android.
Here's how you can use Any Recover to get back your lost files due to File Explorer Crashing:
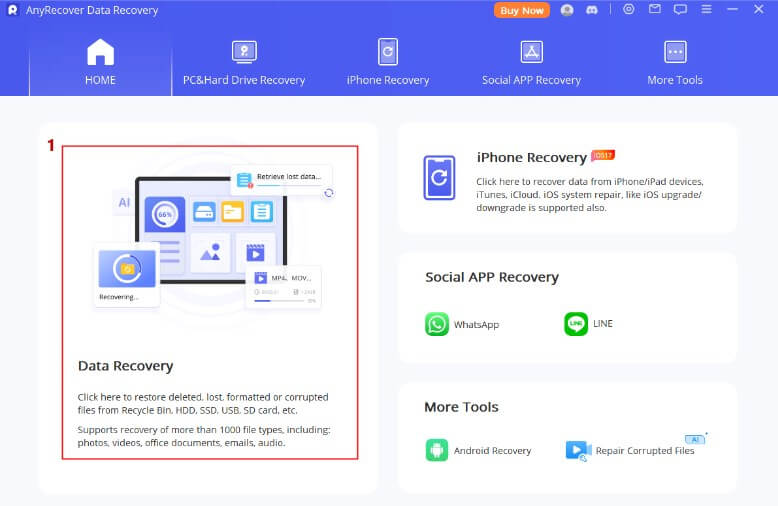
Step 1 Launch Any Recover tool on your computer and go to "Data Recovery" option. Here, you will have to select the location where you have lost your data.
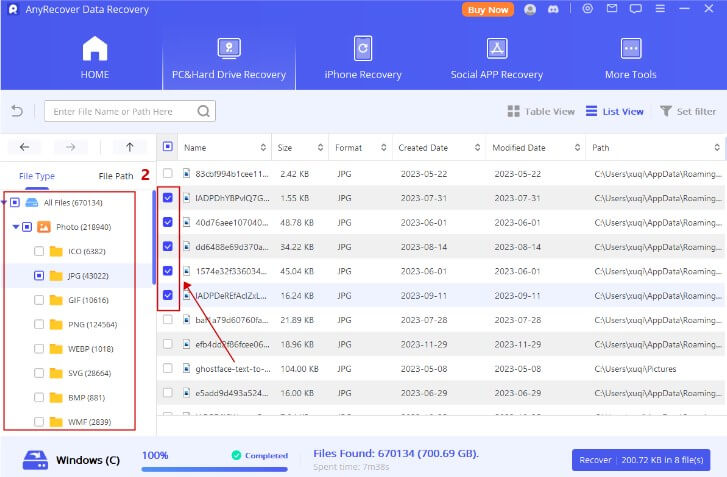
Step 2 The tool will start scanning your drive for all the deleted or lost files. The scanning might take some time according to the size of your disk. So be patient. Then you can preview and choose the file you want to restore.
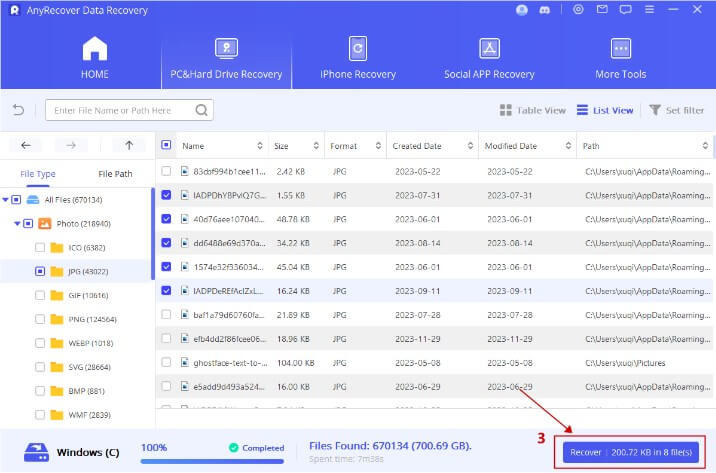
Step 3 You can hit the "Recover" button and save that file on your computer and retrieve the lost data.
That's how you can easily get back all your lost files with the help of AnyRecover.
FAQs about Windows 11 File Explorer Crashing
How do I fix File Explorer in Windows 11?
To fix File Explorer in Windows 11, a general tip is to restart File Explorer via the Task Manager. You can follow the steps give above and get rid of this issue within just a few minutes.
What causes Windows File Explorer to crash?
The most common causes of Windows File Explorer crashing include corrupted system files, outdated or incompatible drivers, and conflicts with third-party software. Other factors like malware infections and hardware issues can also contribute to the problem.
How to prevent File Explorer keeping crashing?
To prevent File Explorer from crashing, keep your Windows and drivers updated, regularly scan your system for malware, avoid installing unnecessary third-party software, manage your startup programs, regularly clean your system using disk cleanup tools, and back up your important files.
Conclusion
Dealing with Windows 11 File Explorer crashing can be frustrating, but with the right approach, it's possible to resolve the issue and restore smooth operation. Whether it's resetting File Explorer, running system scans, or even reinstalling Windows, there's a solution that can work for you.
In case you experience data loss due to File Explorer crashing, remember that tools like AnyRecover are available to help you recover your lost files.
Related Articles:
Time Limited Offer
for All Products
Not valid with other discount *
 Hard Drive Recovery
 Deleted Files Recovery


