How To Fix Video Scheduler Internal Error In Windows 10/11
Have you ever experienced the sudden appearance of a blue screen of death with a stop code that stops all your PC’s functions? If yes, then you are at the right spot. We are going to share the methods to solve and avoid the video scheduler internal error Windows 10/11. If you are interested, stay with us!
Part 1: What is Video Scheduler Internal Error?
The “Video Scheduler Internal Error” is a situation that puts your PC in a Blue Screen Of Death. This error causes a computer to malfunction with unpredictable crashes and reboots in seconds.
BSOD error freezes the computer’s screen and makes it display a blue screen with a stop code, which ultimately seizes all PC functions. Such a situation puts users at a high risk of data loss without any preventive measures.
Part 2: What Causes Video Scheduler Internal Error?
Multiple roots swiftly cause video scheduler internal error Windows 10/11 to occur randomly without any alert pop-up and notification.
Everyone needs to know these causes and keep everything up to the mark to avoid such a problem.
The most common causes of BSOD error are:
Crashed computer files
Outdated versions of graphic drivers
Incompatible software
Overclocked graphic card
Corrupted hardware
Part 3: 7 Ways To Fix Video Scheduler Internal Error In Windows 10/11
Method 2: Update Graphic Card Driver
Method 5: Uninstall Recently Installed Software
1Method 1: Malware Scan for PC to Fix video_scheduler_internal_error
Step 1: On your PC, open "Settings and go to Update & Security"
Step 2: Click on the "Windows security > Virus & Threat Protection".
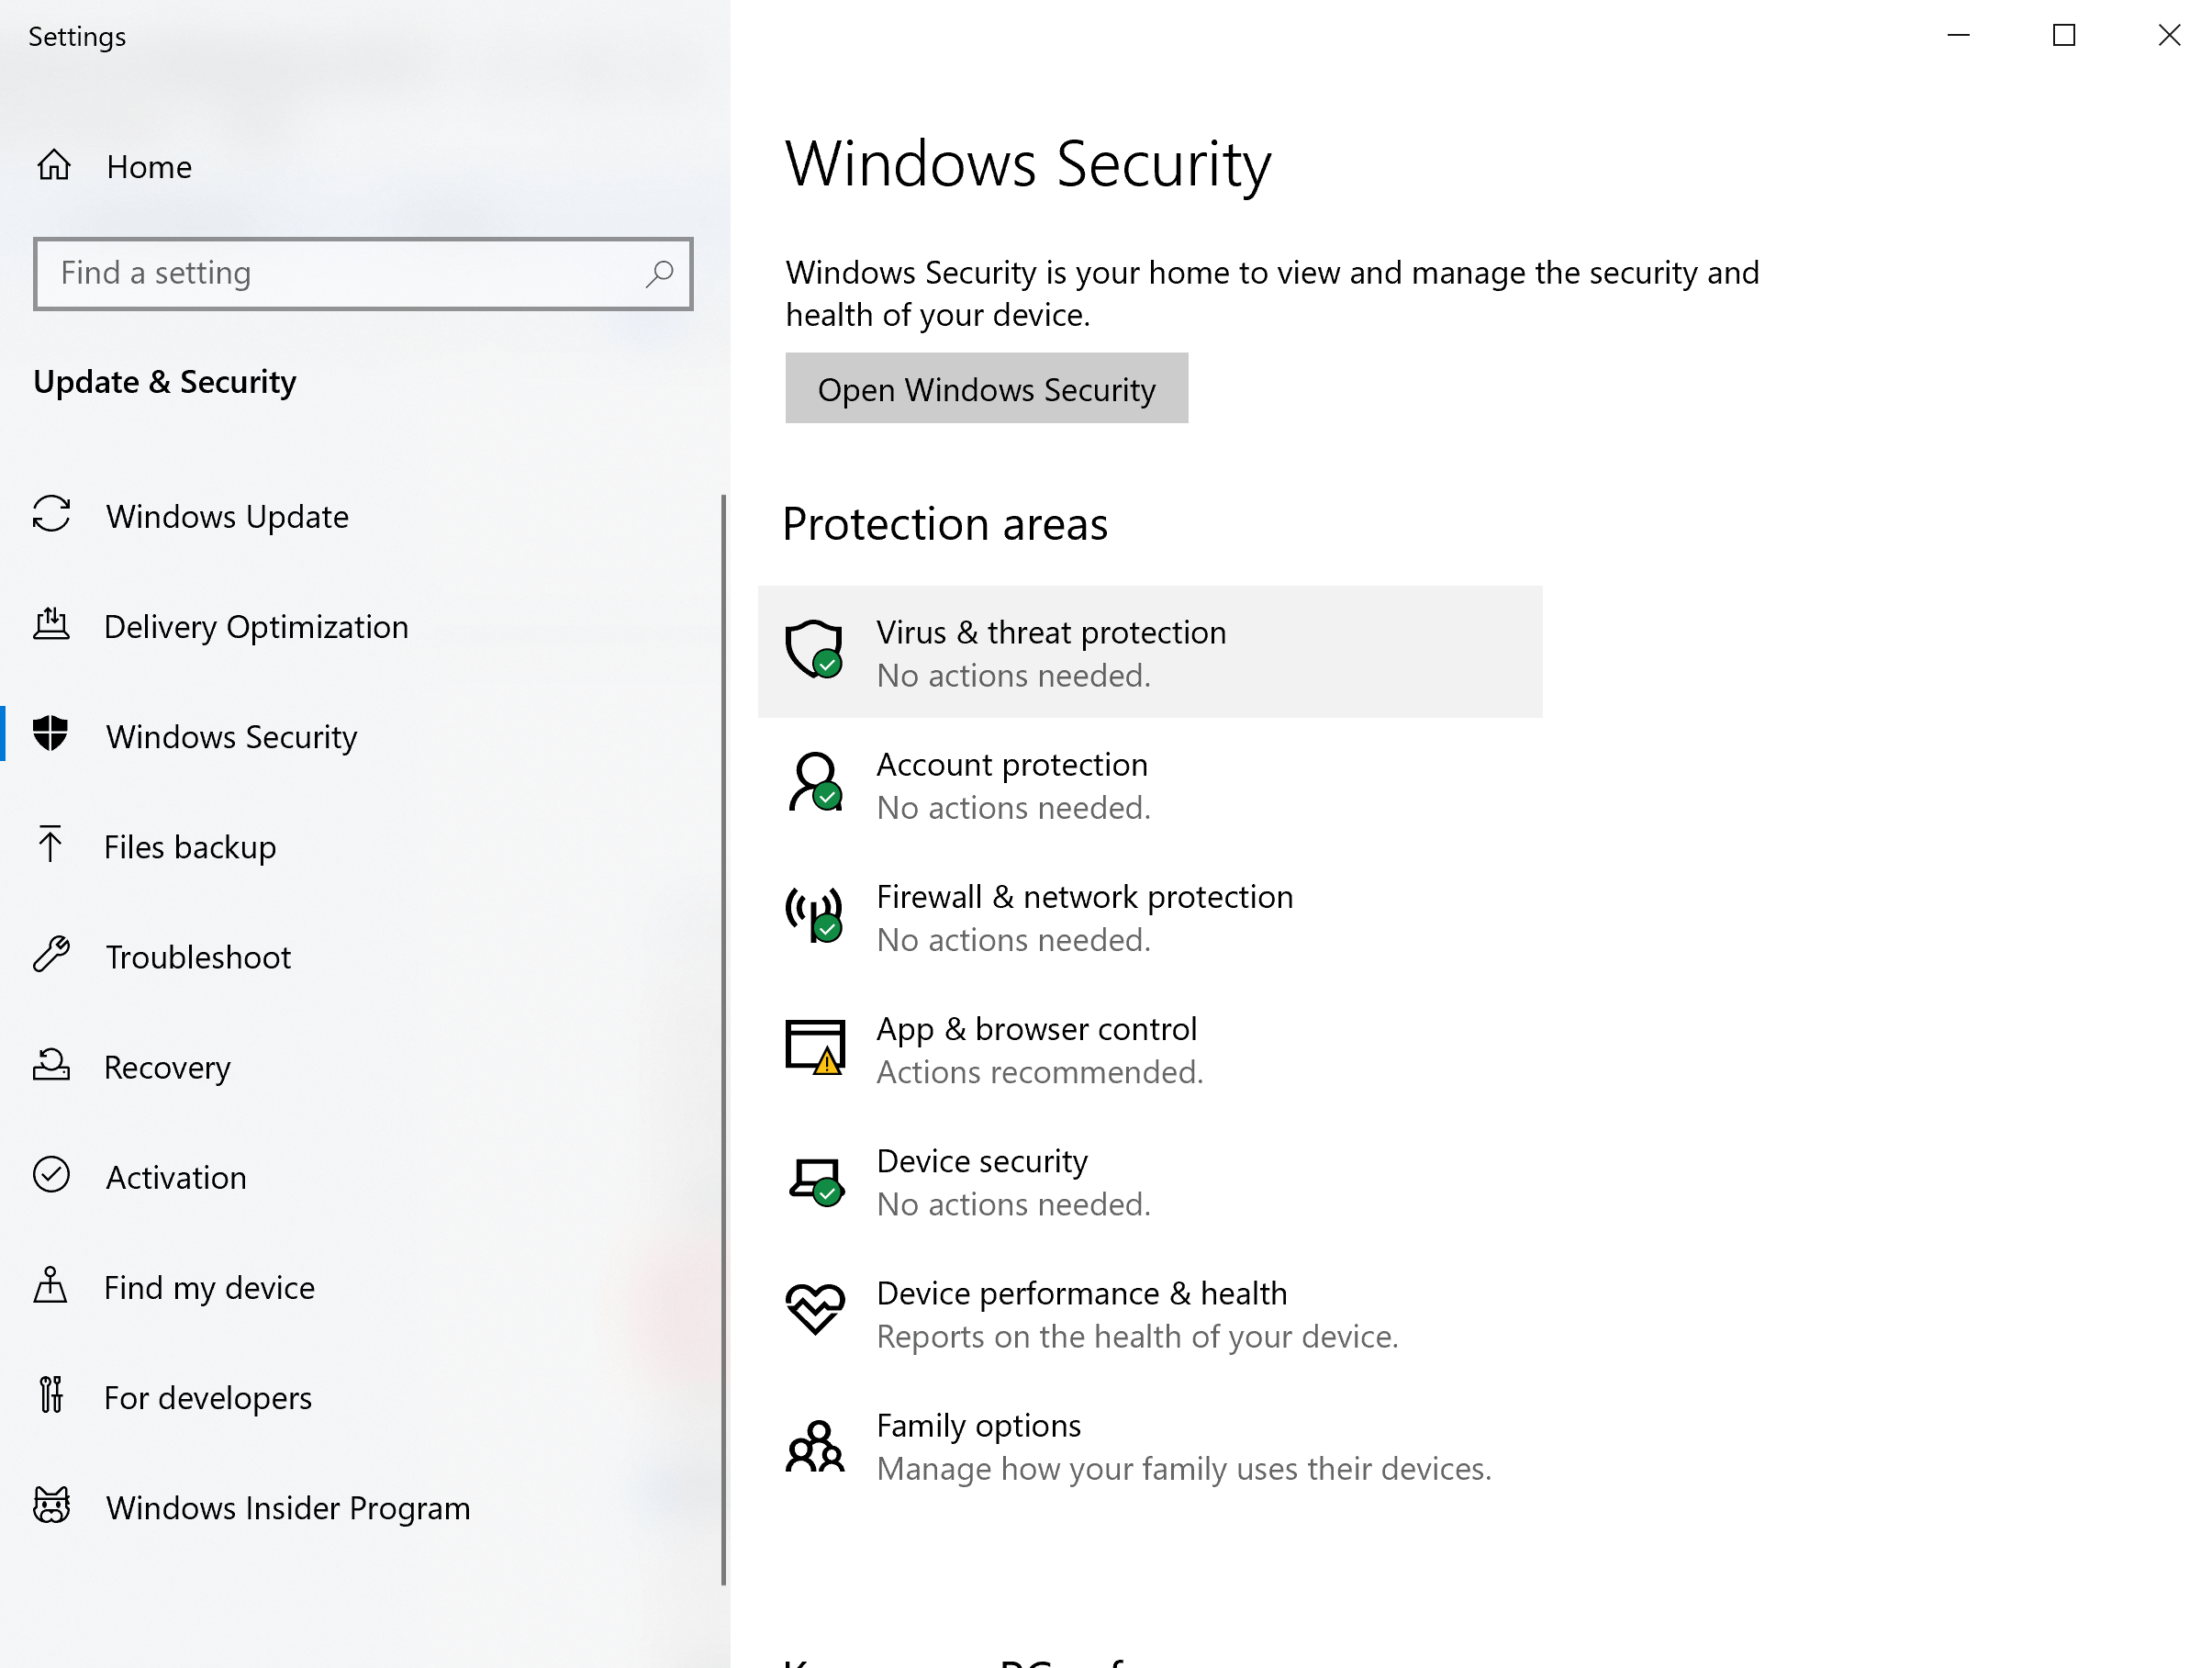
Step 3: A list of current threats will appear on the screen. Now, see if there is any action required and follow the steps guided by Windows 10/11
2Method 2: Update Graphic Card Driver to Fix Internal Video Scheduler Error
Step 1: In the search bar of Windows, search for "Device Manager" and open it.
Step 2: Click on the "Display Adapters", and the installed graphic driver will slide down.
Step 3: Select the driver by right-clicking on it and clicking on the "Update" option from the drop-down menu.
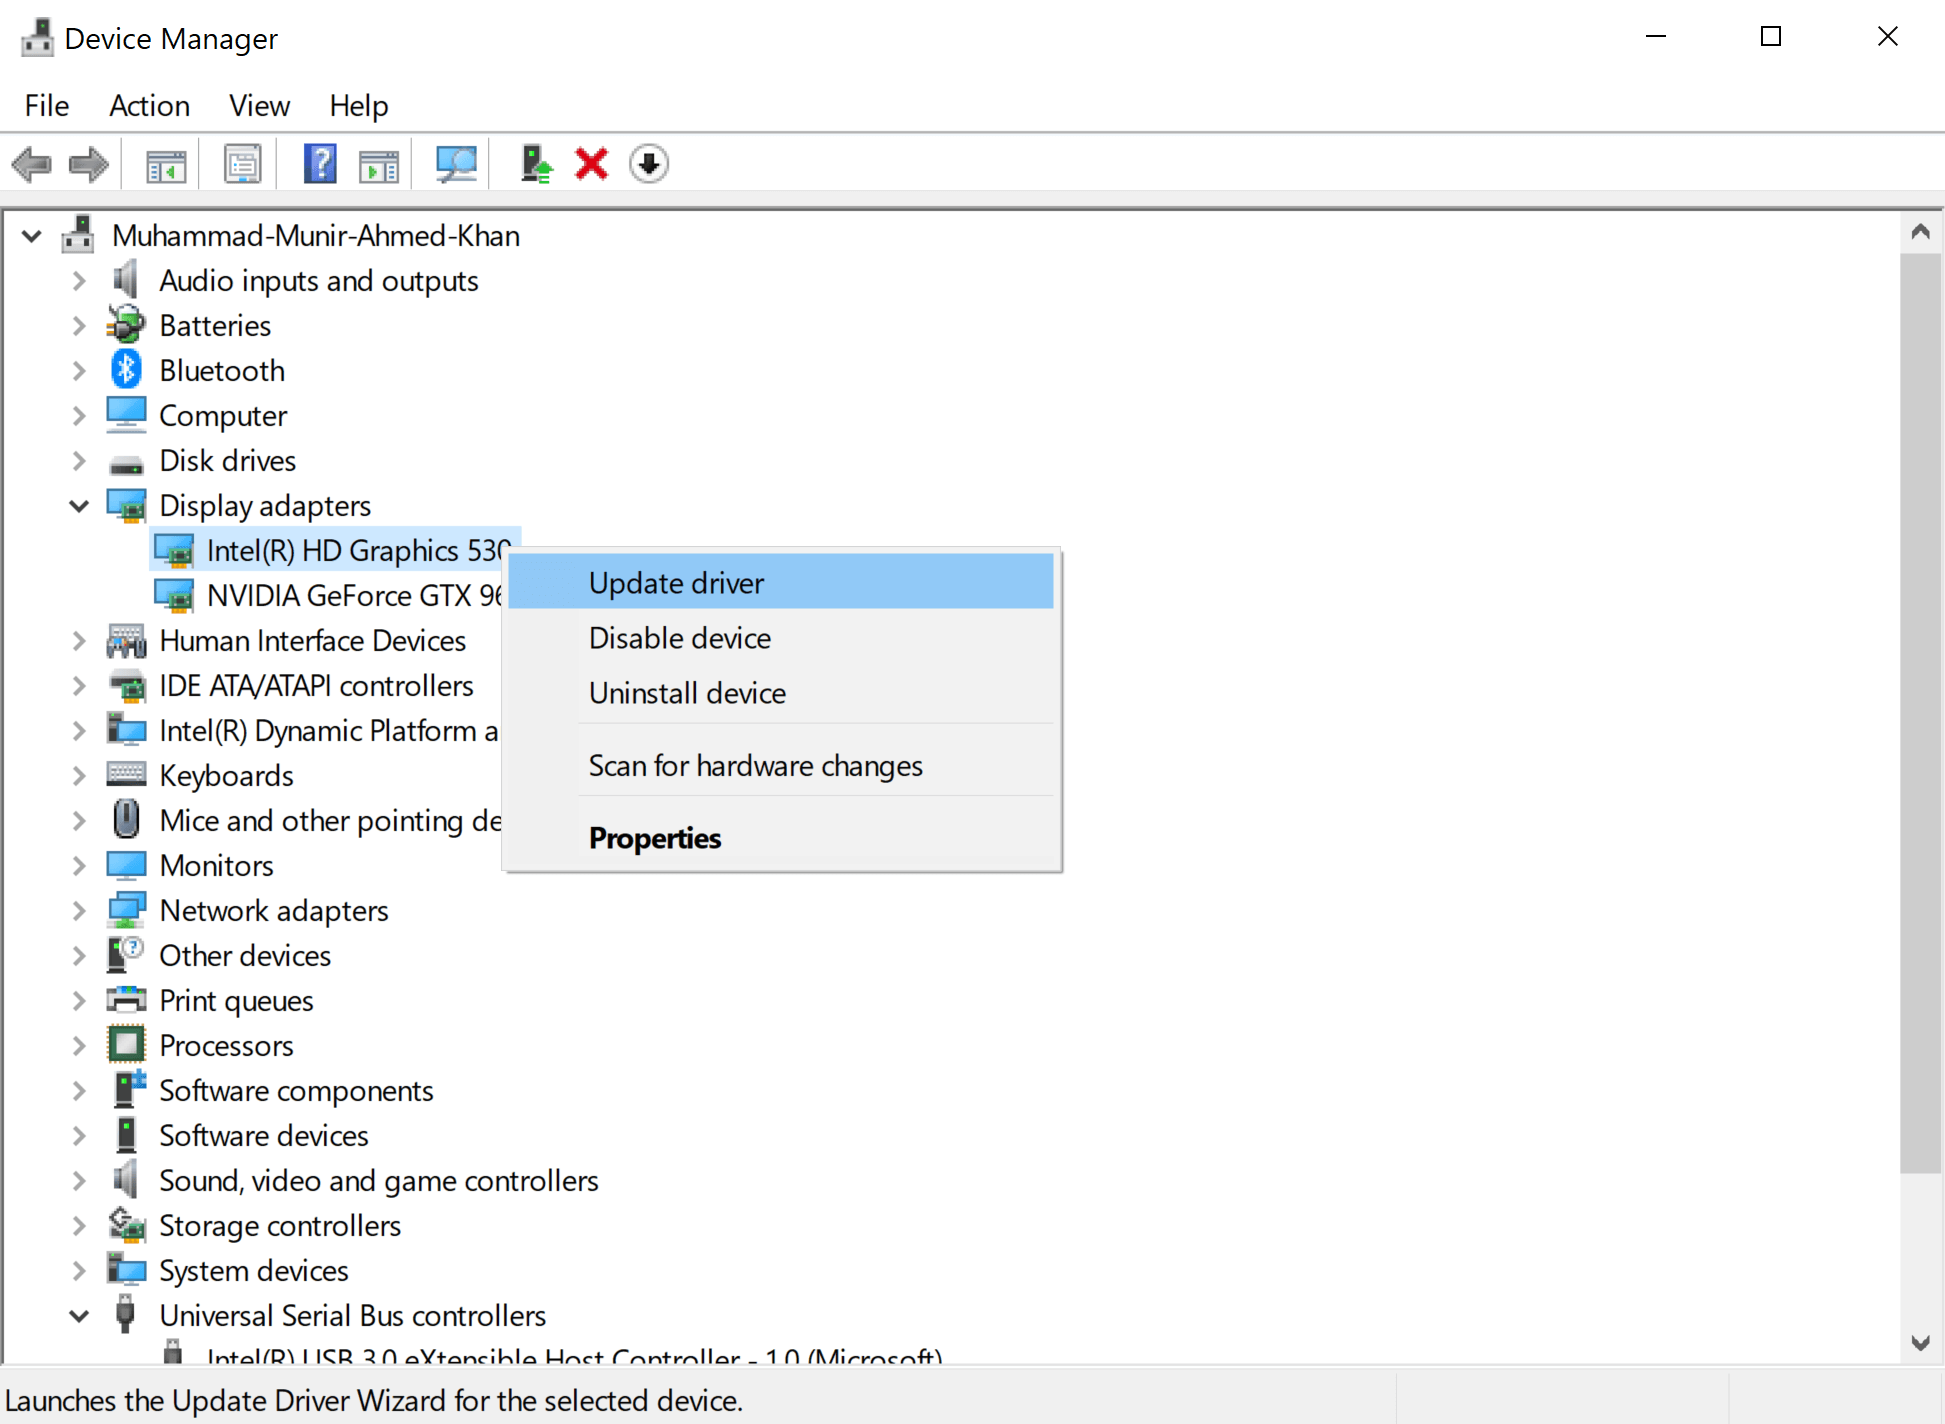
Step 4: Now click on "Search Automatically" for a driver and wait for a while. Once the PC has done its job, reboot your computer to check whether the issue is resolved or not.
3Method 3: Run CHKDSK Command to stop code video_scheduler_internal_error
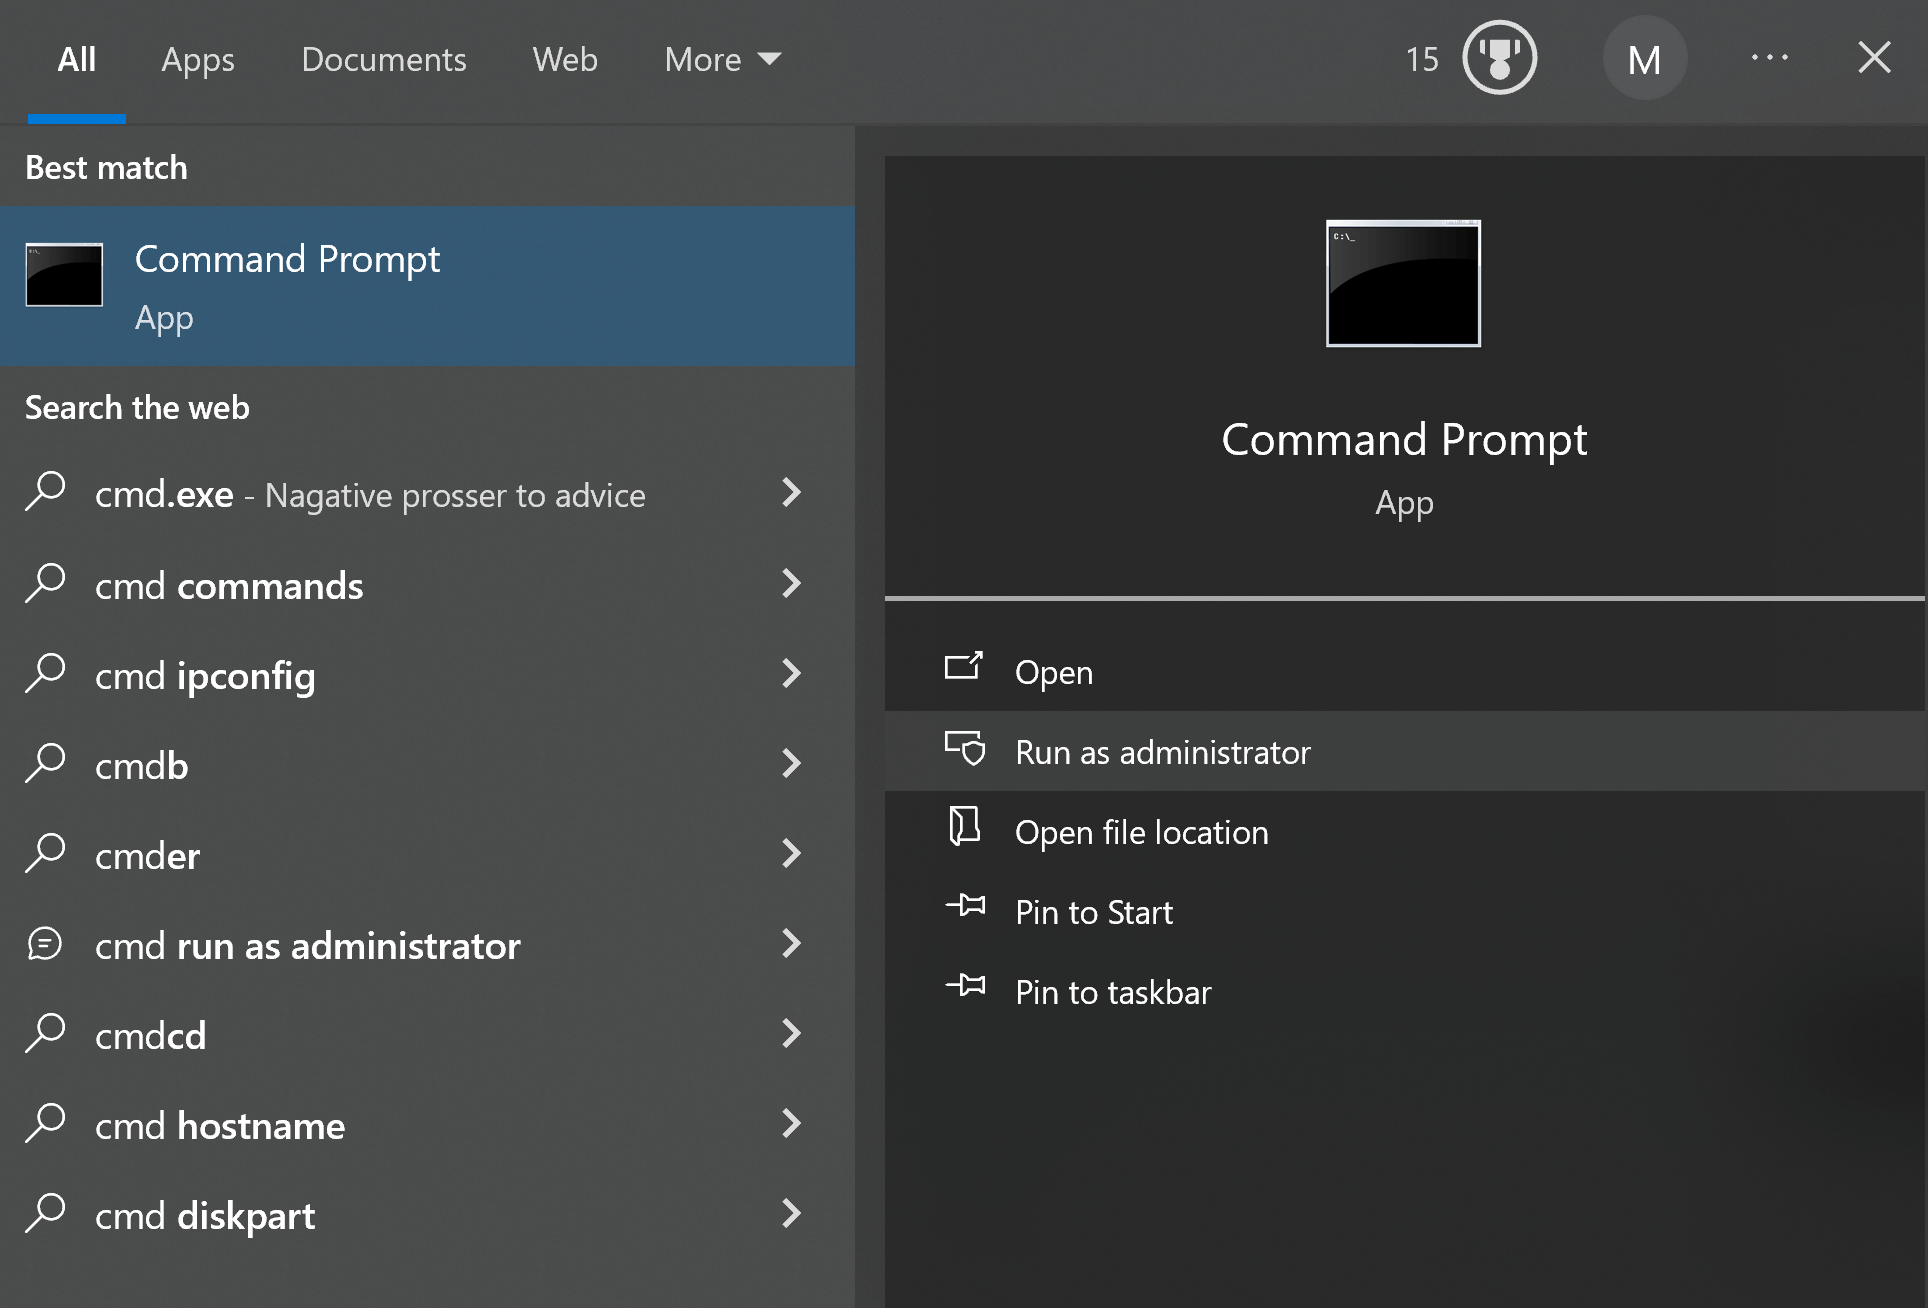
Step 1: Type "cmd" in the Windows search bar and click on the "Run as Administrator" option.
Step 2: Once the command prompt opens, type "chkdsk A: /f /r /x" and press the Enter key.
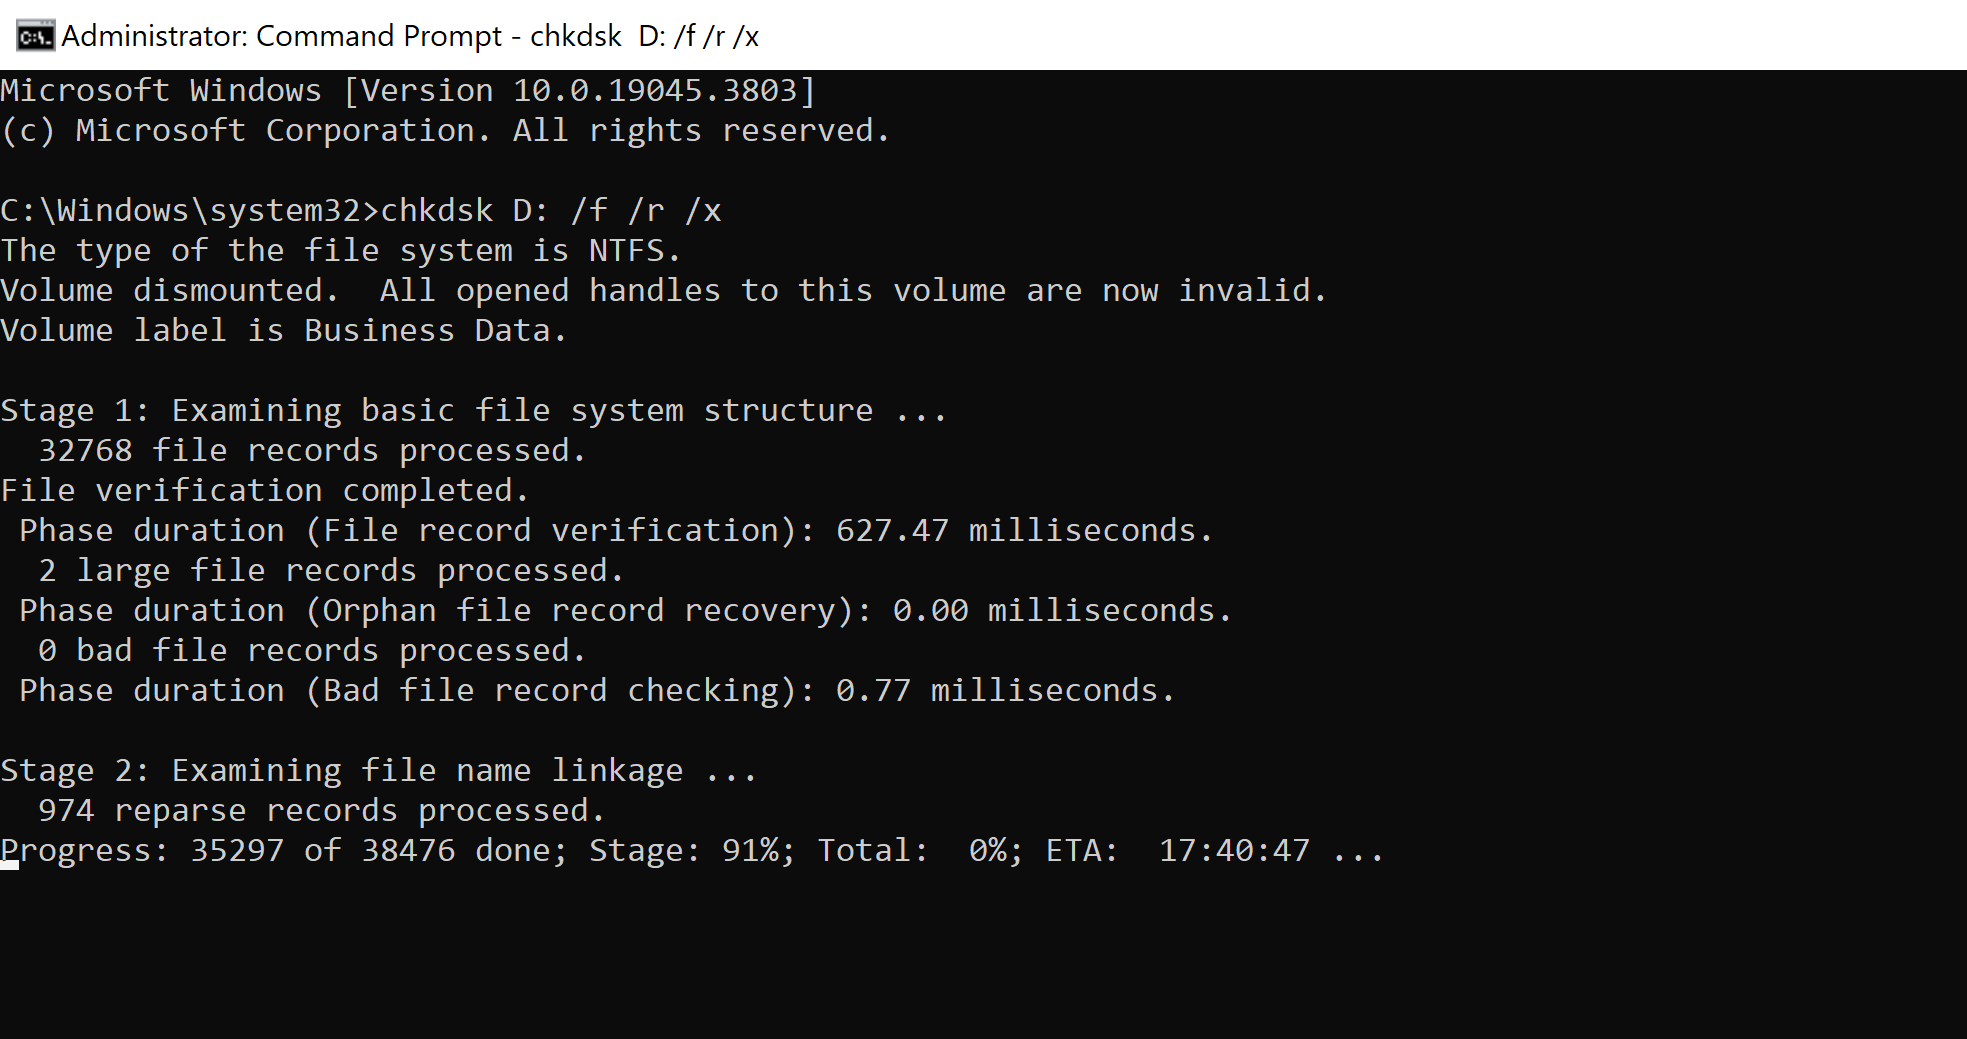
Note: Replace "A" with the drive letter.
Step 3: The scanning and fixing process will start on its own. Wait for its completion and reboot your device at the end to check whether the system is fine or not.
4Method 4: SFC Scanning to fix video scheduler internal error 11/10
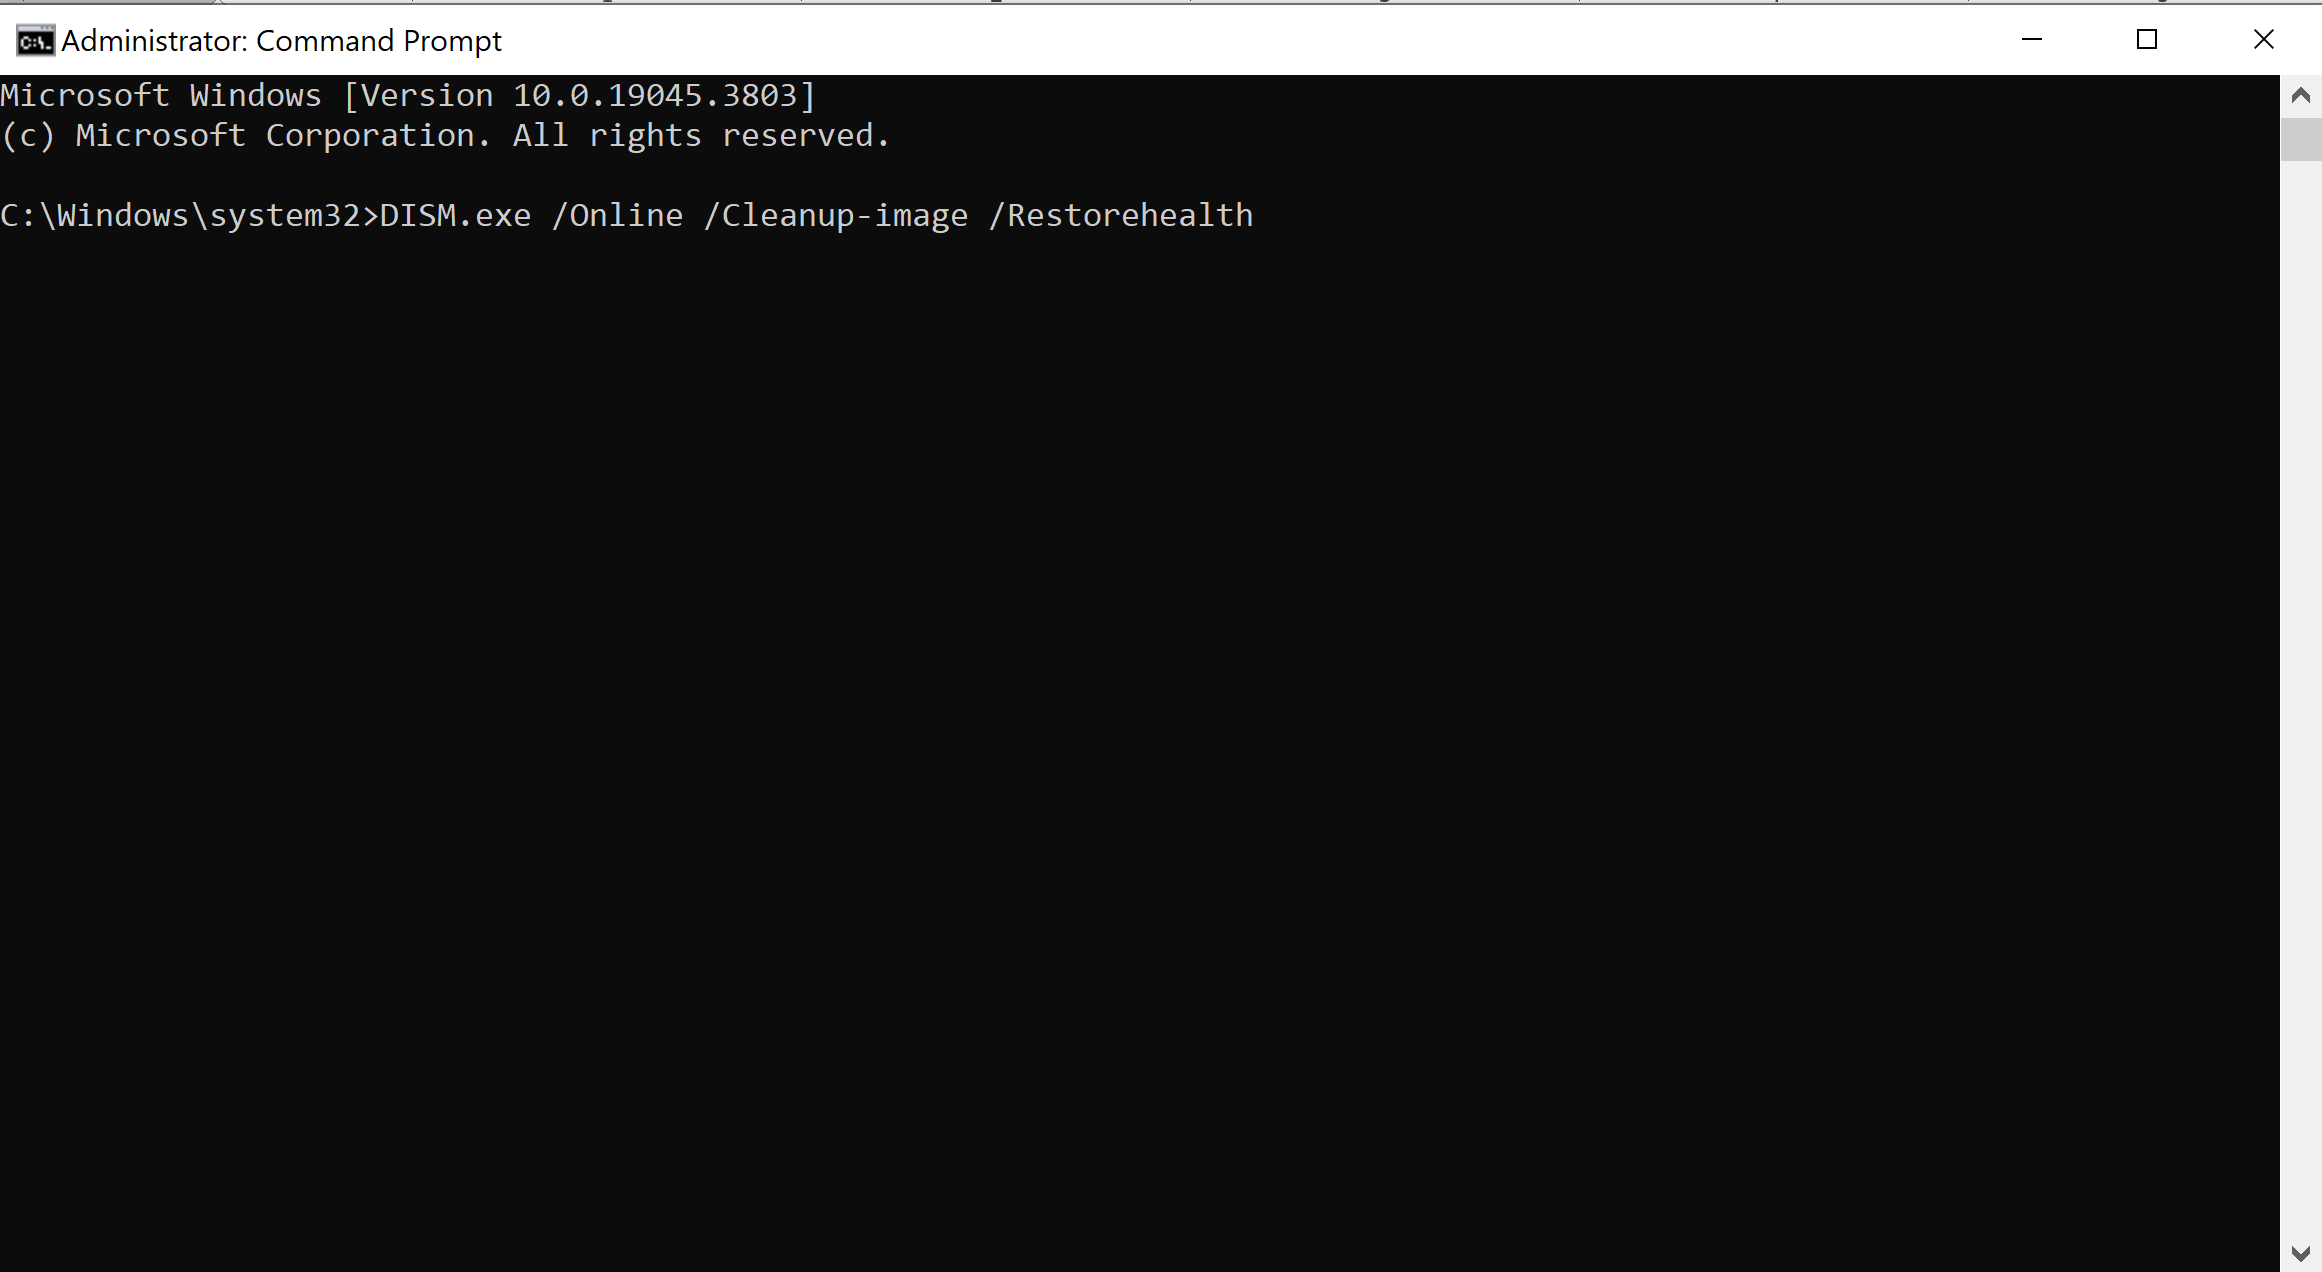
Step 1: Open the command prompt and type "DISM.exe /Online /Cleanup-image /Restorehealth". Hit the "Enter" key.
Step 2: The Window will start finding the file that needs to be fixed. Wait for the completion of the process and type "SFC/scannow" after the identification of the corrupted file.
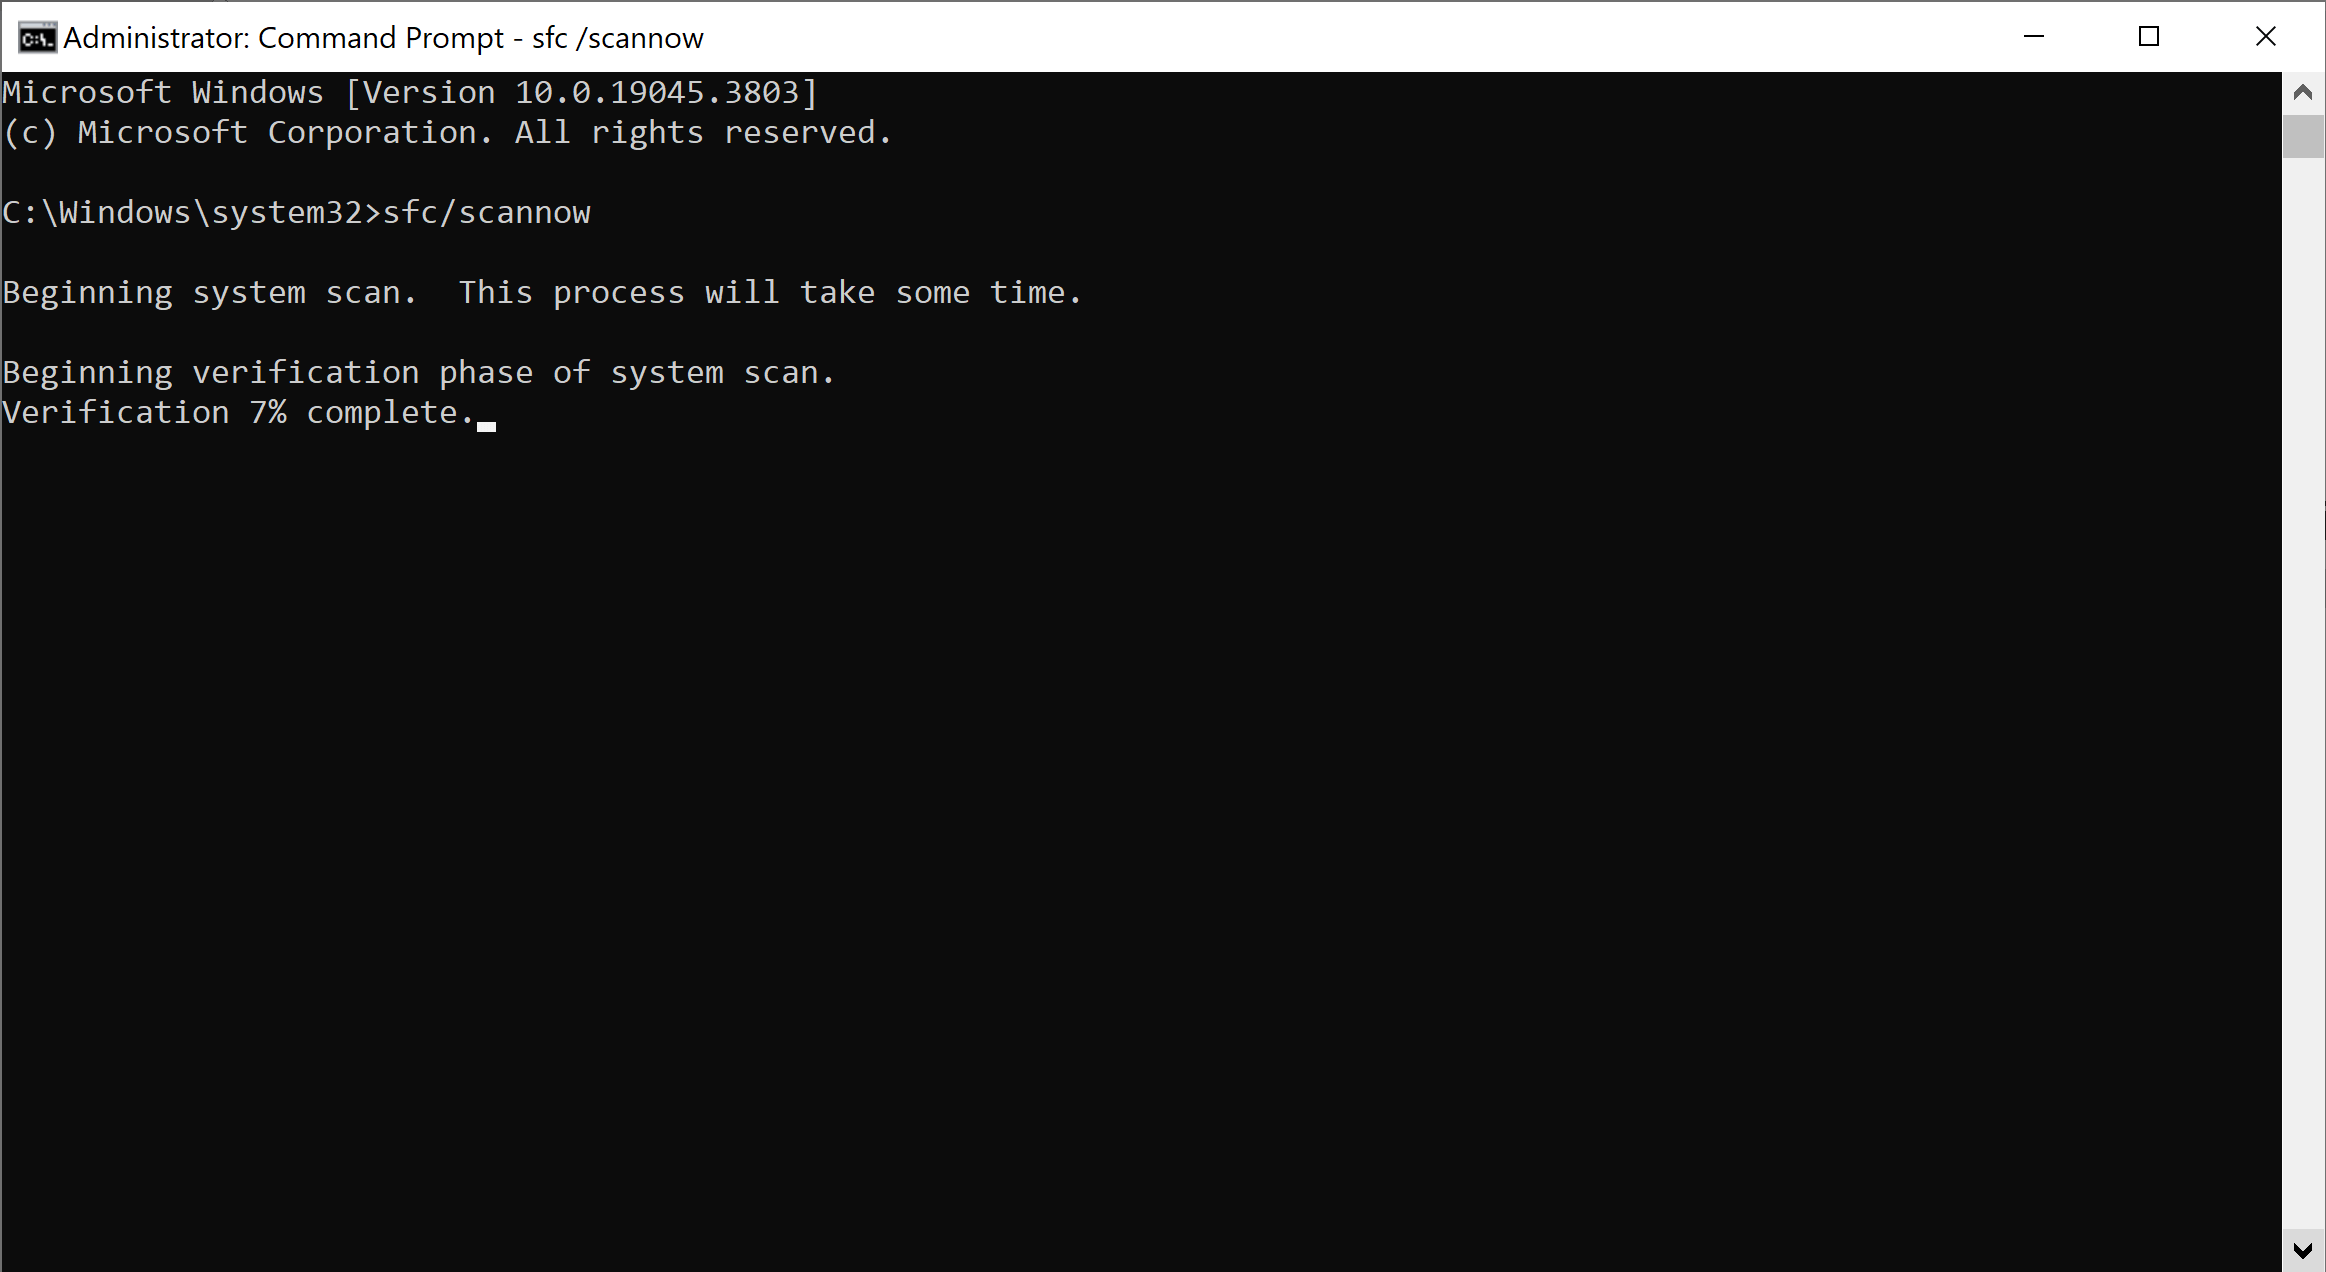
Step 3: Again, a scan and fixing process will start. Let it complete and restart your computer in the end to see its proper functioning.
5Method 5: Uninstall Recently Installed Software to stop code video scheduler internal error
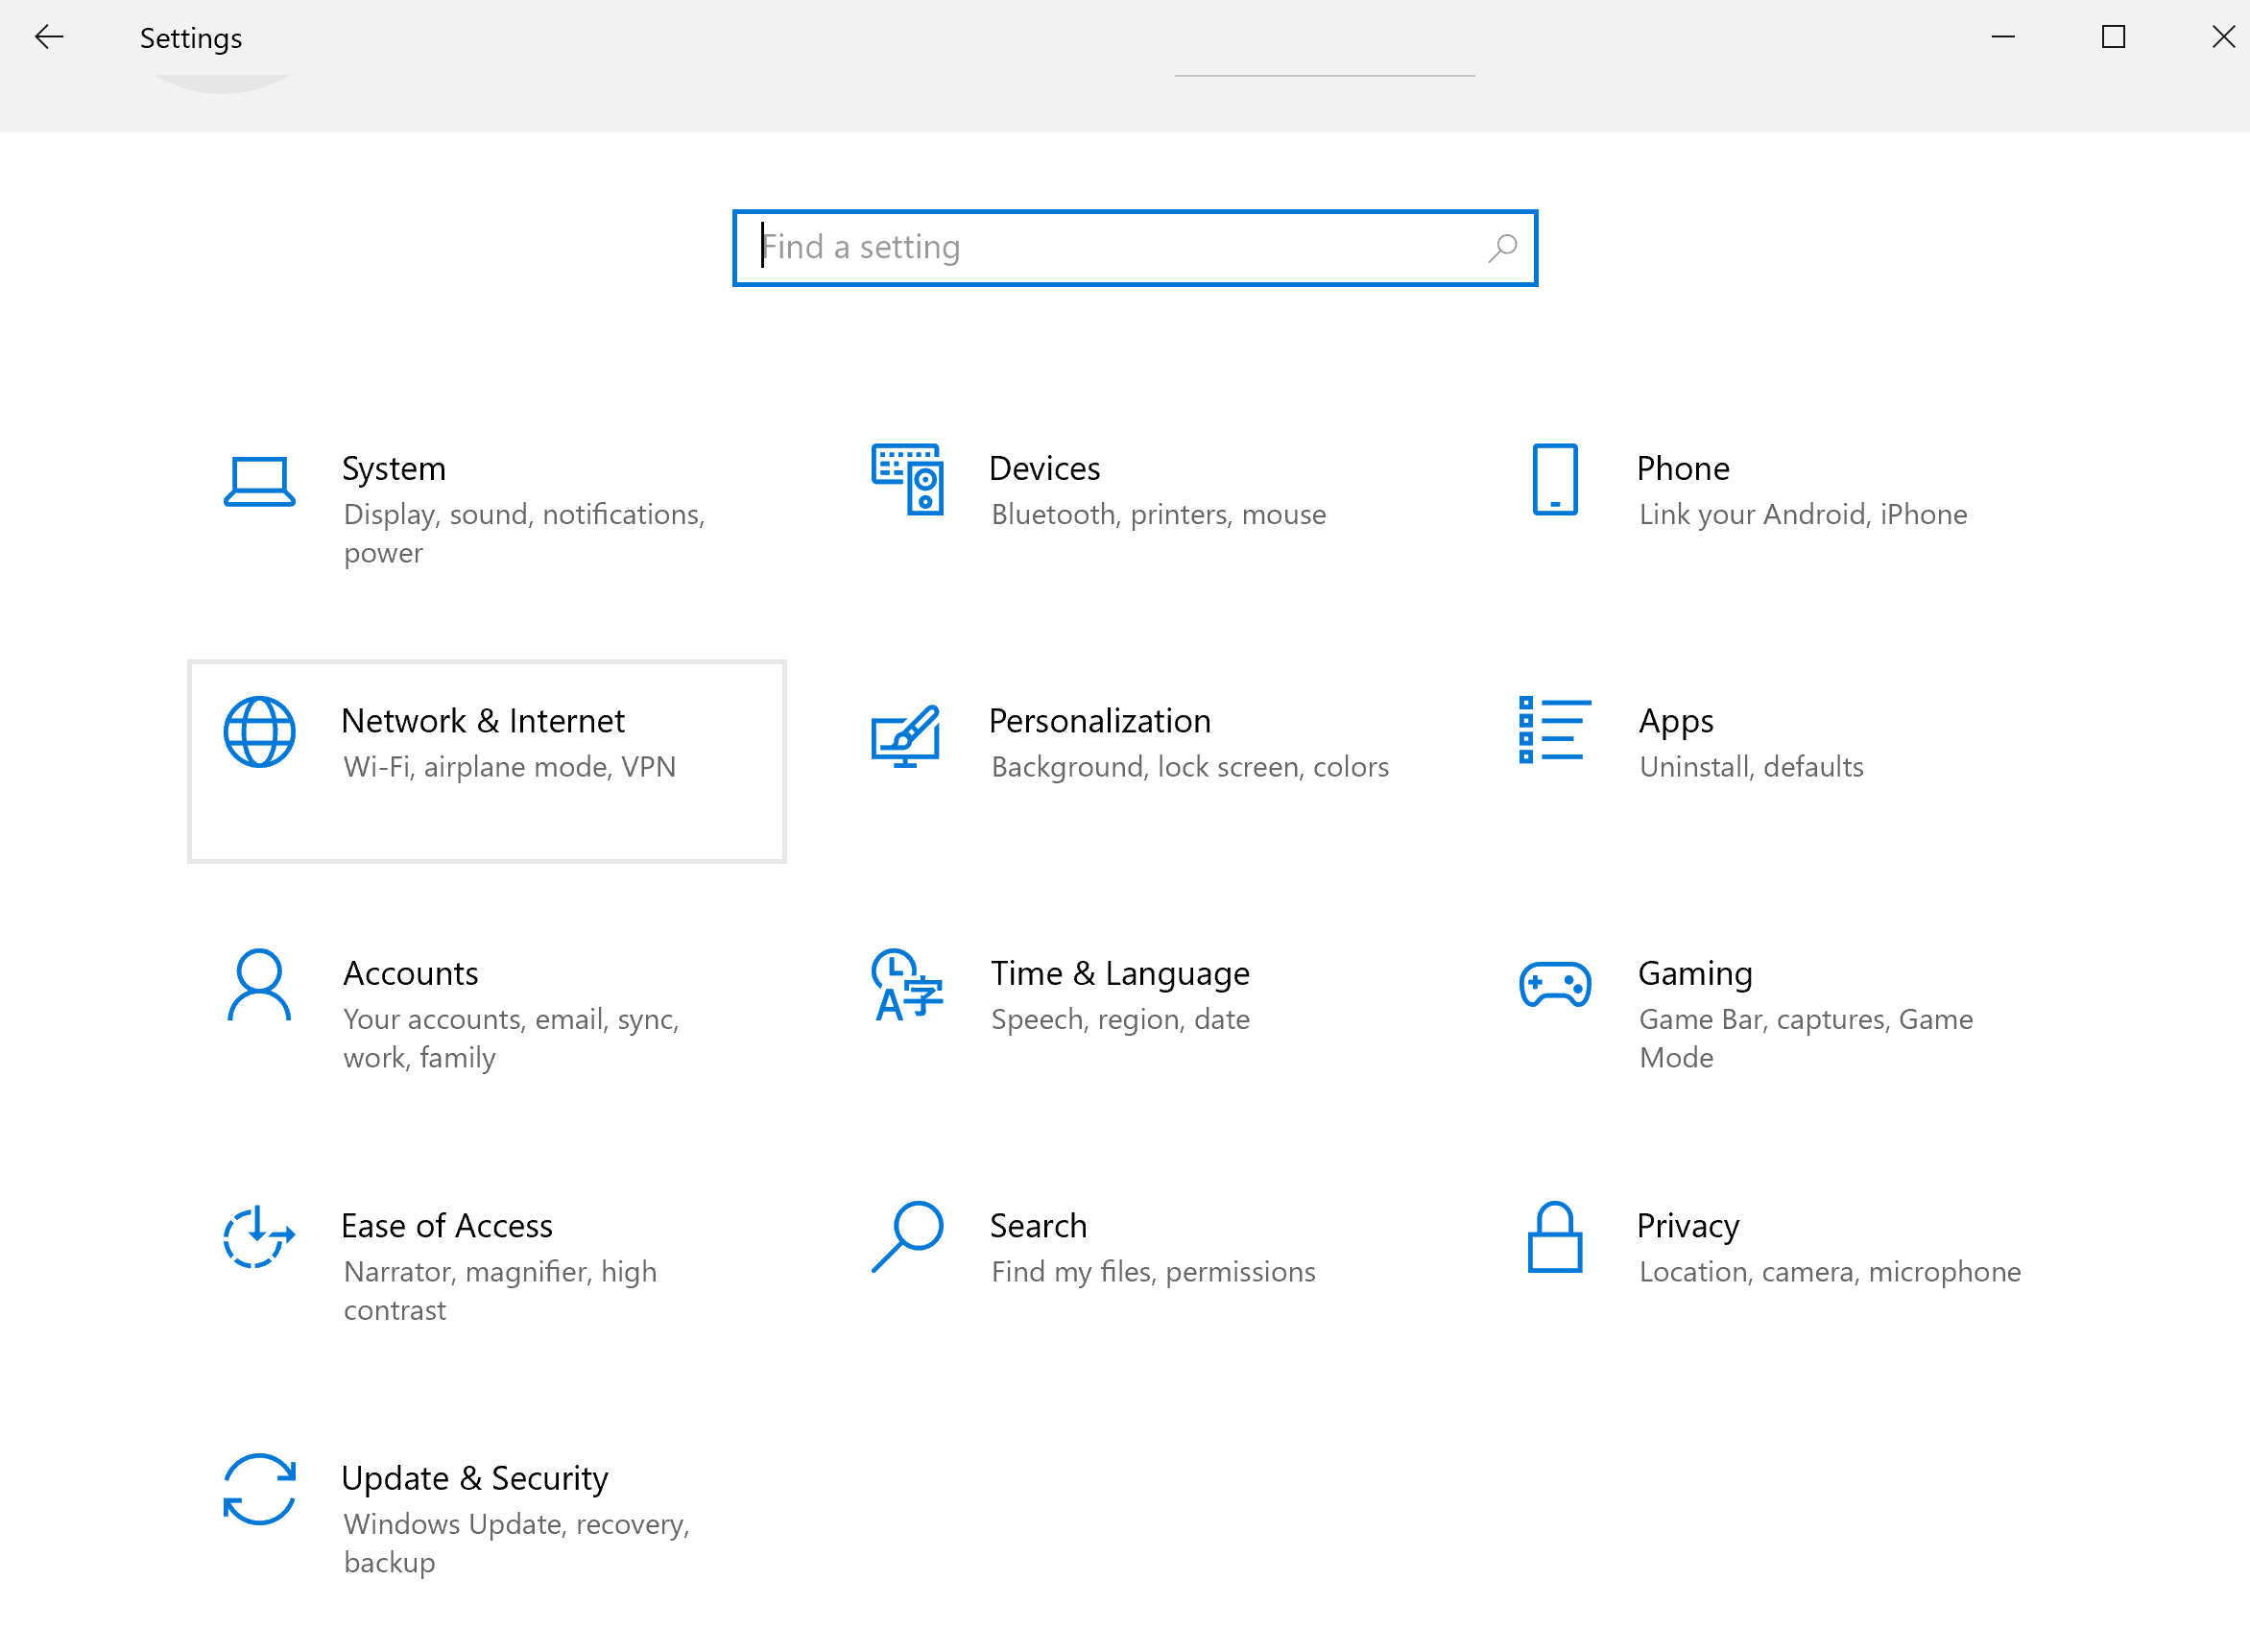
Step 1: Open "Settings" and go to the "Apps".
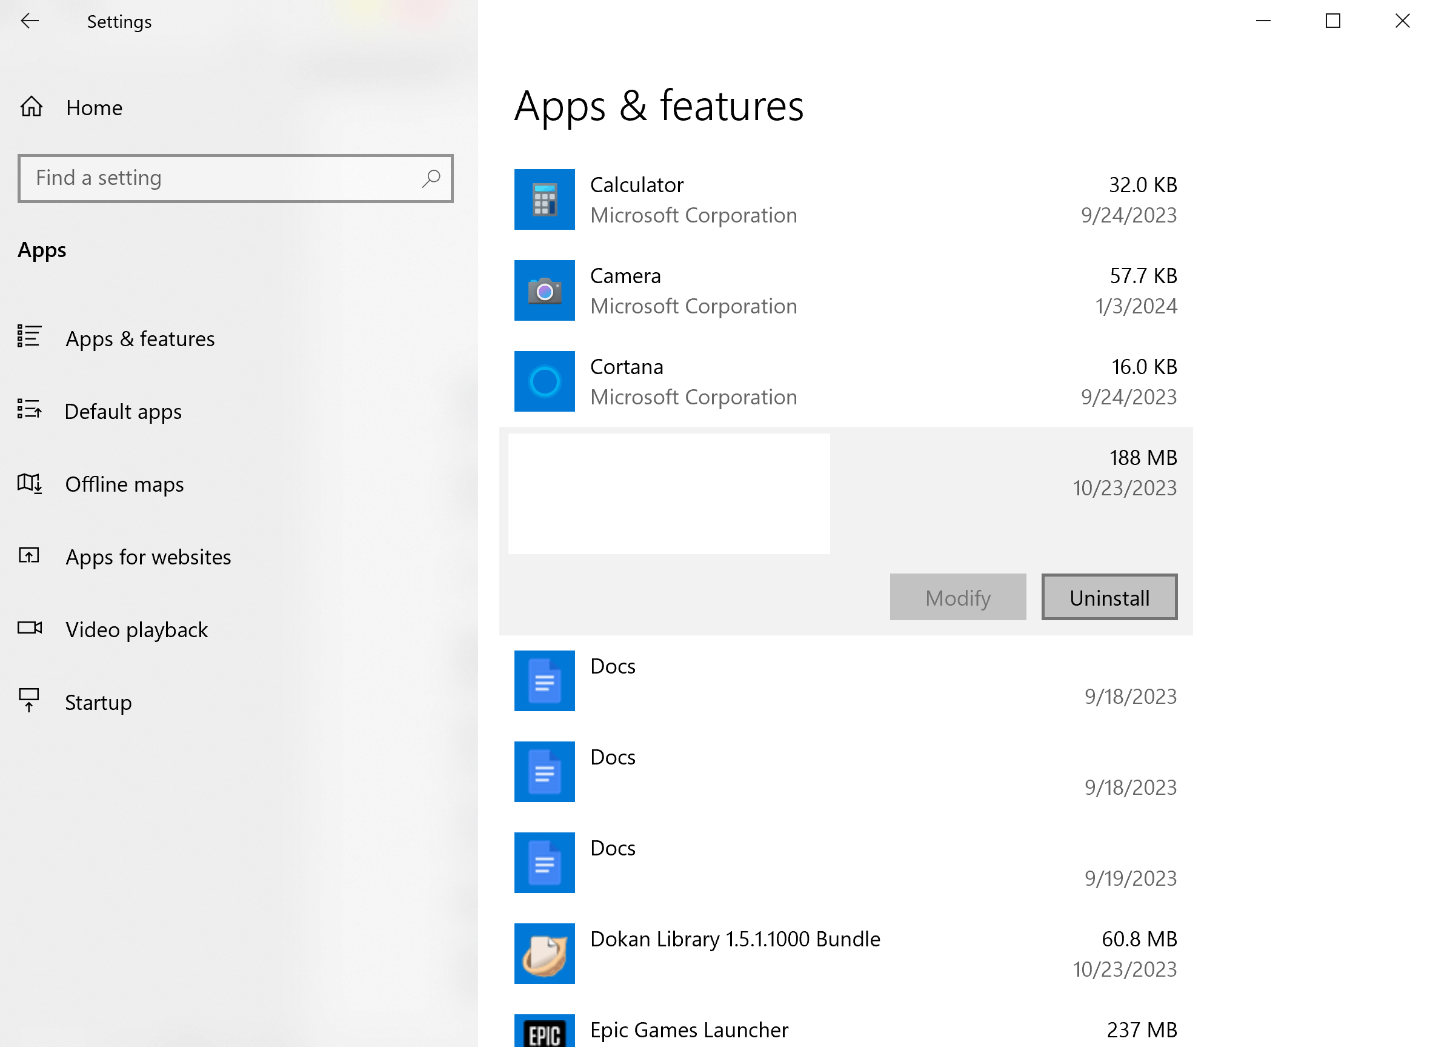
Step 2: All the installed apps will appear on the screen. Select the recently installed app that you think causes the BSOD error.
Step 3: Click on the app and hit the "Uninstall" button. Follow the instructions of Windows. If required, restart your PC.
6Method 6: Disable Hardware Acceleration to fix windows video scheduler internal error
Step 1: Open the "Control Panel". Click on the "Display > Change Display Settings > Advanced Settings".
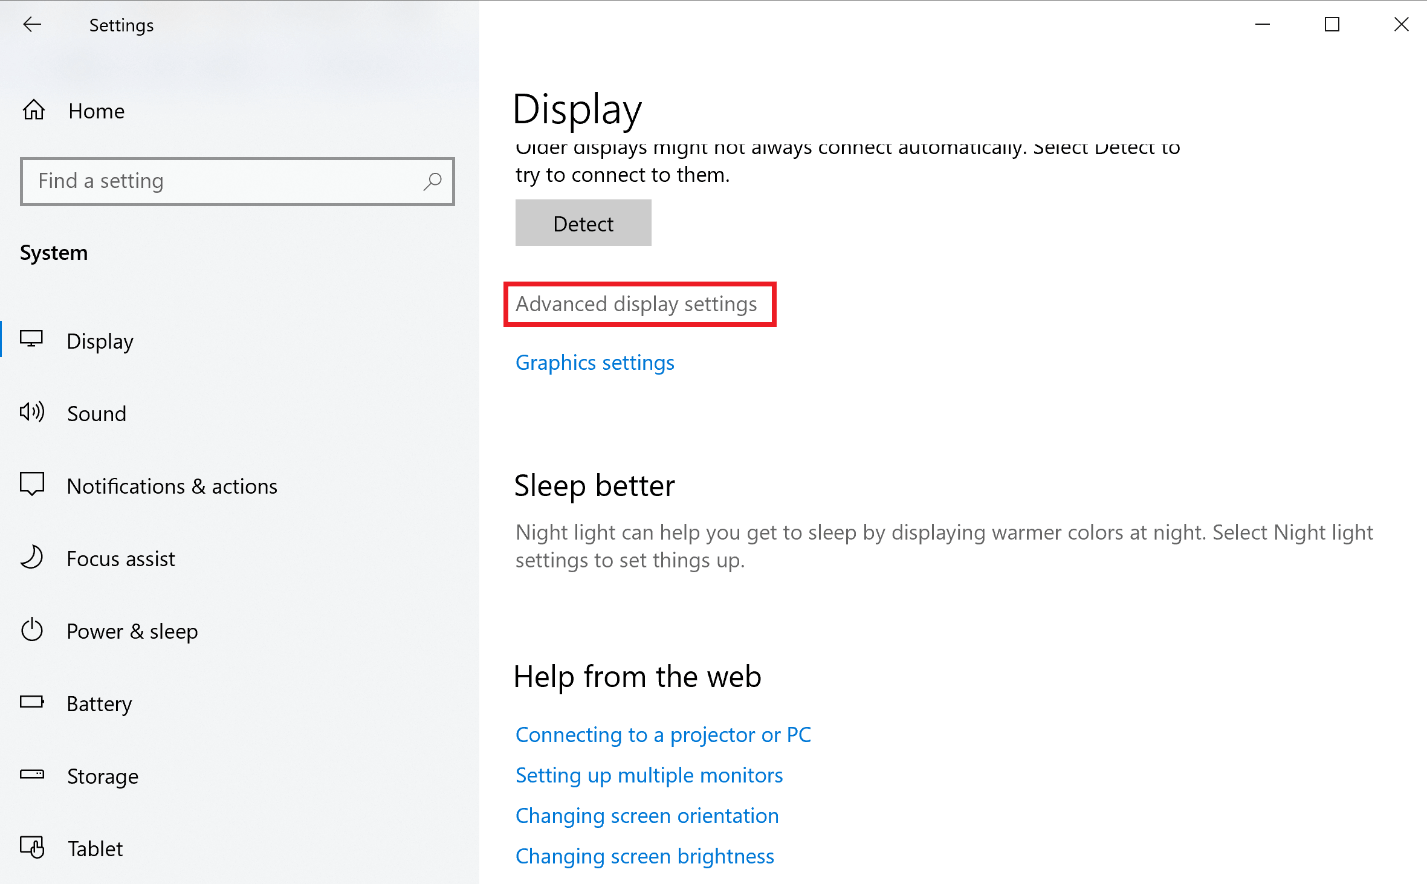
Step 2: If you see a Troubleshooting option here, click on it and a new small. A pop-up window will appear on the screen.
Step 3: Now, move the slider from None to Full and click on the "OK" button. Restart your computer.
7Method 7: Reset Your PC to stop code video_scheduler_internal_error
Step 1: Open "Control Pane"l and go to "Settings". Search for the "Recovery" Options.
Step 2: A Recovery panel will appear on the right side of the screen. Click on the "Get Started" under Reset this PC.
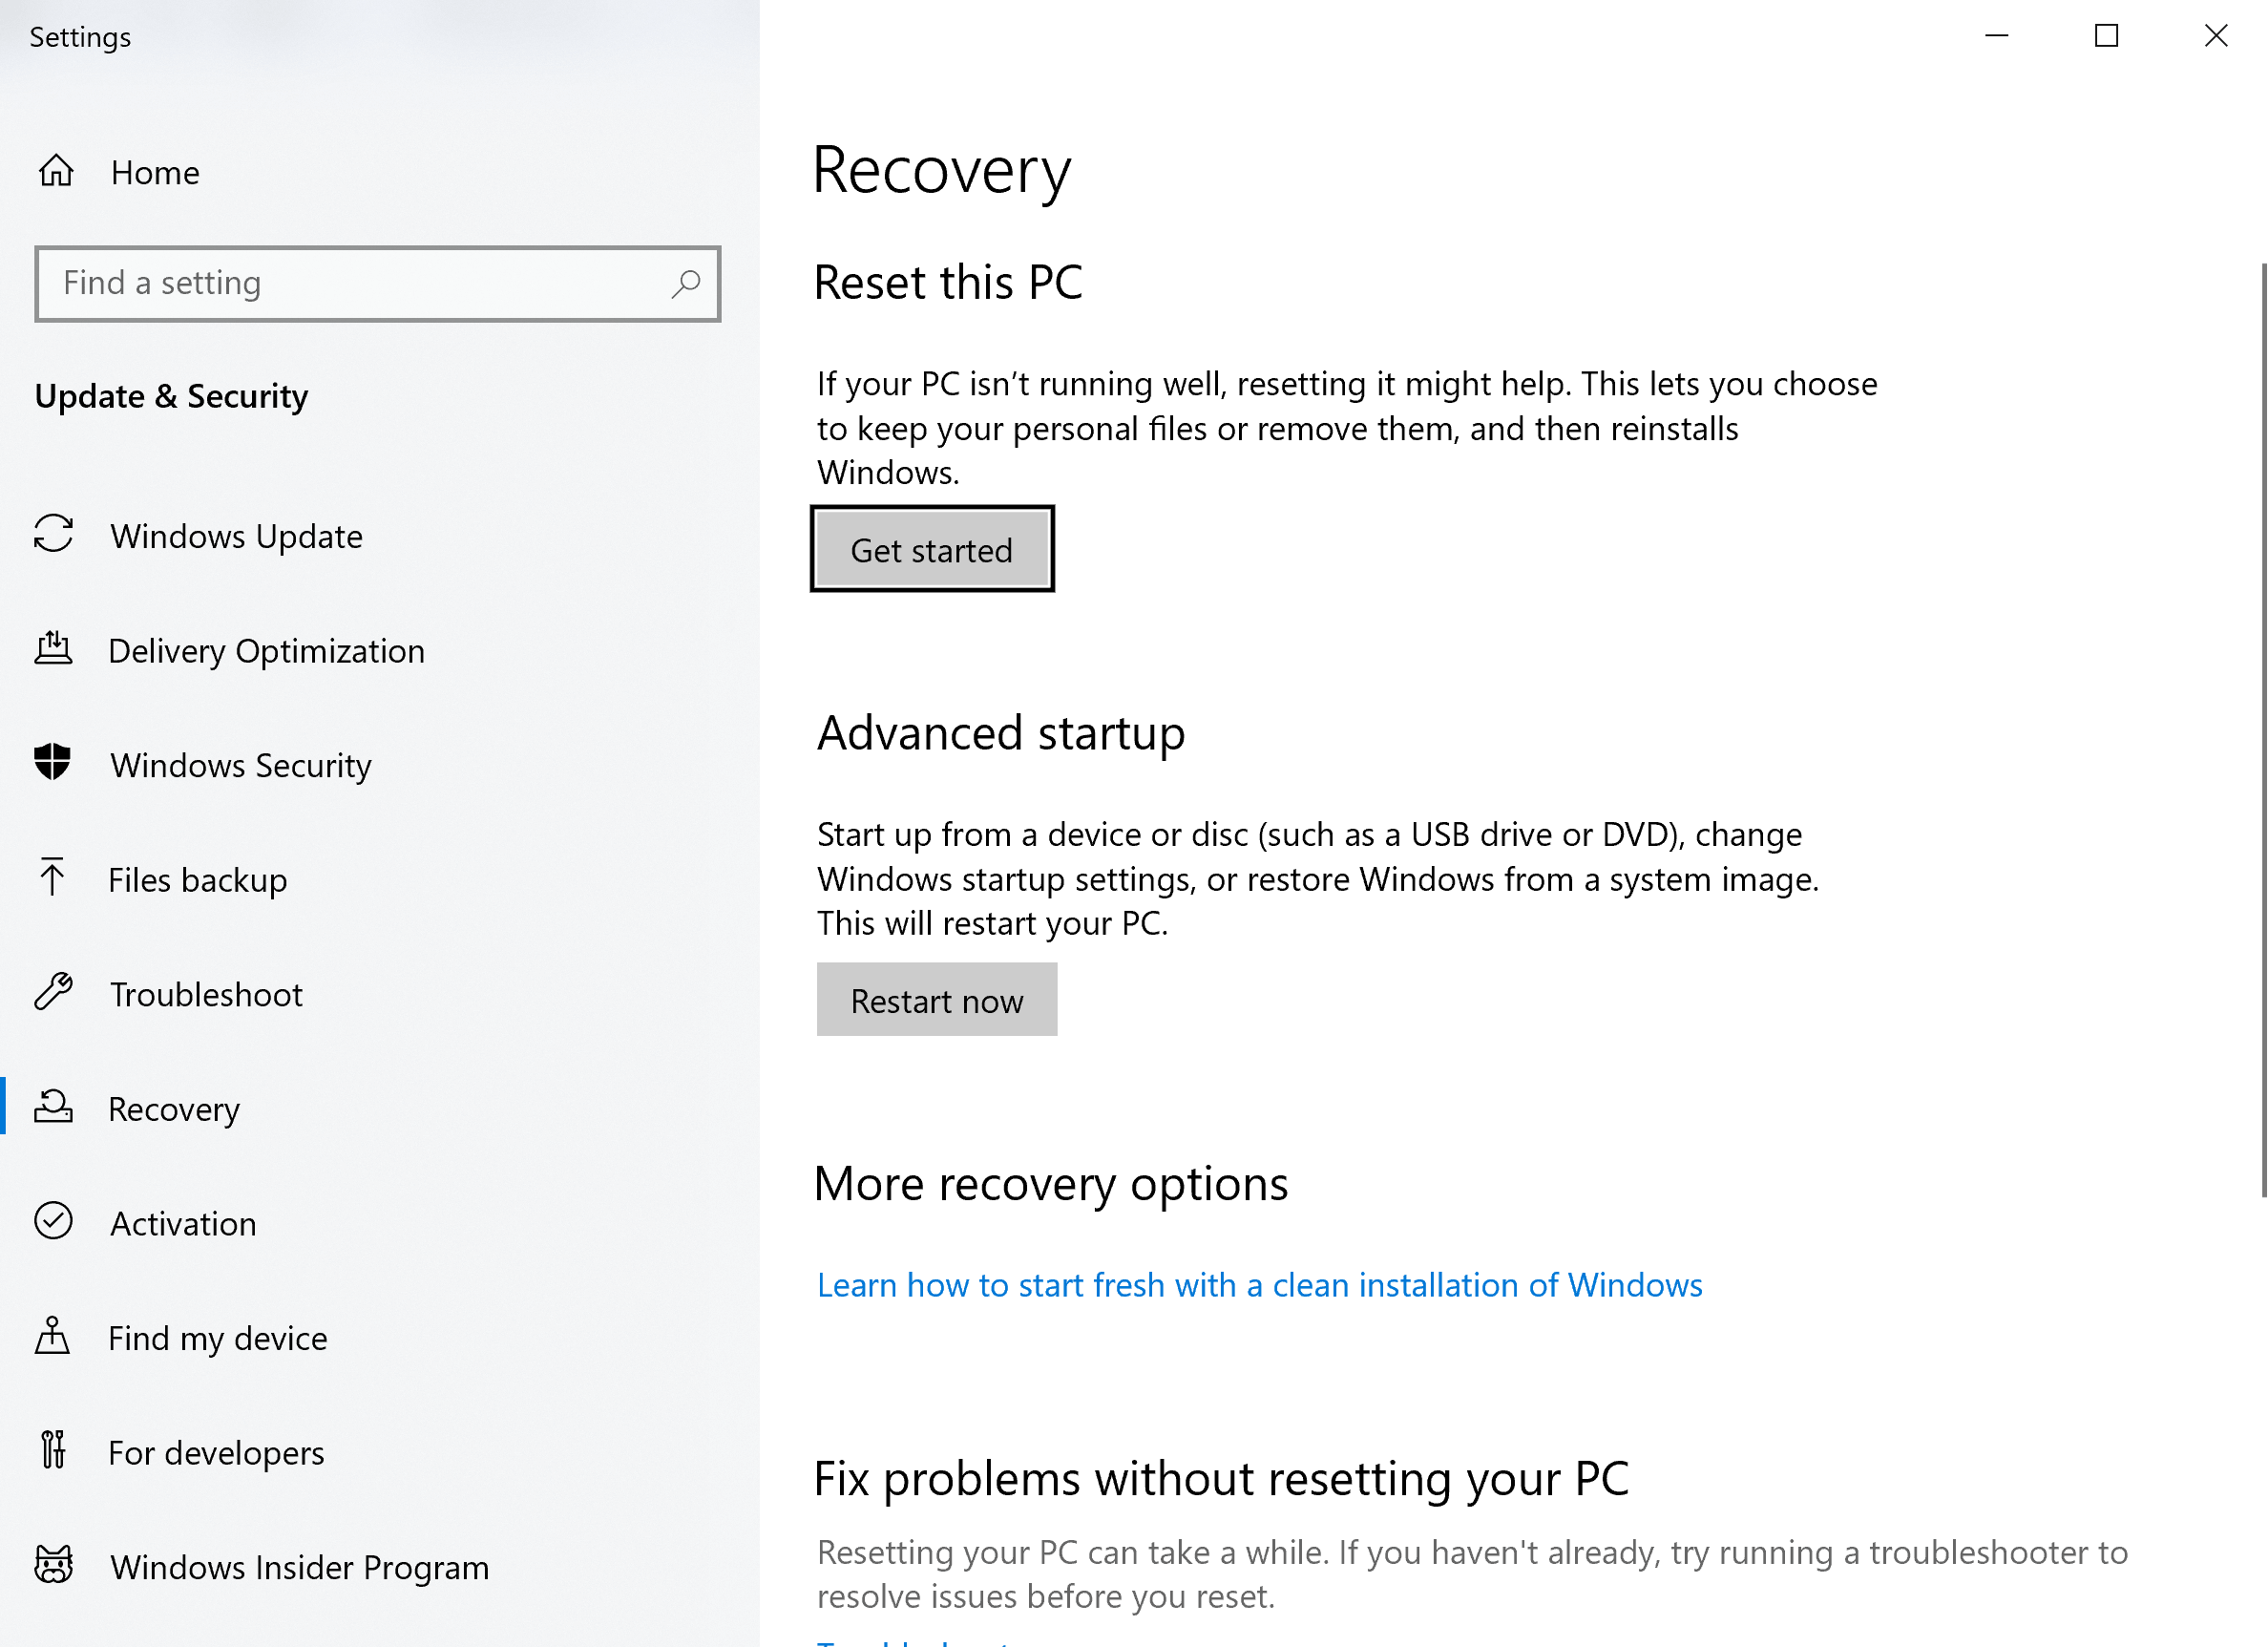
Step 3: Two more options will appear on the screen regarding keeping files or not. Select the option according to your choice and follow the on-screen instructions.
Step 4: Reset will start and you can again set your PC from scratch.
Part 4: Fix Dasta Loss Due To Blue Screen Video Scheduler Internal Error
As discussed earlier, the sudden attack of the blue screen video scheduler internal error harms data. If you have also lost your data due to an unexpected attack of BSOD error, then Anyrecover can help you. Just follow the easy steps to retrieve your lost data in a few simple clicks.
AnyRecover Key Features
- AnyRecover is professional in Recovering Lost/Corrupted/Deleted Data after BSOD on Windows in a few simple steps.
- Be able to restore 1000+ formats of photos, videos, messages, documents and emails, etc.
- You could also preview data before recovering.
- It can recover all the data in its original form without overwriting it.
- 100% safe and easy to use for both novice and experienced users. .
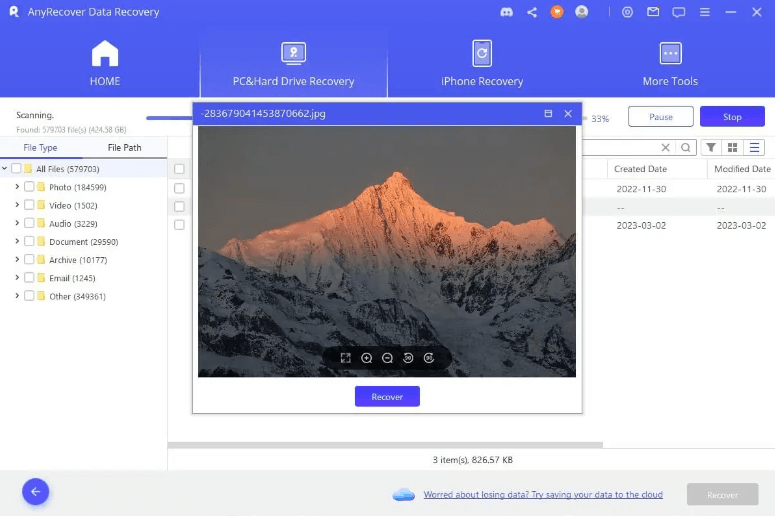
Step 1: Download the software on your device and install it. Open the software and select the recovery mode. In our case, click on the Hard Drive Recovery.
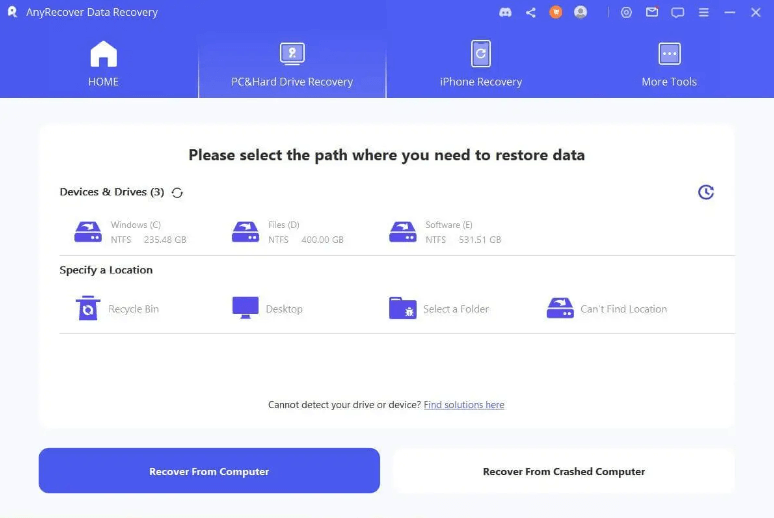
Step 2: Now, select the location or drive that contained data before deletion. Automatic scanning of the selected drive will start. You can also use the Pause and Stop button to manage the scanning process.
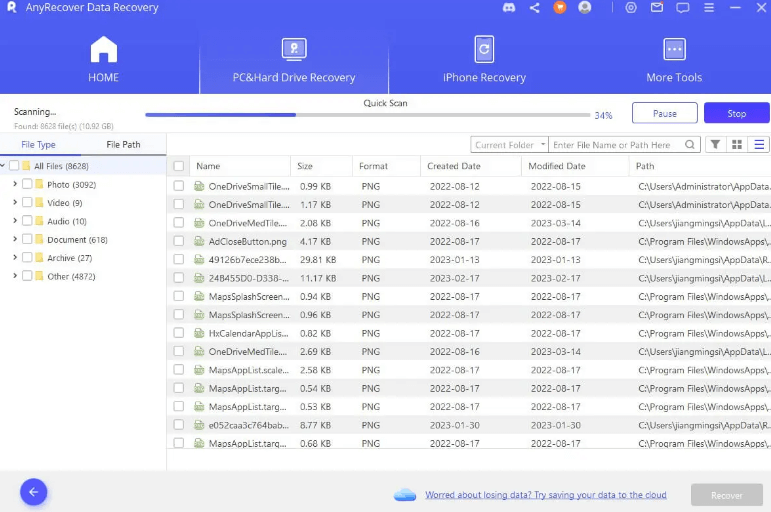
Step 3: Once the scanning process is finished, simply select the data which you want to recover. Preview the selected data and click on the Recover button. All the selected data will be restored at the given location on your device/PC.
Data Recovery
One Click to Recover Lost Files
Part 5: Helpful Tips To Prevent Stop Code 0x00000119
We have discussed some detailed methods to get rid of 0x00000119 error. Here are the tips that you can follow to avoid the attack of the 0x00000119 error.
Clean your hardware after a few days to manually remove the debris.
Make sure of the safety of every device before changing and linking it to your PC.
Always make a hardware change by the recommendation of any professional person.
Do not install incompatible software or applications on your device.
Reboot and reset your PC on your own.
Use authentic Anti-virus programs.
Conclusion:
The sudden appearance of a blue screen with a stop code irritates Windows users a lot. It is an unwanted, unpredictable, and unavoidable attack once it happens. In this article, we have tried our best to list the common methods to solve and avoid this problem effortlessly. If you lost your data due to this error, you can use Anyrecover to recover the deleted data in a few minutes.
Related Articles:
Time Limited Offer
for All Products
Not valid with other discount *
 Hard Drive Recovery
 Deleted Files Recovery


