[Top 6 Ways] How to Recover Files Lost in Cut and Paste
The cut and paste command seems like a very simple option to move files from one storage device to another but what if the unforeseen happens? Have you ever lost a file from the cut and paste command and can't recover it? You use the Ctrl + Z shortcut to undo the action but the file is nowhere to be found. A wrong file transfer is all it takes to ruin a good day.
Don't panic; there are various ways to recover files lost in cut and paste operations. This article would help you understand how the cut and paste operations work and explain various ways about how to recover cut and paste files disappeared on Windows 11/10.

Part 1: Where Do Cut Files Go?
Have you noticed how a file becomes transparent after cutting or using the Ctrl + X shortcut to move it and wondered where are cut files stored within that period? All cut files – images, texts, videos, files, folders, programs, etc. – go to the clipboard. The clipboard is a virtual space in the computer's memory that stores cut files.
In cases something goes wrong and you do not paste a file after cutting, the clipboard returns the cut files to the source folder. The same happens when you copy a file; it remains in the clipboard until you paste it into a destination.
Part 2: Common Scenarios of Files Lost During Cut and Paste
What if there is a disruption in the transfer process and the paste operation couldn't be completed after cutting? In events like this, you are at a high risk of losing your data. Let us identify various scenarios that can result in file loss during cut and paste.
Unfinished cut and paste operations are the main reason for data loss. The interruption in the cut and paste process is usually based on any of the following reasons:
- Sudden power failure.
- Improper ejection of external storage devices.
- Hardware failure.
- Virus infection.
- Software failure.
Part 3: Can You Recover Cut and Paste Files?
Yes, you can always recover files lost during cut and paste. When you cut a file, it will stay on the clipboard or the drive for a time. Before it is overwritten by new data, you can try different possible ways to recover them.
You can start by checking the Recycle Bin on Windows computers if the lost files were saved on your computer. You can also recover cut files by showing hidden files, using Command Prompt, file history, system restore, cloud backup, or using the professional AnyRecover data recovery tool, which will be specifically explained below.
Part 4: How to Recover Files Lost in Cut and Paste
Before you proceed in the following 6 ways to recover lost files while moving folders, there are 2 things you have to check out. The first thing to do when a cut and paste operation isn't successful is to undo the cut with the Windows shortcut Ctrl + Z, or use the Windows + V command to view your clipboard history.
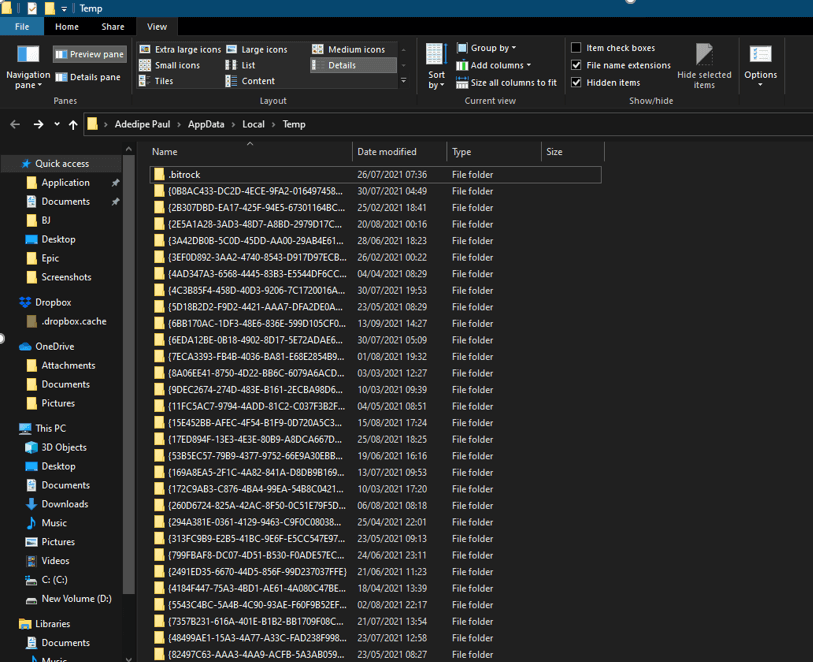
Also we recommend that you check the Temp folder. Here's how
-
Use the Windows + R keyboard shortcut to the run box.
-
Input %temp% and press OK.
-
Check each folder to see if the missing cut file would reappear in the original location.

If you still fail to find your files lost during cut and paste, try the methods below to recover them in Windows.
1. Recover Files Lost in Cut and Paste Using Software
To efficiently recover cut paste lost files without trying multiple methods, using data recovery software is always a reliable way. Among many choices, AnyRecover is your best shot, which is a tested and trusted data recovery tool for recovering files lost in cut and paste or deleted files from your computer drive, and other external storage devices.
Using this method, you just need to perform 3 simple steps with a user-friendly interface and then you can easily recover files lost in cut and paste.
![]()
2,061,704 Downloads
Features of AnyRecover
Recovering files from any scenarios like cut and paste, emptied recycle bin, unsaved or deleted files and formatting.
Recovering almost all types of files lost in cut and paste such as photos, documents, archives and vidoes.
Having the highest success rate and safety rate, AnyRecover offers a free trial that enables user to perform a deep scan, preview and recover.
-
Supporting most Windows versions including the latest Windows 11, and Mac systems.
To Recover Files Lost in Cut and Paste Operations with AnyRecover:
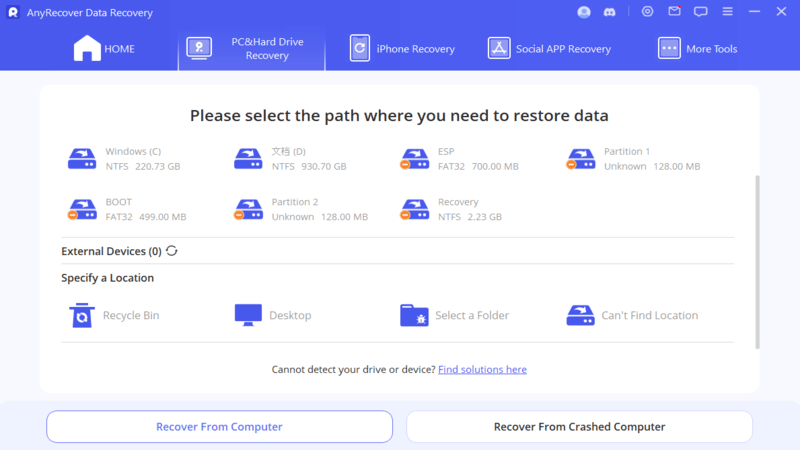
Step 1 Launch AnyRecover on your computer. Find the location where the missing file was saved.
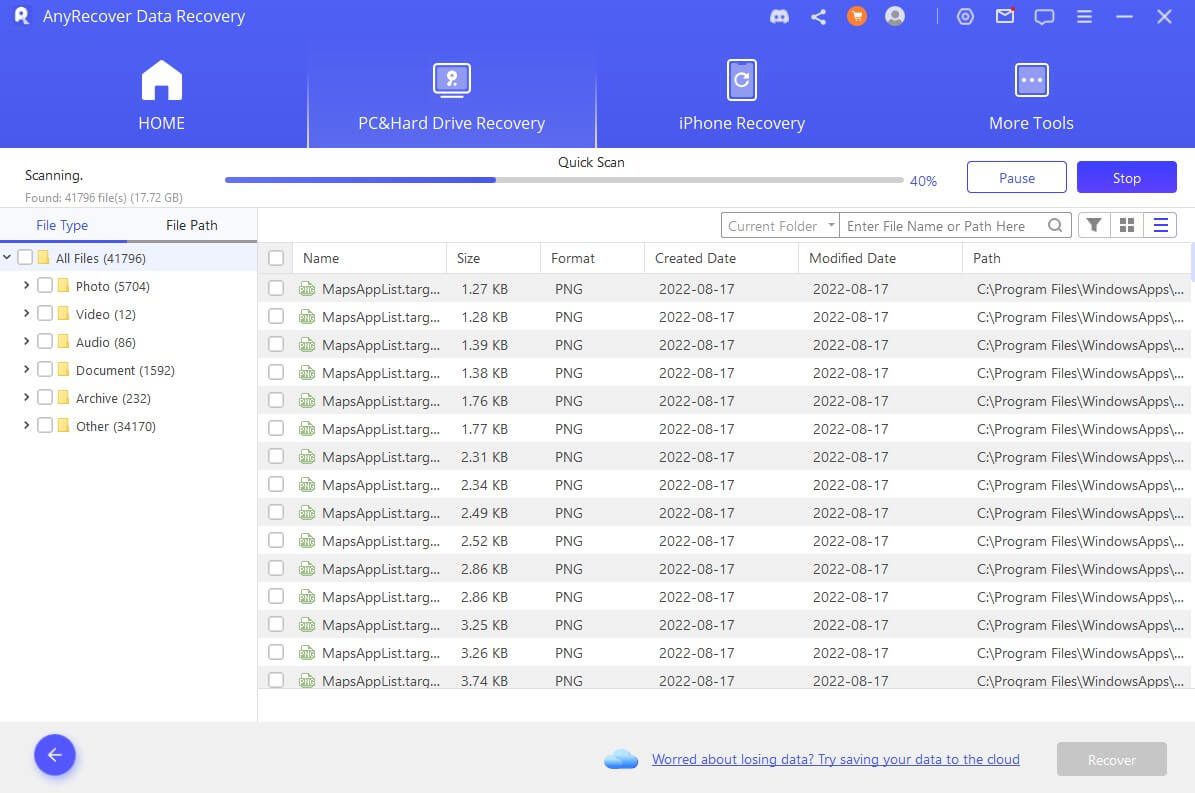
Step 2 Wait some time for AnyRecover to complete the all-round scan for missing files.
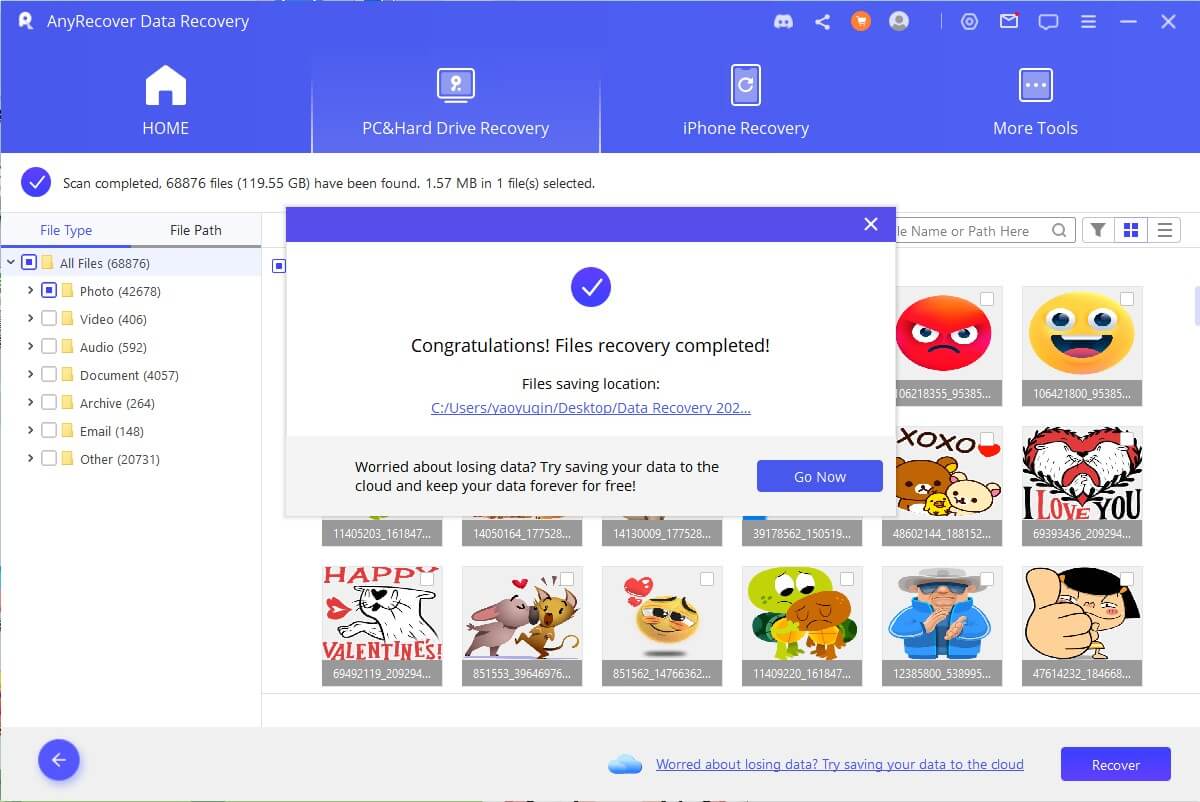
Step 3 Once the scan is complete, you can select and preview the recoverable files on the left side of the window. Finally select Recover to get them back.
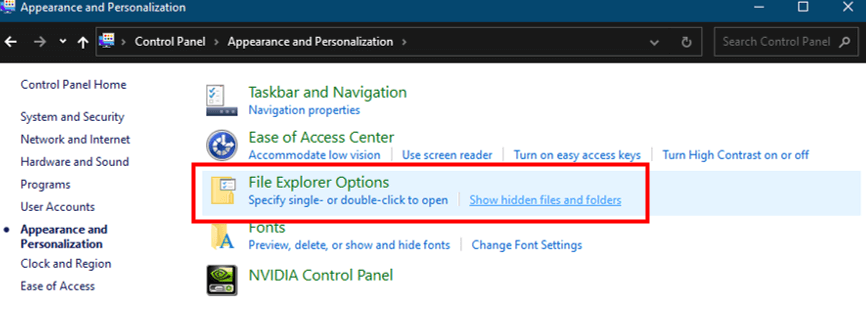
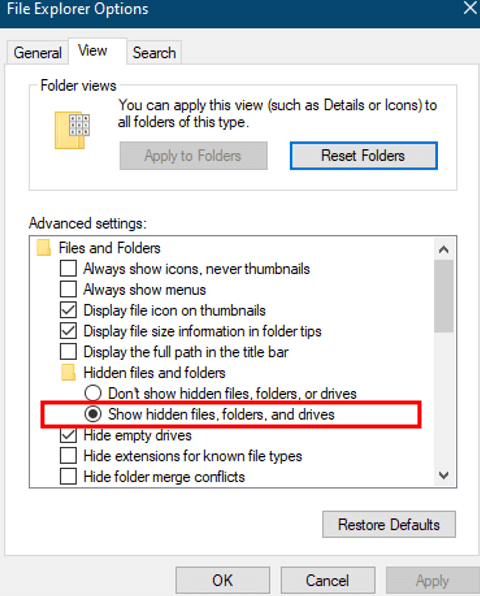
2. Recover Files Lost in Cut and Paste by Showing Hidden Files
There are times whereby the files lost during cut and paste are hidden, so you cannot see them. Showing hidden files in File Explorer is another effective way to recover lost files during a cut and paste on Windows devices.
-
Launch Control Panel.
-
Select Appearance and Personalization.
-
Choose File Explorer Options or click on Show hidden files and folders.
-
Click View and mark Show hidden files, folders, and drives.

3. Recover Files Lost in Cut and Paste by Using CMD
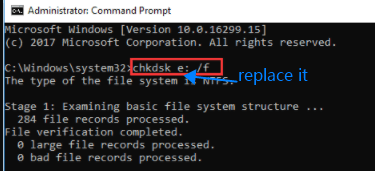
You can also use Command Prompt lines to recover files lost in cut and paste.
-
Launch Command Prompt.
-
Input the command chkdsk (drive letter): /f and press Enter. The drive letter is the letter for the drive which you want to recover files lost during copy and paste; let's say C: D: or E:
-
Press Y and Enter to continue the recovery process.
-
Press the drive letter from which you want to recover.
-
Press Enter.
-
Input the command >attrib -h -r -s /s /d E:\*.* and press Enter to complete the recovery process.
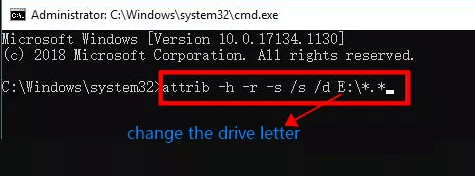
You should regain lost files during a cut and paste after this process.
4. Recover Files Lost in Cut and Paste by Using File History
This method works on Windows 10 computers if you have enabled File History. To check if File History is enabled:
-
Launch Settings.
-
Go to Update & Security.
-
Select Backup.
-
Confirm if Automatically back up my files is turned on. If it is not, then you could not recover files lost in cut and paste with this method.
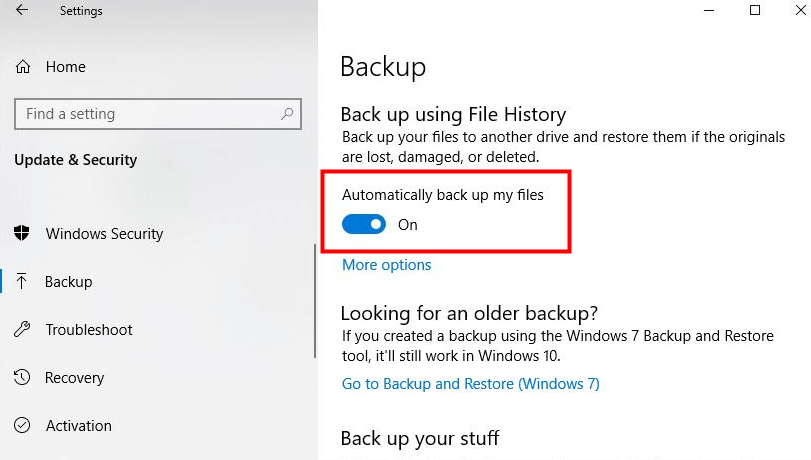
If the File History backup is turned on before you lost files during cut and paste, follow the steps below to get them back:
-
Locate the file location where the missing file should be.
-
Click the Home tab and select History.
-
Locate the missing file.
-
Double click and select Restore to recover the lost files.
5. Recover Files Lost in Cut and Paste by Using System Restore
If you have enabled System Restore on your Windows 11/10 computer, you can recover files lost during cut and paste. The System Restore function enables you to return the computer system settings and files to a previous point before the cut and paste action. To use System Restore to recover files:
-
Use the Windows search box to search for Create a restore point.
-
Click on System Restore.
-
Click Next.
-
Select an option from the list of restore points on Windows. Use the date and time stamps to identify the restore points.
-
Click Next, then Finish.

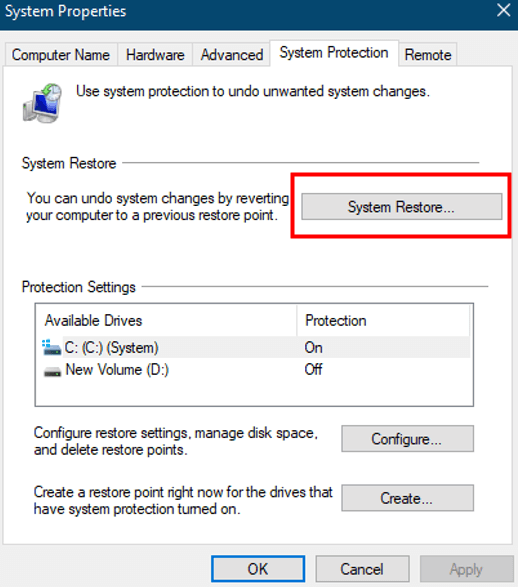
Wait for some time for the process to complete, then check the document folders if you have recovered the files you lost during cut and paste.
6. Recover Files Lost in Cut and Paste by Checking Cloud Backup
If you use a cloud storage tool like Google Drive or Dropbox, the following steps would help you recover files lost in cut and paste:
-
Log in to the storage service via a reliable browser. You mustn't synchronize the local app if you don't want to lose the cloud version.
-
Locate the lost files and save them on your Windows Computer.

This method comes in handy in most events where you lose files in cut and paste. In cases where the file was deleted permanently, we recommend you use a trusted data recovery tool like AnyRecover.
Bonus: Tips to Prevent Data Loss During Cut and Paste
Prevention is the first step to recover lost data; it is best if you try your possible best to forestall data loss during such crucial operations. These tips would help you prevent data loss during cut and paste:
- Use "copy and paste" rather than "cut and paste" to reduce the risk of data loss.
- Use a UPS device alongside your computer to avoid losing data in case of power failure while transferring data between storage devices.
- Do not force stop a cut and paste operation before it is completed.
- Avoid ejecting an external storage device while moving cut files.
Conclusion
Now that you understand where cut files go, alongside the possible causes to files lost in cut and paste and how to recover files lost in cut and paste, you can recover them easily. Nevertheless, you can always rely on AnyRecover data recovery software to recover files lost in cut and paste regardless of the root cause.
Start a deep scan for free right now!
Time Limited Offer
for All Products
Not valid with other discount *

 Hard Drive Recovery
 Deleted Files Recovery
