The Computer Has Rebooted From a Bugcheck on Windows 11? How to Fix?
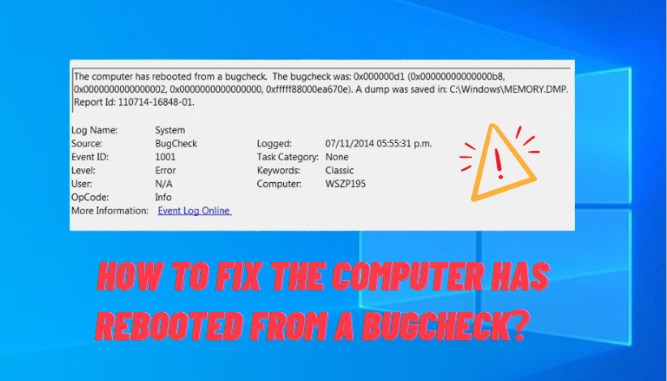
Have you ever seen the message "The computer has rebooted from a bugcheck" on your Windows 11 computer? It can be really frustrating and confusing.
But don't worry! In this article, we're here to help you. We understand how annoying it is when your computer suddenly crashes, and we want to make it easy for you to fix it.
So, let's talk about why this happens and give you simple, step-by-step solutions to get your Windows 11 computer back to normal.
Causes of The Computer Has Rebooted From a Bugcheck
Before getting straight to the computer has rebooted from a bugcheck issue, it's essential to first understand it's causes.
Well, there are different reasons that can trigger the computer has rebooted from a bugcheck windows 11 issue. Some of them are:
To find out the specific reason for the bugcheck, you can utilize the event log for the bugcheck code and parameters.
Now let's discuss how you can fix the computer has rebooted from a bugcheck issue.
How to Fix The Computer Has Rebooted From a Bugcheck on Windows 11?
As there are different causes behind the computer has rebooted from a bugcheck error. Similarly, there are different fixes you can try to get rid of it.
Let's discuss them in detail.
Fix 1: Run SFC and DISM to Repair System Files
Fix 2: Update or Reinstall the Drivers
Fix 3: Update or Reset the BIOS to the Latest Version
Fix 4: Turn off Overclocking or XMP Settings in the BIOS
Fix 6: Uninstall any Incompatible or Suspicious Software or Antivirus Programs
Fix 7: Scan your Computer for Malware using a Reputable Tool
Fix 8: Test your Hardware for Errors, such as RAM, hard disk, or CPU
Fix 1: Run SFC and DISM to Repair System Files
Corrupted or missing system files can lead to the computer has rebooted from a bugcheck issue. Running SFC and DISM can help repair these files and restore system stability.
Step 1. Press Win + X and select "Windows Terminal (Admin)" to open an elevated command prompt.
Step 2. In the command prompt window, type sfc /scannow and press Enter. This command will initiate the System File Checker scan. Allow it to complete; it may take some time.
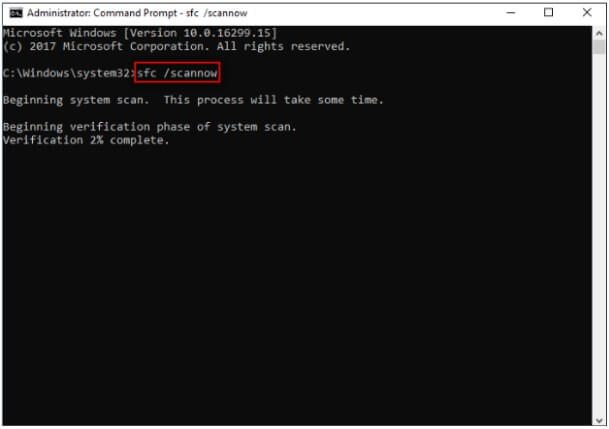
Step 3. After SFC finishes, type DISM /Online /Cleanup-Image /RestoreHealth and press Enter. This command will run the DISM tool to repair Windows image files.
Step 4. Reboot your computer after both scans are complete.
Fix 2: Update or Reinstall the Drivers
Outdated or incompatible drivers can also cause system instability and trigger bugchecks. Updating or reinstalling drivers can resolve this issue.
Step 1. Right-click on the Start button and select "Device Manager."
Step 2. Locate the device categories with a yellow triangle icon, indicating driver issues.
Step 3. Right-click on each problematic device, choose "Update driver," and follow the on-screen instructions to update it.
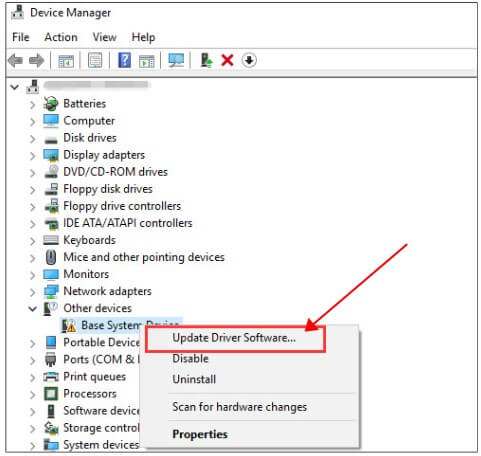
Step 4. If updating doesn't work, you can right-click the device and select "Uninstall device," then reboot your computer to let Windows automatically reinstall the driver.
Fix 3: Update or Reset the BIOS to the Latest Version
An outdated or misconfigured BIOS can lead to compatibility issues, causing bugchecks.
Updating the BIOS to the latest version compatible with your CPU ensures that your motherboard functions optimally, fixing the computer has rebooted from a bugcheck windows 11 error.
Step 1. Restart your computer and press the appropriate key to enter the BIOS setup. The key may vary depending on your computer model, but it is usually F2, F10, F12, or Delete.
Step 2. In the BIOS setup, look for an option to update the BIOS. You may need to download the latest BIOS file from your motherboard manufacturer's website and save it to a USB flash drive.
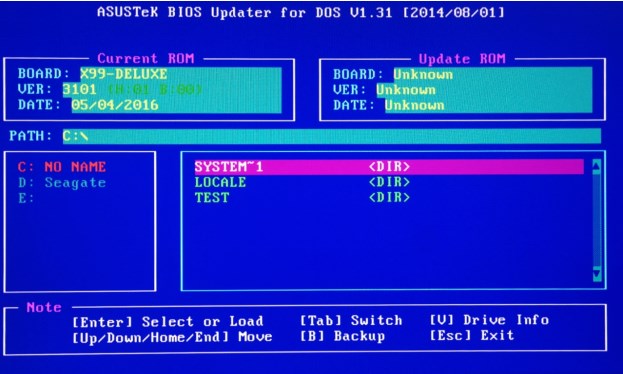
Step 3. Follow the instructions on the screen to update the BIOS. Do not turn off your computer or interrupt the process until it is completed.
Step 4. If updating the BIOS does not fix the error, you can try resetting the BIOS to its default settings. In the BIOS setup, look for an option to load defaults. This will erase any custom settings you have made and revert to the factory defaults.
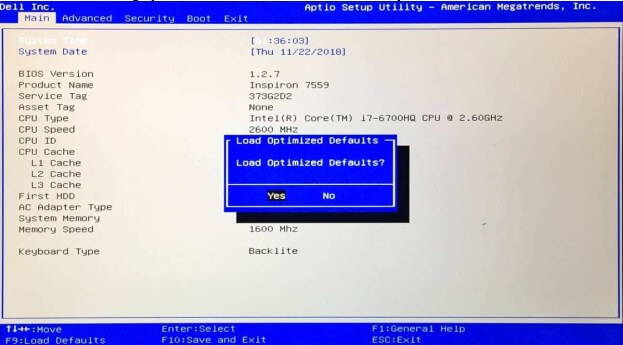
Step 5. Save and exit the BIOS setup and restart your computer. Check if the error is resolved.
Fix 4: Turn off Overclocking or XMP Settings in the BIOS
Overclocking your CPU or enabling XMP settings can push your hardware beyond its limits, leading to the computer has rebooted from a bugcheck error.
Disabling overclocking or XMP settings ensures that your hardware operates at default, stable frequencies.
Step 1. Restart your computer and enter the BIOS menu (usually by pressing a key like Del, F2, or F12 during startup).
Step 2. Locate the overclocking or XMP settings and set them to "Disabled" or "Default."
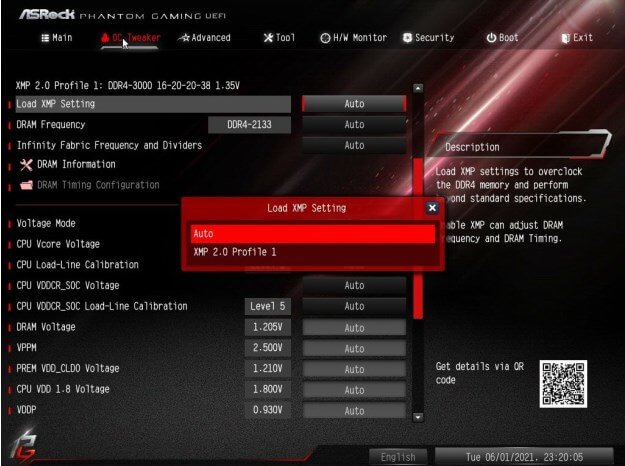
Step 3. Save changes and exit the BIOS.
Fix 5: Turn off Fast Startup
Fast startup can sometimes cause issues with hardware initialization during boot, leading to the computer has rebooted from a bugcheck error.
So, disabling fast startup ensures a complete and clean boot process, reducing the chances of bugchecks.
Step 1. Open the "Settings" app by pressing Win + I.
Step 2. Click on "System," then select "Power & sleep" from the left sidebar.
Step 3. Scroll down and click on "Additional power settings" on the right side.
Step 4. Click on "Choose what the power buttons do."
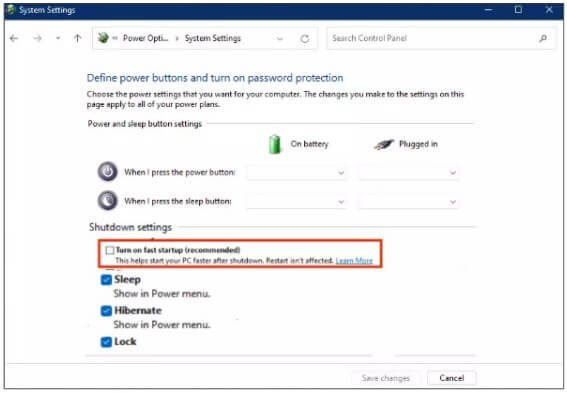
Step 5. Under "Shutdown settings," uncheck "Turn on fast startup (recommended)."
Fix 6: Uninstall any Incompatible or Suspicious Software or Antivirus Programs
Certain software applications, especially incompatible or malicious ones, can interfere with your system's stability and trigger problems like the computer has rebooted from a bugcheck.
Removing those problematic software will help you get rid of this issue.
Step 1. Press Win + X and select "Apps and Features" from the menu.
Step 2. Browse through the list of installed programs and identify any software that you suspect could be causing issues.
Step 3. Select the problematic software and click "Uninstall."
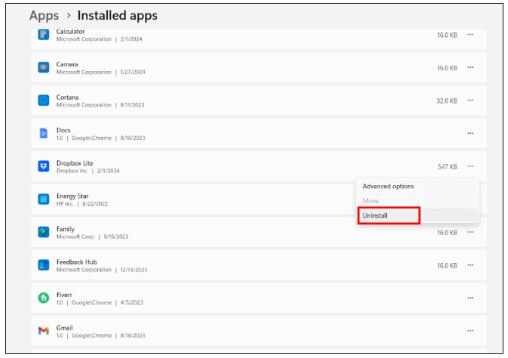
Step 4. Follow the on-screen prompts to complete the uninstallation process.
Fix 7: Scan your Computer for Malware using a Reputable Tool
Most of the times, malware or viruses can disrupt system processes, causing crashes and unexpected reboots.
So, scanning your computer for malware ensures that any malicious software is detected and removed, restoring system stability.
Step 1. Install a reputable antivirus or antimalware program if you don't already have one.
Step 2. Update the antivirus software to the latest definitions.
Step 3. Perform a full system scan.

Step 4. Follow the software's instructions to remove any detected threats.
Fix 8: Test your Hardware for Errors, such as RAM, hard disk, or CPU
Hardware issues like faulty RAM, a failing hard disk, or an overheating CPU can lead to system crashes and the computer has rebooted from a bugcheck problem.
Identifying and addressing hardware problems can prevent future bug checks and ensure your computer runs smoothly.
To check for RAM issues, use the Windows Memory Diagnostic tool:
Step 1. Type "Windows Memory Diagnostic" in the Windows search bar and select it.
Step 2. Choose "Restart now and check for problems."
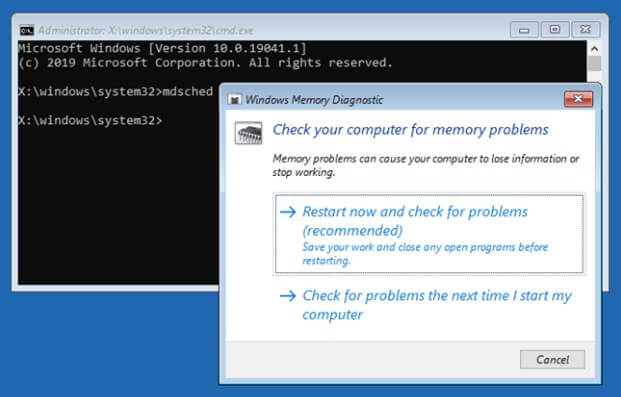
Step 3. Windows will restart and perform a memory test. Follow any recommended actions.
To check your hard disk:
Step 1. Press Win + X and select "Windows Terminal (Admin)" to open an elevated command prompt.
Step 2. Type chkdsk /f /r and press Enter. Follow the prompts to schedule a disk check on the next system restart.
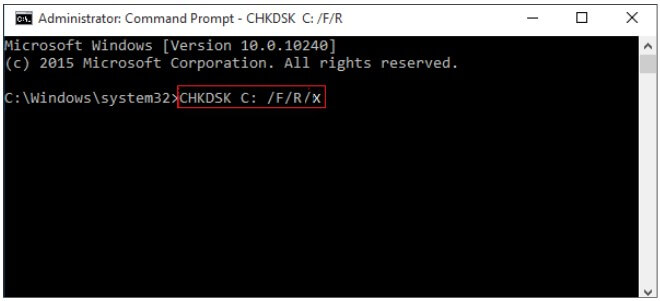
So, these are some easy-to-follow methods that will help you get rid of the computer has rebooted from a bugcheck Windows 11 issue.
Part 3: How to Recover Data When The Computer Has Rebooted From a Bugcheck?
When you face the computer has rebooted from a bugcheck issue on your computer, there are chances you might lose some data stored on your hard drive. So in this situation, a data recovery tool like AnyRecover will help you.
AnyRecover is a user-friendly data recovery tool designed to help you retrieve lost or deleted files in various scenarios, including system crashes like bugchecks. With its intuitive interface and powerful features, Any Recover makes data recovery a breeze.
![]()
20,000,000 Downloads
Features of AnyRecover
-
It can restore your important data from Windows or Mac, as well as from various storage devices such as hard drives, USB drives, SD cards, SSDs, and more.
-
You can restore lost data resulting from accidental deletion, formatting, virus or malware attacks, device corruption, lost partitions, and other scenes.
-
1000+ file types to restore including photos, videos, documents, emails, archives, etc.
-
Recover apps' data without Backup.
-
It can work on Wins, Mac, iOS and Android.
How to Use AnyRecover to Get Back Lost Data?
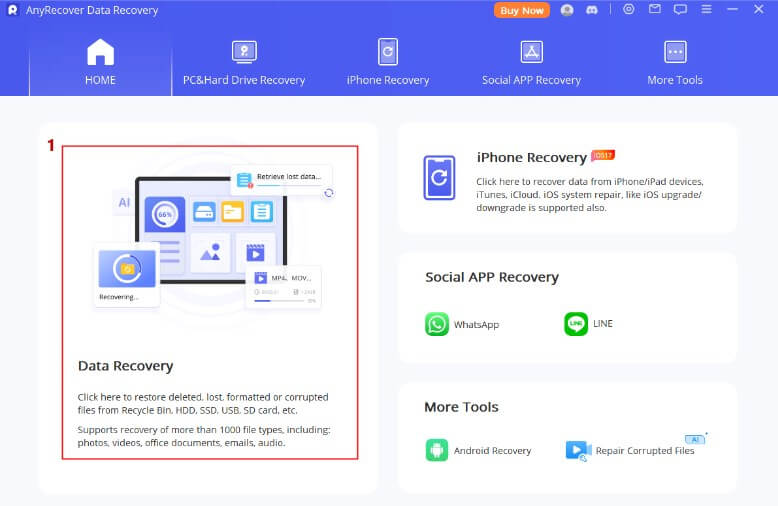
Step 1 SFirst, download and install AnyRecover. Go to "Data Recovery" and select the location where you have lost the data.
Step 2 The tool will quickly start scanning that drive for all the lost or deleted files. After that, you can choose the file.
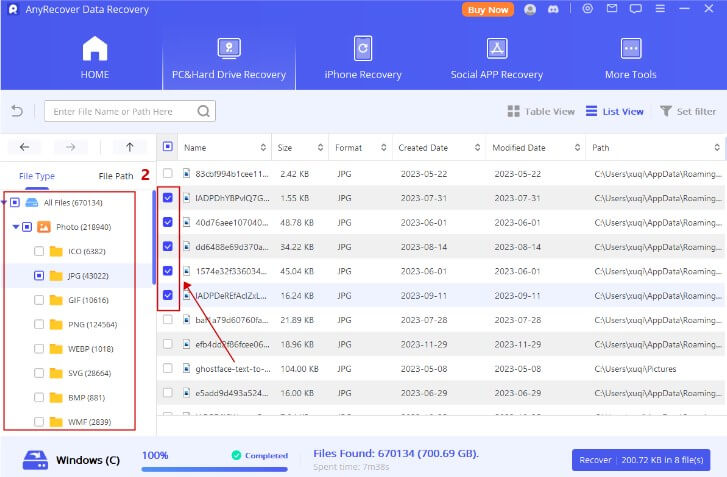
Step 3 Hit the Recover button. Then you can recover the data on your device.
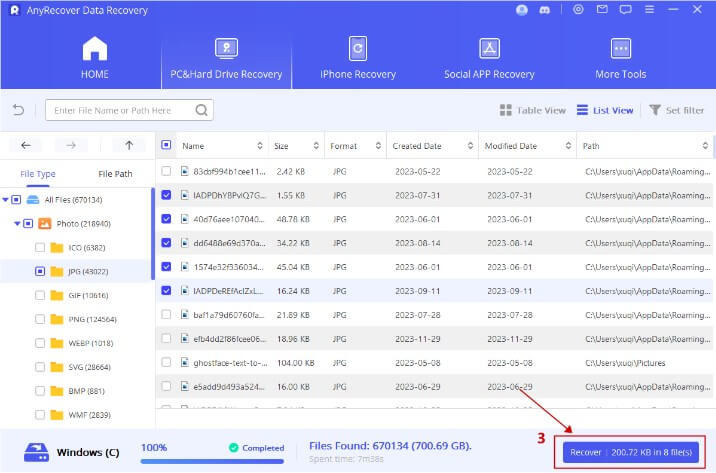
That's how you can recover the lost data or files after facing the the computer has rebooted from a bugcheck Windows 11 issue.
FAQs about The Computer Has Rebooted From a Bugcheck
What is the computer has rebooted from a bugcheck 0x00000116?
This code means that the graphics driver has failed to respond to a command within the allotted time. This may be due to a faulty or outdated driver, a corrupted video card, or a power supply issue.
What is the computer has rebooted from a bugcheck 0x00000d1?
This code means that the system has attempted to access an invalid or nonexistent memory address. This may be due to a faulty or outdated driver, a corrupted hardware device, or a malware infection.
What is the computer has rebooted from a bugcheck 1001?
This code means that the system has encountered a hardware error and has reported it to the Event Log. This may be due to a faulty or overheating component, a power surge, or a physical damage.
Conclusion
So now you know how to tackle the computer has rebooted from a bugcheck. All you have to do is follow the steps given above and you will end up resolving the issue within just a few minutes.
But if you have lost the data during or after the computer has rebooted from a bugcheck error, you can use AnyRecover to recover your important data files.
Related Articles:
Time Limited Offer
for All Products
Not valid with other discount *
 Hard Drive Recovery
 Deleted Files Recovery


