10 Ways to Solve Attempted Write to Readonly Memory Problem
When you come across "attempted write to readonly memory", you are likely to stress about how to solve the issue. The last thing you want is to be bothered by a blue screen of death or BSOD error. It does not matter if you are using Windows 7, Windows 8, or Windows 10, BSOD errors can occur. If you experience the blue screen error, it is important that you do not worry as we have prepared the perfect post just for you. It takes a close look at the top 10 ways to solve "attempted write to readonly memory" problem.
Windows 10/8 users might see that their computer screen states that their PC has run into problems and requires a restart. On the other hand, Windows 7 users would notice that their screen states that an attempt has been made to write to readonly memory and Windows x000000be. In both the cases, our post will come in handy.
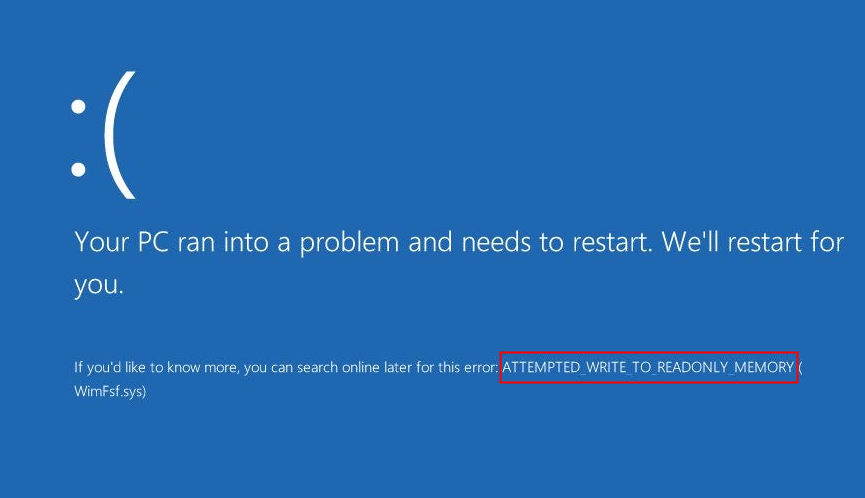
Part 1: Something You Need to Know About "Attempted Write to Readonly Memory"
1. What Is "Attempted Write To Readonly Memory"?
Before we take a look at how you can restore your Windows PC from BSOD issue, you first have to understand what attempted write to readonly memory is. You might think that you can simply restart the PC to take care of the problem. However, it requires more attention. The error Windows 0X000000BE occurs when the driver attempts to use the readonly segment of the computer memory. Now, in case the system successfully identifies the driver causing the error, it would mention it close to the stop message.
2. What Causes "Attempted Write To Readonly Memory "?
The following are some of the reasons why the "attempted write to readonly memory" might occur.
-
Corrupt driver of your device.
-
The firmware software may be incompatible.
-
Malfunctioning system services.
Part 2: How Do I Fix "Attempted Write To Readonly Memory"?
Once you have a better understanding of attempted write to readonly memory, you can dive deeper to find out how you can fix the issue on your own.
Way 1: Enter Safe Mode
One of the ways to fix "attempted write to readonly memory" is by entering safe mode. You might have switched to safe mode when you forgot to shut down the computer and simply turned off its power supply. Safe mode is meant to help ensure that the computer is capable of tackling the problem on its own. Before you try any other method to solve the issue, you must enter safe mode as required. It will ensure that the right step is taken towards resolving the matter.
-
If you are a Windows 7 user, it is advised that you reboot your PC and hold F8 to enter Advanced Boot Options. Select Safe Mode by using the arrow keys. They will allow you to solve the error.
-
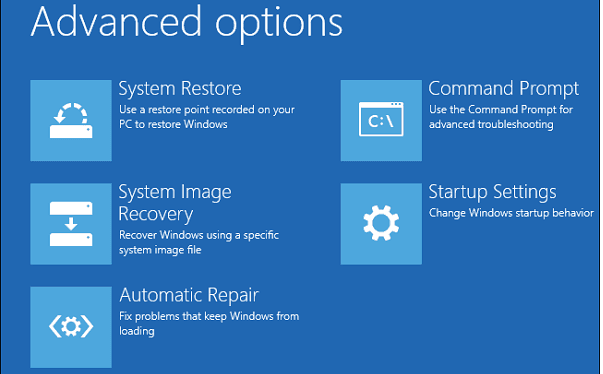
As for Windows 10/ users, you have to select repair installation disk and restart the computer, Then press Shift + Restart buttons at the same time, go to Troubleshoot > Advanced options > Startup Settings > Restart. After that you can hit F4 to activate safe mode.
Way 2: Remove Newly-Installed Software
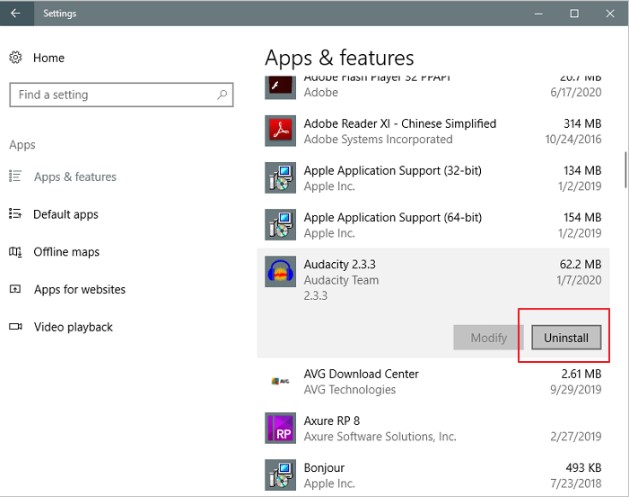
Another way to solve "attempted write to readonly memory" is by removing newly-installed software. Uninstall recent software to deal with the BSOD error. There is a possibility that the new software that you have installed onto your system might be attempted to write to readonly memory.
-
To uninstall recently downloaded software, you need to head over to Settings.
-
Then, select Apps and click on Apps & Features.
-
Finally, select the application that needs to be installed by clicking on Uninstall.
Way 3: Check Windows Update
If the above options do not help, there is no need to worry as you might just need to update Windows to fix the stop code "attempted to write to readonly memory". Keep in mind that Microsoft suggests not to install any service packs or updates when it is running on safe mode unless it does not start normally. The reason behind this is that the specific drivers tend to be unavailable in the mode. Here is what you need to do.
-
Simply open your browser and head over to Microsoft update catalog.
-
Next, enter "kb" to the search box. Then, it will show you the required update.
-
All you have to do is hit download and install the update.
-
Finally, the PC will restart to resolve "attempted to write to readonly memory".
Way 4: Check Computer RAM
In order to resolve the Windows 10 BSOD error, you might also want to check your computer's RAM. This error is connected with the memory of your computer. It is common for a shortage of storage space to result in the BSOD.
Way 5: Run Windows Memory Diagnostic
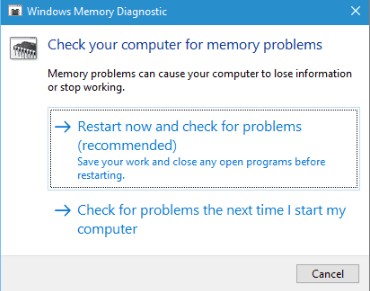
If there is a memory issue, you will need to run Windows Memory Diagnostic. The following steps will enable you to determine if your computer's memory is working as it should be.
-
Firstly, you need to hold Win + R for opening the Run dialog command box.
-
Next, you simply have to enter "mdsched.exe" into the blank space and hit OK.
-
Choose Restart now and check for problems for detecting memory issues.
-
Now, the Memory Diagnostic tool would scan the computer automatically to scan for errors.
-
The tool would replace the current device so that the issue is resolved.
Way 6: Run Troubleshooter
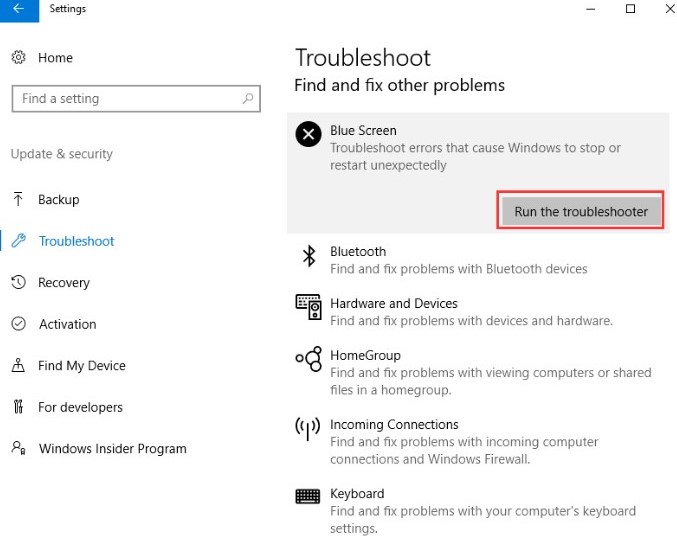
When trying to solve "attempted write to readonly memory", it is a good idea to give the troubleshooter a try. It might prove helpful. Here is how you can use it.
-
Click on the Start button in safe mode and select Settings.
-
Next, head over to Update & Security and click “Troubleshoot”.
-
Now, you just have to find the blue screen and select Run the troubleshooter.
-
Finally, the on-screen wizard will guide you to perform the fix.
Way 7: Run CHKDSK
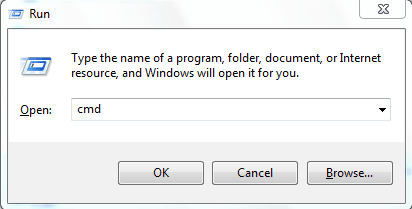
To remove "attempted write to readonly memory", you might want to consider running CHKDSK. This error would occur when there is a system file error, or also in case of a bad sector error. If the options mentioned do not work, you have nothing to stress about. You just need to remain in safe mode; now run CHKDSK for repairing defective system files and bad sectors. As you are already in safe mode, you just need to follow the steps mentioned below.
-
Firstly, hit the Windows+R keys. Now type and enter "cmd".
-
Next, right-click the Command Prompt.
-
Select Run as administrator.
-
Enter "sfc /scannow" in the field.
-
After the scan is complete, you will need to run the command "chkdsk E: /f /r /x". The alphabet "E" represents the drive that you want to fix.
It is also possible to use a CHKDSK alternative tool. You can download a reasonable tool from the internet and use it to fix the issue. It will simplify the work. However, it is not necessary to use a tool as you can do the work directly by following the steps mentioned above.
Way 8: Update Your Device Driver
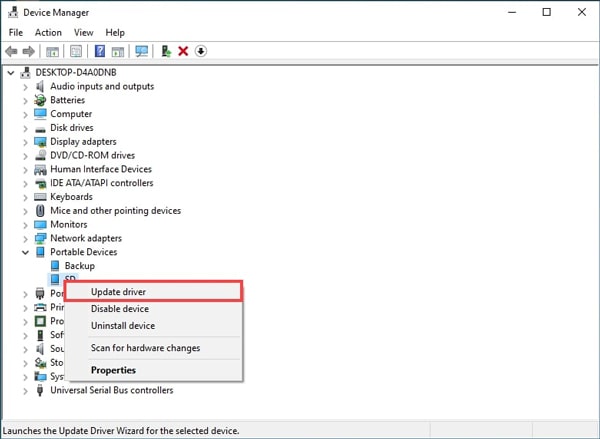
In order to resolve the "attempted write to readonly memory", simply update the device driver. Once in safe mode, you can update the drive as a corrupt or faulty device drive might be to blame. By updating the device driver, you will fix the issue. Here are the steps you need to follow.
-
Right-click the Windows button and choose Device Manager.
-
Next, you should check for the faulty driver which would be displayed with a yellow colored triangle.
-
Click Update driver by right-clicking the driver.
-
Choose Search automatically for updated driver software.
Way 9: Update BIOS
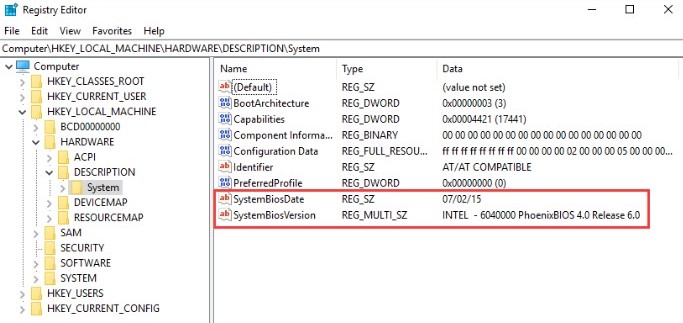
Finally, you can also update BIOS to resolve "attempted write to readonly memory". Updating BIOS is rather straightforward. Before you can update BIOS, you have to check your current BIOS version in the Windows Registry. Here is how you can do this.
-
Hit Windows + R and type "regedit" into the Run box for opening the Registry Editor window.
-
Click "HKEY_LOCAL_MACHINE" > "HARDWARE" > "DESCRIPTION" > "SYSTEM" to open the right Registry window.
-
It will show you the SystemBiosVersion and SystemBiosDate keys which you will need to note.
Now that you know your BIOS version, you simply need to head over the manufacturer's website to download the latest version.
Way 10: Run System Restore
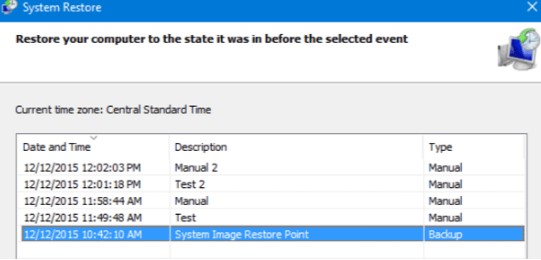
In addition to the above, you can also get rid of "attempted write to readonly memory" by running system restore. System restore is a proven solution for a variety of issues. It should be considered as the last solution for getting rid of attempted write to readonly memory. A pro tip that you should always remember is backing up the system on a regular basis. The following steps cover how you can run system restore to resolve "attempted write to readonly memory".
-
Turn on Windows and hit F8 + Shift.
-
Next, click on Repair Your Computer.
-
Once Windows repair mode is ready, you simply have to click OK when it asks to choose keyboard.
-
Select your account and click OK. You will also need to enter the password.
-
Select System Restore from the System Recovery options. It should show you all of the Windows restore points.
-
Choose the correct restore point. It should have been created when your PC was safe and sound.
-
If you do not see all of the restore points, you will need to check “Show more restore points”.
-
Finally, hit “Next”. Now, you will only need to wait while Windows restores the PC to the selected point.
Conclusion
After you have gone over our post about how to solve "attempted write to readonly memory" in 10 ways, you will have no trouble resolve the issue. The steps have been clearly mentioned so that you can handle the issue in as little time as possible.
Time Limited Offer
for All Products
Not valid with other discount *

 Hard Drive Recovery
 Deleted Files Recovery
