4 Ways to Resize Partition in Windows 11/10 without Data Loss
Newly purchased PCs are usually single-partitioned. Conversely, you can buy a PC with more than one scant partition. But these partitionings generally tend to be monotonous. Therefore, you can alter its partitionings by resizing it.
Resizing a partition is the process of re-allocating the disk space in a Windows 11/10 computer by shrinking or extending the partitions to utilize the disk space effectively.
Some of the significant reasons to resize partition Windows 11/10 are;
-
To fully utilize the disk space. It is not easy to account for all the data on your hard disk. You can therefore opt to resize the partitions in the hard drive and make utmost use of it.
-
To get rid of the 'running out of space' notifications. There is usually an auto-generated notification of "You are running out of space," The only way to curb this is by partitioning.
-
To perform a dual-booting compute. You can decide to have more than one operating system (Microsoft Windows and Ubuntu) running on the same hard drive. In doing so, space must be sufficient space and the best way is to partition the hard drive.
Moreover, computers tend to decrease in their performance when the storage space in the local disk C is insufficient. At this point, partitioning remains to be the best solution.
This article gives a detailed solution on how to resize partition in Windows 11/f10 without data loss, let’s check out.
Comparison Table of the Resizing-Partition Methods
|
|
||||
|---|---|---|---|---|
|
Ease of use
|
Easy
|
Easy
|
Complex
|
Easy
|
|
Needed time
|
A few minutes
|
A few minutes
|
More time
|
More time (extra time to download tool)
|
|
Compatibility
|
Only applicable starting with Windows 11/10 build 20197
|
All window devices
|
All window devices
|
All window devices
|
How to Resize Partition in Windows 11/10 without Data Loss?
Often, most people tend to slack off when it comes to resizing partitions in their Windows 11/10 computer due to fear of data loss. Don't let that fear also take over your mind since here are the best methods to safely resize partition in Windows 11/10 for free.
Method 1: Manage Disks and Volumes in settings
Here are the simple steps to resize partition in Windows 11/10 by managing disks and volumes in settings.
Here, it would be best to keep in mind that this method is only applicable starting with Windows 11/10 build 20197.
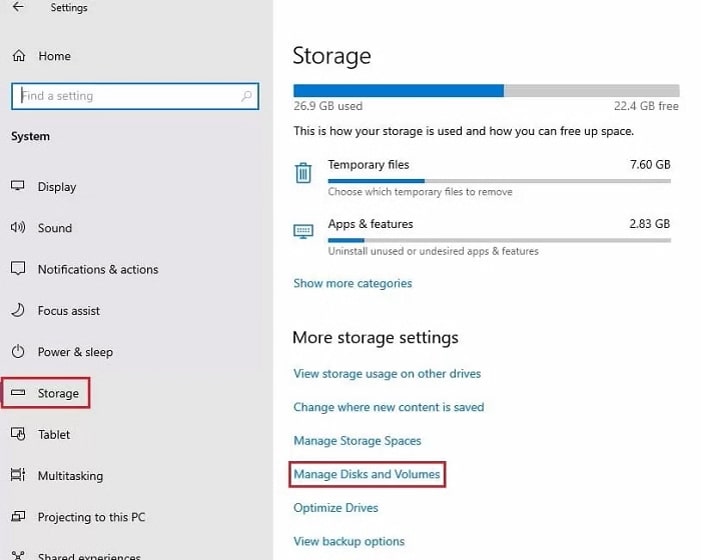
Step 1 Click on the Start menu, select 'Settings'. A new window will open displaying various options; settle on the 'System' option.
Step 2 Scroll down and select the 'Storage' option. On the right, scroll down and choose 'Manage Disks and Volumes'.
Step 3 Click on the arrow button, which is usually next to the drive. Then select the partition that you would like to extend. i.e., Local Disk E. Click on its 'Properties'.
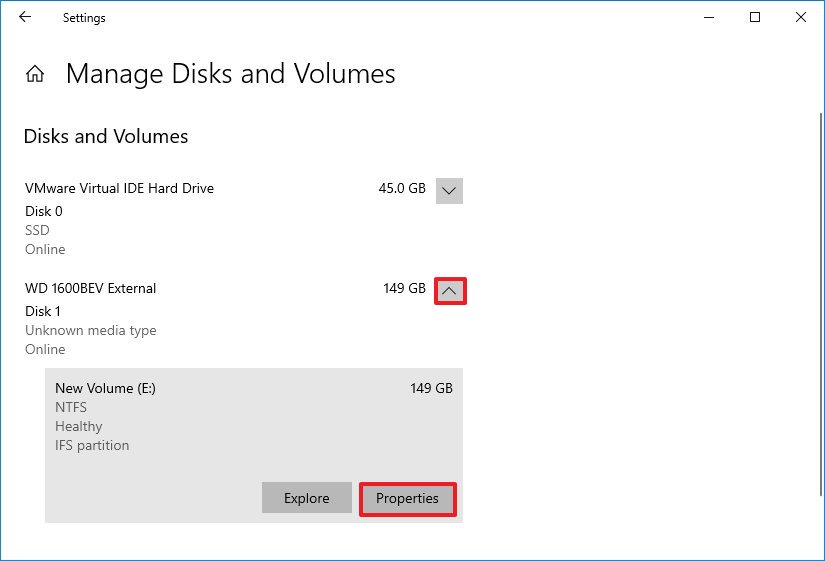
Step 4 A new window will display the properties of your hard disk. Hit the 'Change size' button.
Step 5 Key in the amount of space you would to add to this volume or partitions - Usually, in MBs, then click “OK” and it’s finished.
Method 2. Resize Partition by Disk Management
Another effective way to resize partition in Windows 11/10 without losing data is through disk management. With this built-in utility, you can either shrink or extend a partition. And you need to make sure that there is sufficient unallocated space.
Here are the simple steps on how to resize partition Windows 11/10 by shrinking or extending volume in Disk Management.
Step 1 Open the Disk Management. Clicking on Win + X buttons and select Disk Management from a list of options. At this point, you’ll see all your disk partitions listed.
Step 2 Select the partition you want to resize, then
--To shrink the partition, then right-click on it and select 'Shrink volume'
--If you would like to extend the partition, right-click on it, then select 'Extend Volume'
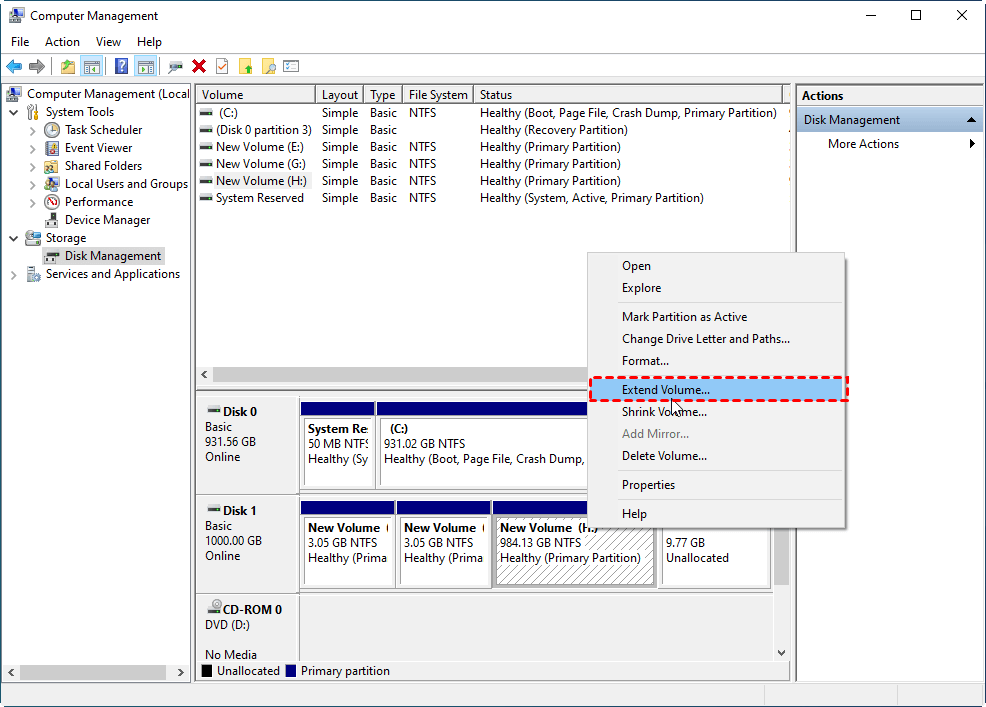
Step 3 Input the amount of space you would like to shrink or extend, and then the hit the corresponding button.
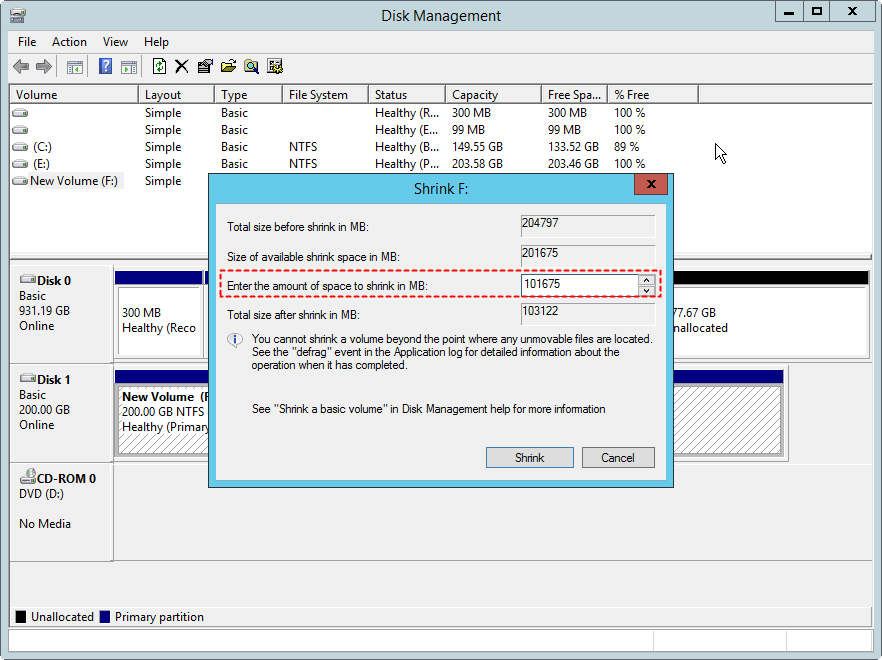
When done, you will be able to see all the operations that you made. And you can repeat the process on different partitions.
Method 3. Shrink/Extend Volume by Diskpart Command
Diskpart is a command-line disk partitioning utility that lets you manage your drives by performing different commands. Therefore you can also resize partition in Windows 11/10 using the Diskpart command.
Ensure the partition to be resized is either in the ‘RAW’ or ‘NTFS’ format and that there is enough unallocated space on the right side and contiguous to the target partition.
But this method is for specialized users, as the procedure is a bit complicated.
Step 1 Launch Diskpart
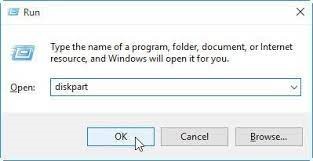
First, type in 'diskpart' in the search box. Or alternatively, you can press 'WIN + R' to bring up the Run box, and type in 'diskpart,' then click on the enter button. Allow Diskpart to run on your computer.
Step 2 Input the following commands in order and hit Enter
-
list volume: you should be able to see current volumes of your hard drive.
-
select volume x: x refers to the number of the disk you want to shrink or extend.
Step 3 Extend or shrink volume
-
To extend a volume: type ‘extend size=xxxx’ then click the ‘Enter’ button. Here, xxxx refers to the disk space size (in MBs).
-
To shrink a volume: type ‘shrink desired = xxx’ and hit the ‘Enter’ button. The xxx represents the size of the partition you wish to shrink.
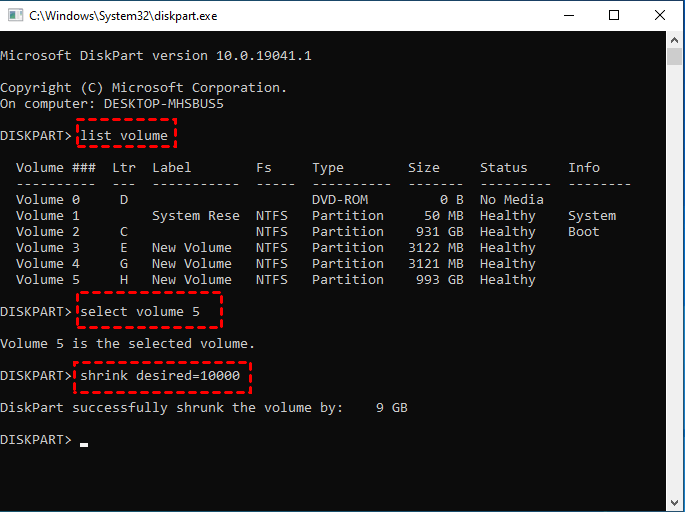
Step 4 Type exit to finish and close Diskpart.
Method 4. Use Free partition Manager Tools
When the above three methods haven't worked for you, you can try using free partition manager tools.
These are third-party tools are relatively simple to use. Some of the popular tools are Disk Genius, Ease US, MiniTool Partition Wizard, and Paragon Partition Manager.
Disk Genius
This is an all-in-one solution for Information Technology professionals. It’s capable of a quick data recovery, backup and restore, partition management, and other disk utilities. Use it to freely partition your disk in simple steps.
EaseUS Partition Master
EaseUS is another tool that will quickly partition your disk as desired. Once you download it, install and allow it to run on your computer. Then select a drive to partition, extend the partition and confirm your partition space before effecting the changes.
MiniTool Partition wizard
This free partition tool will organize disk partitions for best results. Besides, you can use it to check file system, measure SSD performance, align SSD partition, and even convert FAT file formats to NTFS for better functionality.
Paragon Partition Manager
This tool is absolutely free for home and personal use. With Paragon, you can resize and move partitions by adjusting them to desired sizes. Simpy slide the partition to left and right or just enter the partitions size you want to use. The undelete partitions feature lets you recover any volumes and data you have deleted accidentally. You can also expand your partitions and change label of a partition for improved data organization.
Tips on Resizing on Windows 11/10
-
Before resizing, you need to double-check your hard disk storage space and its compartments. Resizing tends to be unsuccessful when space is insufficient. You can opt to transfer your files and folders to an external hard drive before this.
-
Formatting isn't necessary when shrinking your hard drive. When resizing partition in Windows 11/10 by shrinking, your computer will automatically relocate your files safely to the other partitions. Therefore formatting is not the only solution.
-
When your Local Disk C is filling up unnecessarily, your file system is corrupt by malware attacks. You, therefore, need to fix it before opting to partition it.
-
Averagely, the shrinking time for a 10MB file is usually 1 min.
Bottom Line
Undeniably, partitioning creates room for logical and systematic storage of data. When you resize partition on Windows 11/10, it minimizes errors such as data loss, and thus, in the long run, it increases work efficiency.
When looking for a way to partition your hard disk, you need to try either of the above four vividly illustrated methods. Consider the requirements and their ease of use before settling on one.
Time Limited Offer
for All Products
Not valid with other discount *

 Hard Drive Recovery
 Deleted Files Recovery
