The Best Way to Run Windows 10 from a USB
When a Windows oerating system becomes corrupted and crashed, it may be unable to boot and you cannot access the hard drive data. At this point, it may be great to just run your Windows from a portable USB drive. You just have the Windows software on the drive and input it into the laptop whenever you want to use it. The use of USB running of the Windows is quite beneficial as it allows PCs to boot properly without any issue or hassle and also allows for storage of larger files since there'd be space for you.

Part 1: Can You Run Windows 10 from a USB Drive?
Of course, you can. You can run a Windows 10 from a USB stick but with some conditions. Do not fret, we meant requirements.
-
The USB must have at least 16GB of free space (but preferably 32GB of free space.)
Also, you will be needing a Windows license and a 25-character product key. The license can be purchased on the Microsoft official site.
Part 2: How Do You Run Windows 10 from a USB Drive?
This is the part of this article where the mystery is unveiled and the knowledge of the "How" is made known. Now, let's get down to it.
The following steps will help you run Windows 10 perfectly using the USB drive:
-
Firstly, you need to create a Windows 10 ISO file that will be used to install the Windows into the USB drive.
-
Sign in to your Windows 10 device and visit the Windows 10 website.
-
Download the latest version by clicking on the Download tool now button.
-
Save the downloaded file. Locate the downloaded file in your folder, then double click on MediaCreationTool.exe to open the file.
-
A new window opens, click on Accept to agree to the terms and conditions.
-
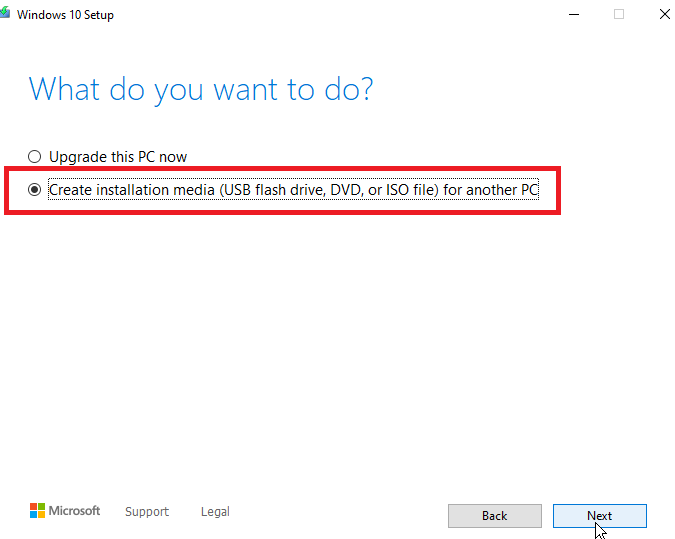
After that, another window opens where you check the box for create installation media (USB flash drive, DVD, or ISO file) for another PC option radio button and click Next.
-
Then, select the correct information of Windows 10 (edition, language, and architecture) and click Next.
-
The next page will ask to "choose which media to use", select the ISO file option and click Next.
-
Choose a location for the file to be stored on your hard drive. Click on the Save button.
-
The ISO file will be created. Click on Finish when it is done.

After all these:
-
Insert the USB drive into your computer.
-
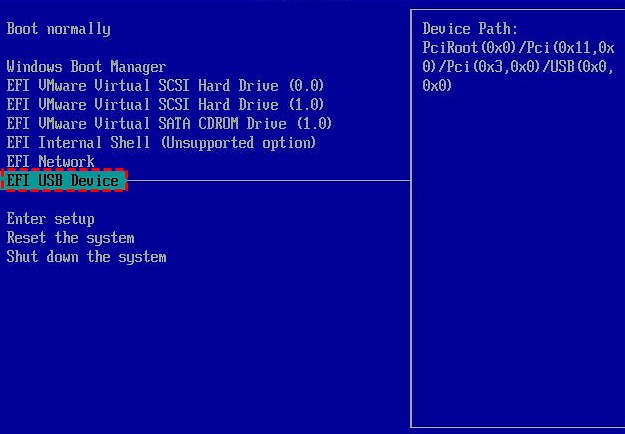
When the computer reboots, press the F11 or F12 key.
-
The boot menu will appear, choose the targeted drive and press Enter.

The steps of how to run Windows 11 from a USB are similar.
Part 3: Pros and Cons of Running Windows 10 from USB
The running of Windows 10 from the USB has its advantages and disadvantages. These will be itemized as follows:
Easy installation: It is much easier to install Windows on a computer using the USB rather than using the disk itself.
Convenient: It is easy to just carry a small USB with the Windows file in it than carrying a CD of the Windows around.
Security: There is no fear of scratching that could cause problems while installing.
Loss: The USB is quite portable, making it easier to get lost at any time.
Long process: It takes a long process of installation than the traditional disk method
FAQ: How to Install Windows on a New PC from a USB Flash Drive
You see! These are two sides of the same coin. How do we mean? You can transfer Windows into a USB drive and also download Windows from a USB drive. Get the drift? Guess you do. Enough of telling you how to do the former, let's give you a little secret on how to do the latter. Installing Windows from a USB drive is not much of a herculean task, it's as easy as doing the reverse. So, here's how it is done:
-
Insert a USB with at least 5GB free space on your computer.
-
Click Start and select Disk Management.
-
Right-click on the drive and select Format. You could choose the FAT32 file system.
-
After that, right-click the USB and select Mark Partition as Active.
-
Use File Explorer, copy and paste everything of the Windows product DVD or ISO to the USB flash drive.
-
Insert the USB drive to another new computer.
-
Launch the computer and press Esc, F10, or F12 keys. Then the boot-device selection menu will appear.
-
Choose boot the PC from the USB flash drive.
-
When Windows setup opens, install the Windows by following the on-screen instructions.
Time Limited Offer
for All Products
Not valid with other discount *
 Hard Drive Recovery
 Deleted Files Recovery

