How to Fix Chrome Not Opening on Windows 11/10
Windows 11 is the much-awaited new version of the popular operating system. However, after updating to Windows 11, many users have reported several issues, like the Chrome not opening on Windows 11. Fortunately, there are multiple solutions to any of the issues you might encounter after you install the new update.
In this article, you will learn 17 ways to stop Google Chrome from crashing on your computer. And these methods are also applicable for Windows 10. Read on.
Part 1. Why Is My Google Chrome Not Opening?
The Chrome not opening on Windows 11/10 issue is clearly related to some software bugs. First of all, Google Chrome’s application might keep crashing. In this case, updating the application or re-installing it will troubleshoot the issue. Moreover, you might encounter crashing Chrome because some other applications on your computer are affecting it. Lastly, this issue might come from Windows 11 instability. At the moment, this version of the operating system is still in the early stage, and so, many issues might arise.
Part 2. 17 Solutions to Chrome Not Opening on Windows 11/10
1. Close the Chrome in Task Manager
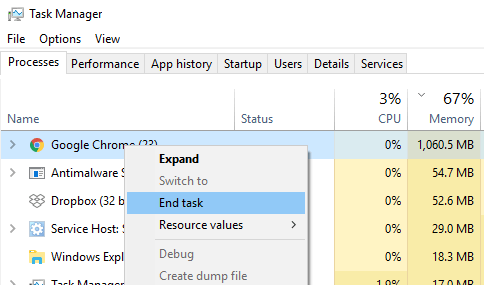
The first and simplest solution to the Chrome not opening on Windows 11/10 issue is to close the task through the Task Manager and then relaunch the app. This process is very easy and can effectively solve the minor software bugs you will come across. The steps for doing it are the following:
-
Press Ctrl + Shift + Esc to open the Task Manager.
-
Find Google Chrome under the Apps section. Right-click on it and click End Task.
-
Then, try relaunching your browser.
2. Run Chrome as Administrator
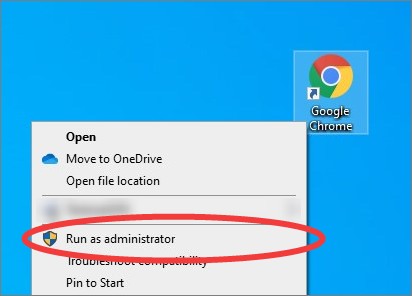
Another simple solution that usually solves all minor software bugs, including the Chrome not opening on Windows 10/11, is running the app as an administrator. Find the application’s icon on your desktop and right-click on it. Then, click the Run as an administrator option, and click Yes on the pop-up window.
3. Adjust Date & Time Settings
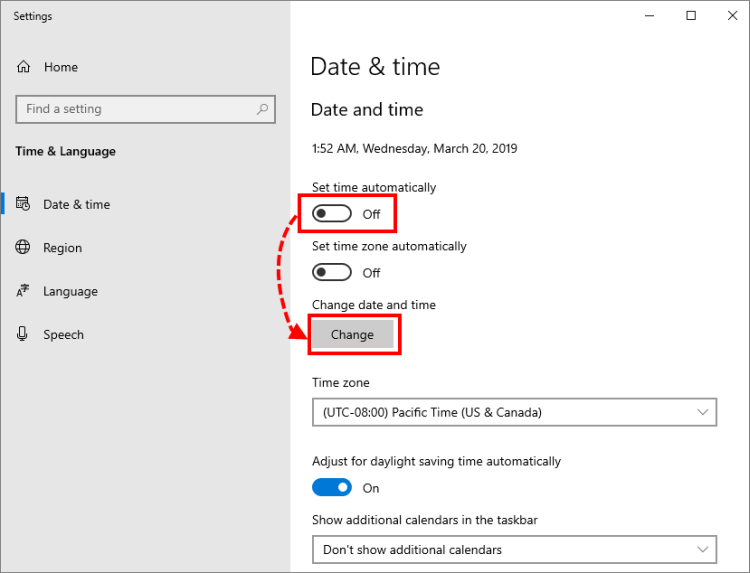
After the Windows 11 update, the date and time of your computer might need to be readjusted because of the instability of the operating system. In some cases, incorrect time and date are influencing the way that your installed apps work, which may lead to the Chrome not opening issue on your computer. To change the date on your Windows computer, you will need to do the following:
-
Hover over the time and date on your taskbar and right-click on it. Click the Adjust date/time option.
-
On the new window, toggle the switch off next to the Set time automatically option.
-
Then, click the Change button under the Change data and time option.
-
Fill in the date and time and click the Change button again.
4. Disable Autohide Taskbar
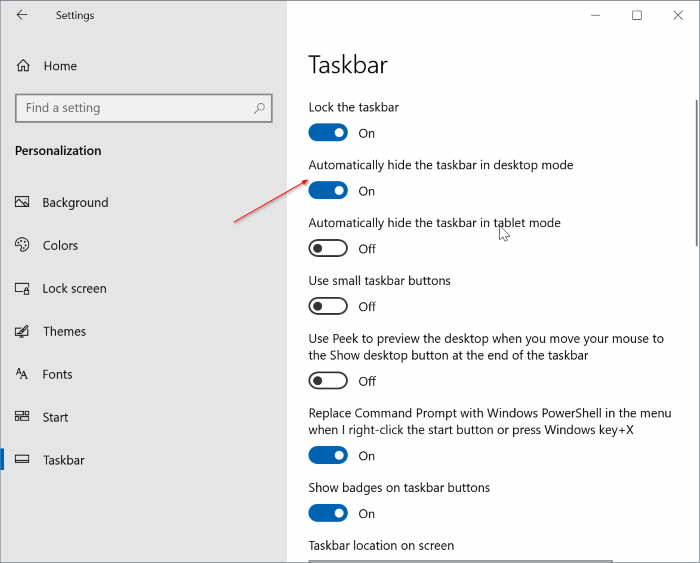
Another possible solution to the Chrome not opening on Windows 11/10 issue is to disable the auto-hide feature of your taskbar. The process for changing this setting is the following:
-
Right-click anywhere on your taskbar and choose the Taskbar settings option.
-
Once you do that, you will see a list of personalization options. The first one is to automatically hide the taskbar. Toggle the switch next to this option to disable it.
5. Disable the Antivirus Software
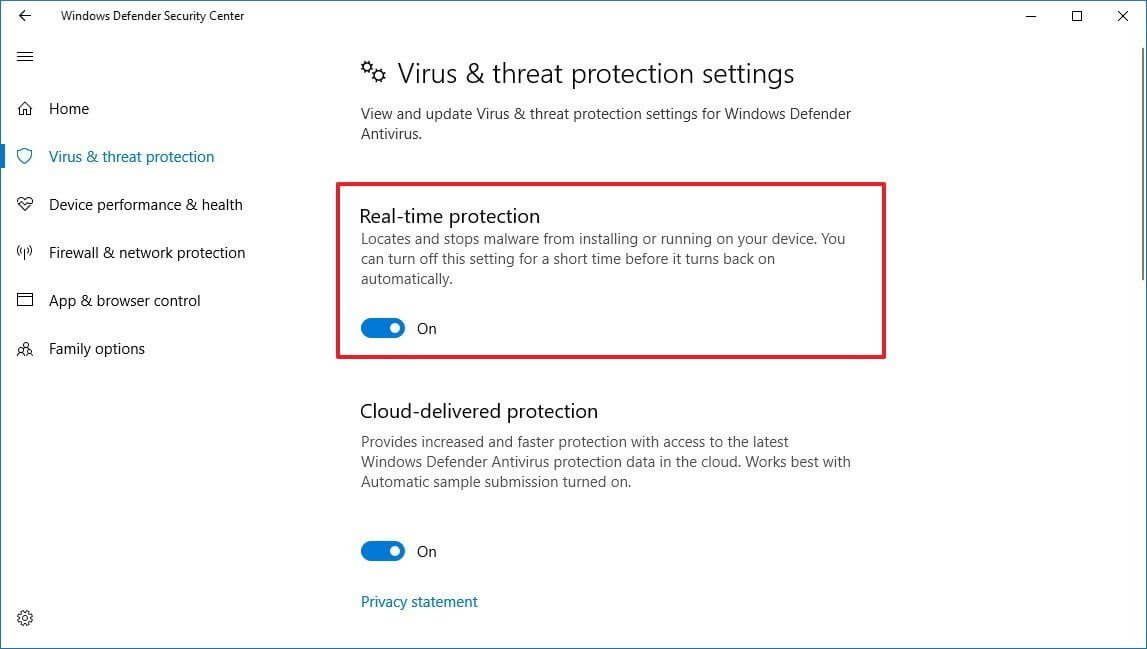
After the Windows 11 update, your antivirus software might start messing with your applications as it might recognize them as potential threats. And that’s why your Chrome not opening on Windows 10/11. If this is the case, you will need to disable your antivirus. Every third-party software has a different process for turning off the antivirus, so you will have to follow its specific instructions. For Windows Defender, the process is the one described in the steps below:
-
Go to Settings > Update & Security >Windows Defender Security Center.
-
Then, click Open Windows Defender Security Center.
-
Click the Virus & threat protection link from the sidebar.
-
On the new window, toggle the switch off for Real-time protection and Cloud-delivered protection to disable your antivirus.
6. Restart the Computer
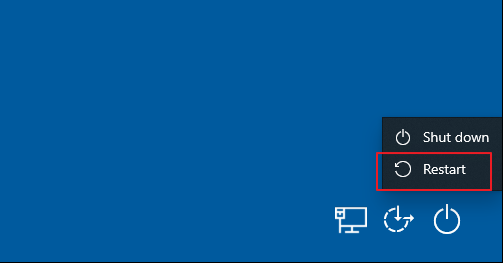
One more solution that can usually fix the majority of minor issues on your electronic devices is restarting your computer. If the applications get stuck or there is a software back, then a reboot will eliminate it. For this reason, once you notice that Chrome is crashing or lagging, you can restart your computer and try launching your browser once more.
7. Run Chrome in Safe Mode
The extensions and add-ons that you have on your browser might be causing the Chrome not opening on Windows 11/10 issue. Luckily, you can easily bypass this issue by running Chrome in safe mode, which will have been disabled by default. To run Google Chrome in safe mode, you will have to follow these steps:
-
Click the three-dots icon within the Chrome, and then click New Incognito Window. By opening your browser in this way, you will not be using any of your add-ons that cause the crashing. You can also open this mode by pressing Ctrl + Shift + N.
-
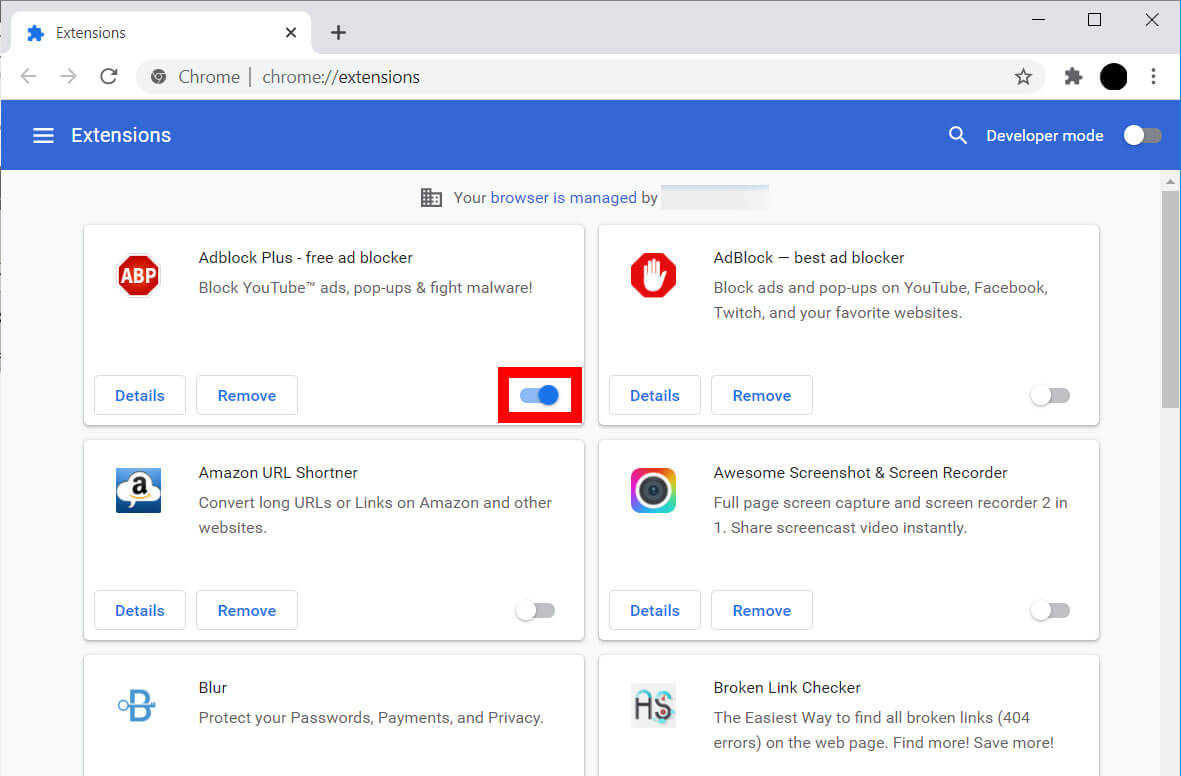
Then, click the three-dots icon once again, and go to More tools > Extensions.
-
On the next screen, you will see all of the extensions you have installed on your browser. Disable the faulty ones by toggling the switch.
8. Clean up the Chrome
The Chrome Cleanup Tool is an amazing feature that allows you to fix your not opening browser in a matter of seconds. This built-in tool cleans your browser, thus eliminating all the glitches. To use the Cleanup Tool, you need to follow these instructions:
-
Click the three-dots icon at the top of your browser, and go to Settings > Advanced > Reset and cleanup.
-
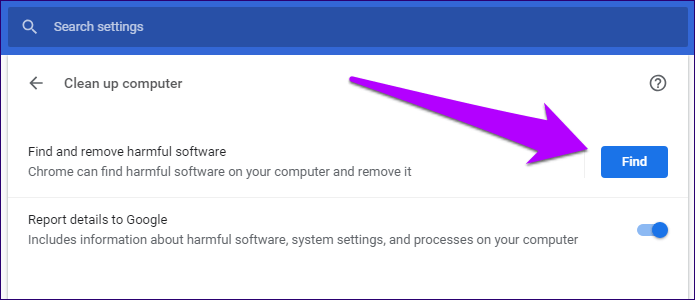
Then, click the Clean up your computer option.
-
This will redirect you to a new screen, where you have to click the Find button, and then, Check for harmful software.
-
Once Chrome finishes scanning your computer, it will let you know of the files that are affecting the browser’s performance. At this stage, you can choose to remove these files and disable the harmful extensions.
9. Delete the User Profile
In some cases, the user profile on Chrome’s folder has been corrupted, a thing that might affect the browser’s performance. Therefore, if you notice that Google Chrome doesn’t open on Windows, you can try deleting the user profile altogether. The process for completing this task is the following:
-
Open the Run dialogue box by using the shortcut Win + R.
-
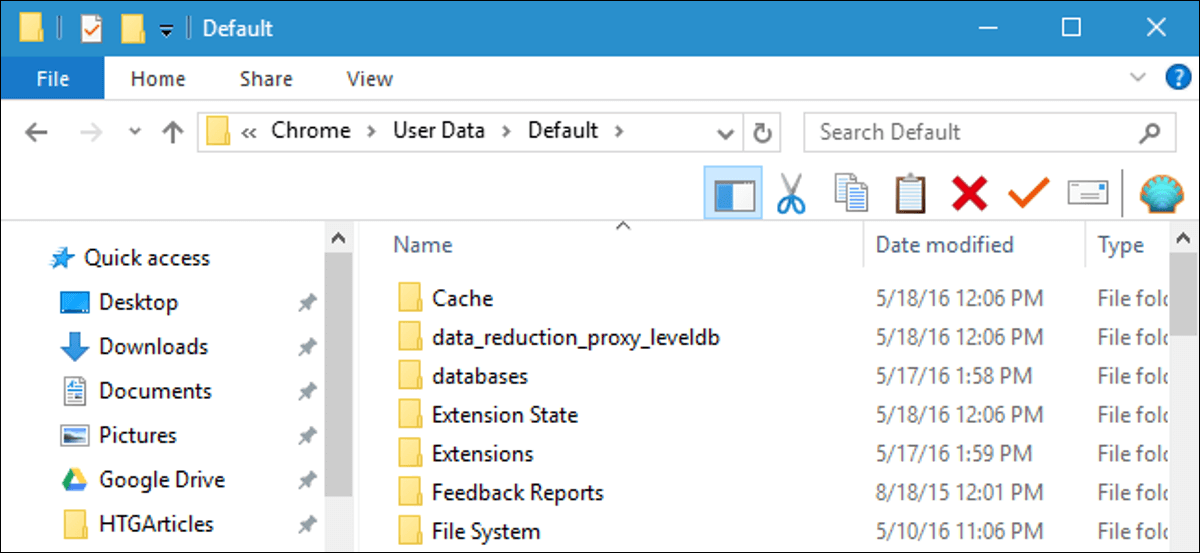
Type %USERPROFILE%\AppData\Local\Google\Chrome\User Data to quickly access the data in the Chrome folder.
-
Locate the Default folder and copy it. Then, go to a location and paste this folder to keep a backup of your data.
-
Then, you can delete the original folder. Once you have done this, relaunch your browser.
-
After Chrome has opened, paste the following line in the address bar: chrome://settings/resetProfileSettings
-
Then, you will see a pop-up window, where you will have to click the Reset settings button.
10. Rename the Chrome
This method has been proven to be very effective for many users that have encountered the Chrome not opening on Windows 11/10 issue. To try it, you need to follow these steps:
-
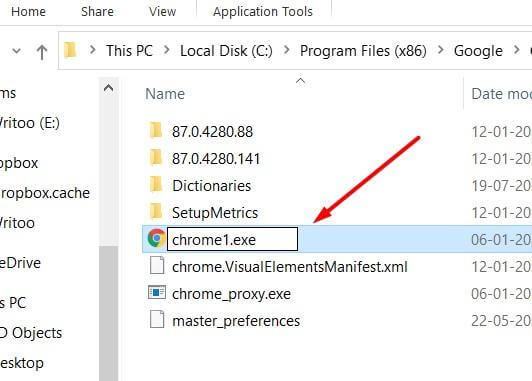
Find Google Chrome on your computer. You can easily do that by opening Windows Explorer and go to the location C:\Program Files (x86)\Google\Chrome\Application. This will automatically take you to the folder where Chrome is installed.
-
Right-click on the app and click the option Rename. Type any name you want.
-
Then, right-click the application once again and click the option Send To > Desktop. This will create a shortcut to the renamed application.
-
Go to your desktop and locate the new shortcut. You can rename it once again back to Chrome.
-
Restart your computer and launch your browser.
11. Reinstall the Chrome
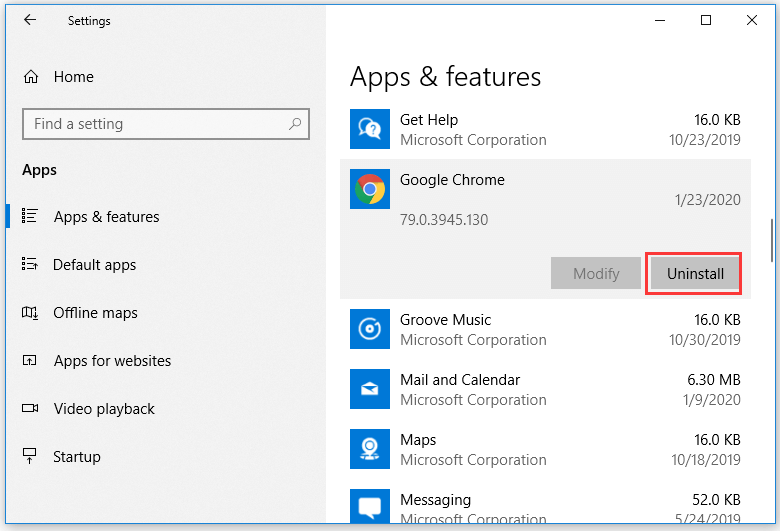
Another drastic solution that you can try is to delete Chrome from your computer and reinstall it. Go to Settings > Apps & Features, and then, locate Chrome and click Uninstall to remove Chrome from your computer. Once you have removed the app, visit the official Google Chrome website to download the installer. Click on it and follow the instruction to reinstall the browser on your Windows 11/10 computer.
12. Run Compatibility Troubleshooter
Another solution that works for most users who have Chrome not opening issue is to run the compatibility troubleshooter. You can easily access it in this way:
-
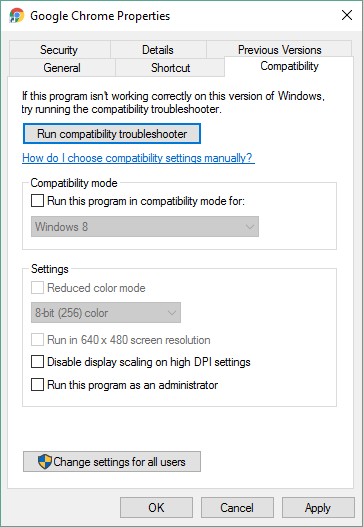
Right-click on Chrome’s icon and click the Properties option.
-
Then, go to the Compatibility tab and click the Change settings for all users button.
-
Once you have done that, click the Run compatibility troubleshooter button and wait for the troubleshooter to complete the scanning.
-
Launch Chrome to check if the issue has been eliminated.
13. Update or Remove Incompatible Applications
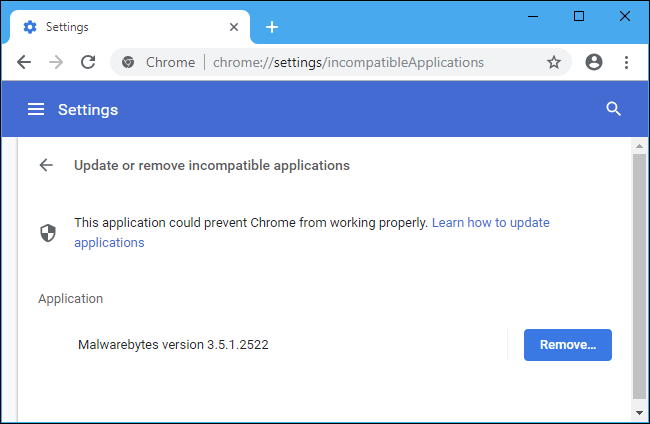
In some cases, the Chrome not opening on Windows 11/10 issue is caused by software conflicts. Fortunately, Chrome has a tool that can detect any such conflicts so that you can remove the apps that cause the problem. To do that, you have to follow these steps:
-
Launch Chrome and go to Menu > Settings > Advanced.
-
If there are some incompatible apps on your computer, you will find there the button Update or remove incompatible applications.
-
Click on this button to see which apps are causing software conflicts.
-
Click the Remove button next to them, and you will be redirected to your computer’s settings to delete them.
14. Uninstall the Unidentifiable Software
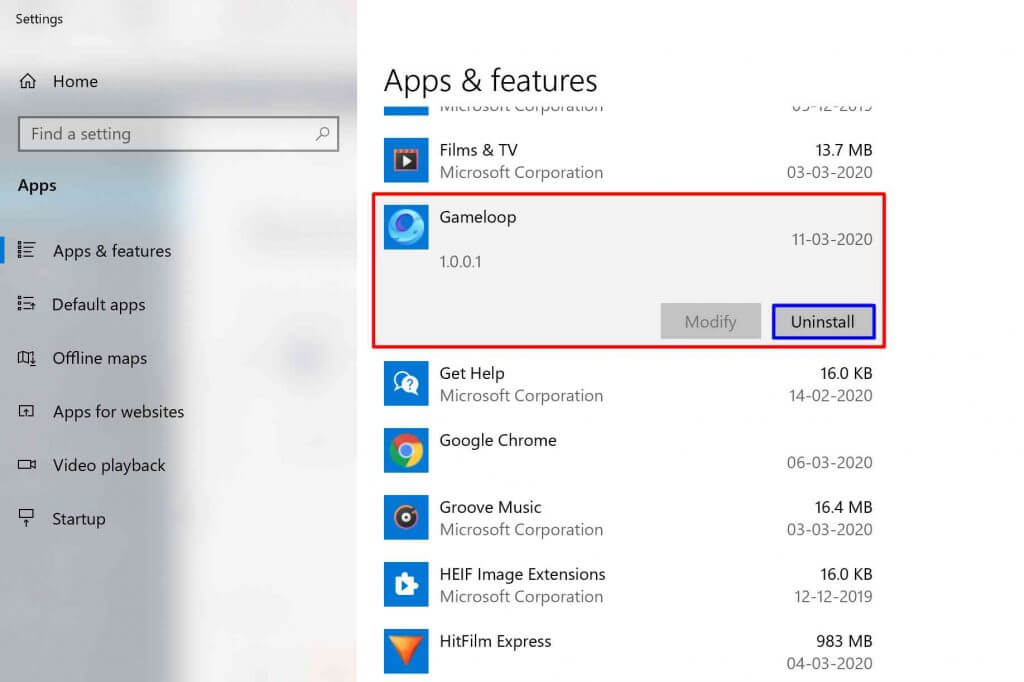
A common cause for Chrome not opening on Windows 10/11 is malware in the form of software on your computer. Therefore, if you remove any software that is not recognized by your computer, you might also solve the issue with your browser. To check that installed software, go to Settings > Apps & Features. Browse the list of your programs and uninstall all the suspicious ones.
15. Adjust Entry Permission of Chrome
The permissions you have allowed on your Chrome can affect its performance by causing glitches and lagging. However, you can easily control the site permissions that you allow. You can do that in this way:
-
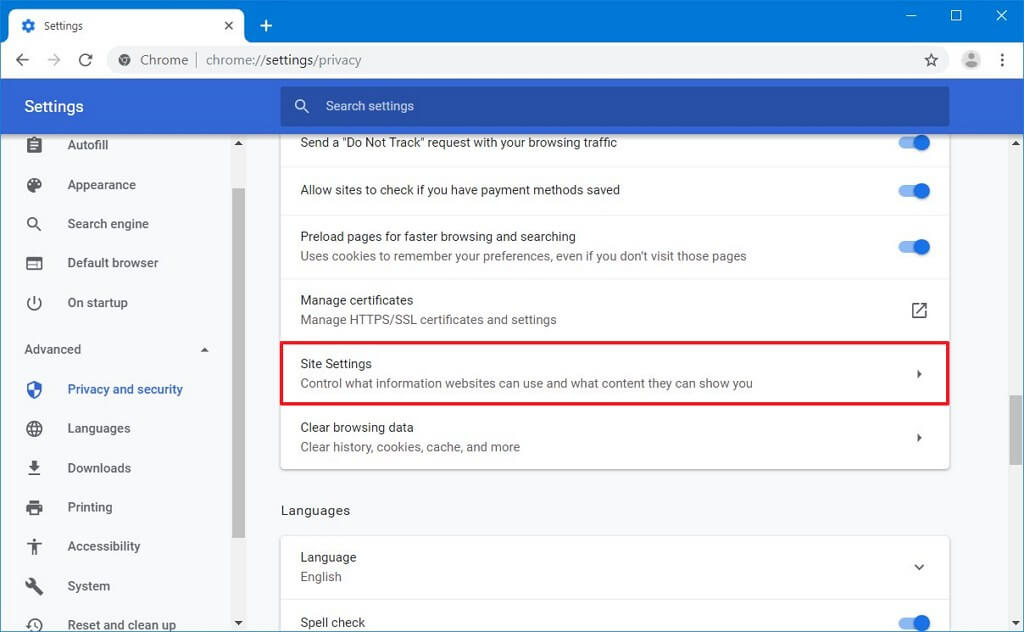
Launch Chrome and go to Menu >Settings.
-
Then, open the Privacy and security section and click the Site Settings option.
-
There, you will find a list of permissions that you can change. Indicatively, you can disable permission for cookies, images, JavaScript, handlers, pop-ups, and ads among others.
16. Reset the Chrome
One more possible solution for Chrome not opening on Windows 10/11 is to reset Chrome’s settings. You can do that in just a few seconds from your browser. In more detail, you can reset Chrome in this way:
-
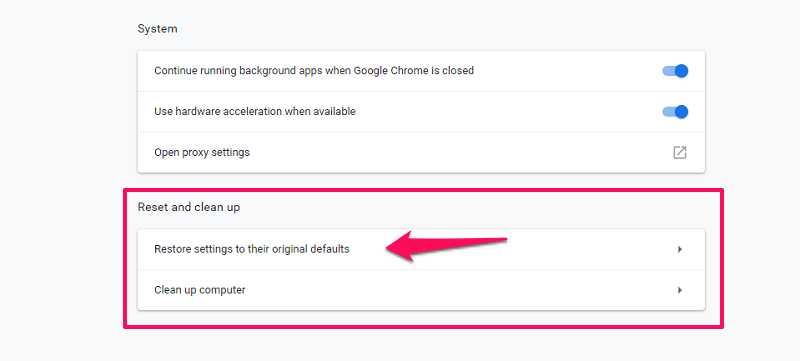
Launch Chrome, and then go to Menu > Settings > Advanced > Reset and clean up.
-
After that, click the Restore settings to their original defaults option.
-
You will now see a pop-up window, where you will have to click the Reset settings option.
17. Reset the TCP/IP Stack and DNS
Lastly, if none of these solutions work and the Chrome can still not open, you can try a more drastic one, which is to reset the TCP/IP parameters and change the DNS server on your Windows 11/10 computer. To reset the TCP/IP stack, you have to do the following:
-
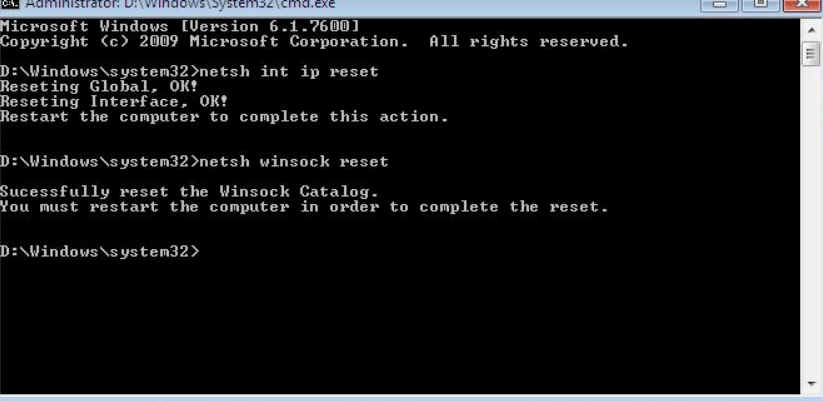
Open the Command Prompt by searching cmd. Run it as an administrator.
-
When it launches, type netsh int ip reset and press Enter. In addition to this, you can also type the commands netsh int ipv4 reset and netsh int ipv6 reset and press Enter.
-
Restart your computer.
-
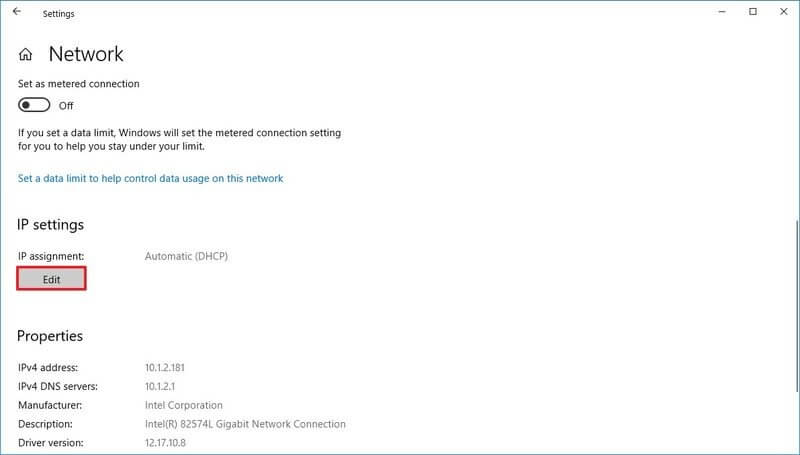
Right-click on the network icon on your taskbar and click on the Network & Internet Settings.
-
Then, click on the network you are using.
-
Find the IP settings option and click Edit.
-
On the pop-up window, change the Automatic (DHCP) option to Manual and type your new primary and alternate DNS.
On the other hand, the way to change the DNS server is as follows:
Conclusion
The Windows 11 update has caused numerous issues to users that have decided to upgrade their operating system. However, there are always ways to fix these problems, until there is a new Windows update. Try all of the above methods to solve your Chrome not opening on Windows 11/10 issue.
Time Limited Offer
for All Products
Not valid with other discount *

 Hard Drive Recovery
 Deleted Files Recovery
