[All Cases Included] Fix SFC Scannow Not Working in Windows 11/10
There are times when you try to run the SFC/ Scannow command using the Windows command prompt for repairing corrupt Windows files and it just does not work. You might try to run SFC/ Scannow, but it would just stop midway and display an error message stating that Windows Resource Protection is unable to perform the requested operation. Thus, the SFC/ Scannow command would not be able to repair your corrupt Windows files. However, there is no need to worry as we have prepared the ultimate post that will enable you to fix all SFC Scannow not working issues.
Part 1. Why Is SFC Scannow Not Working?
The first question that you would have when SFC/ Scannow command does not work is what might be the reason behind it. Generally, if the data in your hard drives get corrupted, it would cause the SFC scan to crash. Corrupted files cause the SFC/ Scannow to crash and stop. Other reasons behind the SFC Scannow not working are mentioned below:
- Improper shutdown: Certain files can become corrupt due to an improper shutdown or power loss. It would prevent the completion of the SFC scan.
- Hardware problems: Users have also reported that hardware problems can be to blame for SFC/ Scannow stopping. Faulty RAM is usually the main culprit and should be tested.
- Certain features may cause issues: In addition to the above, certain features such as Turbo Memory might not be compatible with all of the hard drives which could cause issues with the SFC/ Scannow.
- Changes to the system32 directory: Finally, there is also a possibility that changes to the System32 directory could be causing the problem.
Part 2. How to Fix All SFC Scannow Not Working Issues
Now that you know more about the causes of SFC/ Scannow not working in Windows 11/ 10, we will move on with how you can fix the issues to get it working once again. Here is what you need to do.
Case 1: Windows Resource Protection Could Not Perform the Requested Operation
If the Windows Resource Protection is unable to perform the requested operation, you can try the following methods to resolve the problem.
1. Run SFC Scannow in Safe Mode
-
Firstly, open the Start menu and hit the Power button. Hold the Shift key and select Restart from the options.
-
Several options should appear. Select Troubleshoot, Advanced Options, and finally Command Prompt.
-
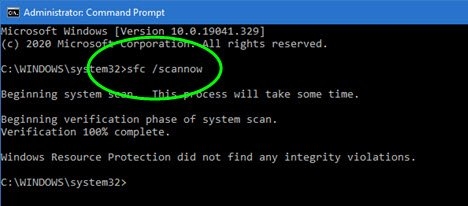
When the window opens, input sfc/scannow and press Enter key.
2. Run Chkdsk
Running Chkdsk might be able to solve the problem in case of your hard drive getting corrupt. It can take an hour or more for the scan to complete depending on your hard disk size. After the steps below, you can try to perform SFC scan.
-
Start Command Prompt as an administrator by searching it in the "Search" box.
-
Enter chkdsk /f C: and hit Enter. Schedule the scan and enter Y followed by Enter to restart your PC.
3. Run Startup Repair
A bootable version of Windows OS is required for running startup repair. The free Microsoft Media Creation Tool should do the trick. You can download the ISO file through the Microsoft official website. Then, you can proceed with the following steps:
Launch Media Creation Tool. Select Create installation media for creating a bootable pen drive or an installation disk to mount it as a virtual drive.
When you launch setup, choose Upgrade followed by Next.
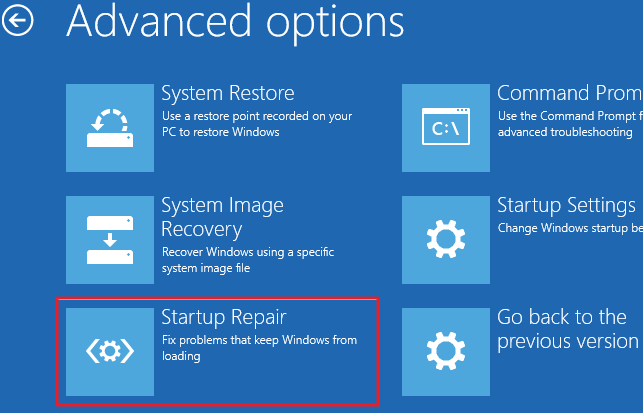
Now, you must select Repair > Troubleshoot > Advanced options.
To initiate the process, you must select Startup Repair.
Run SFC once the process is complete. It should do the trick.
4. Change Security Descriptors
In addition to the above, you can alter the security descriptions to make SFC/ Scannow work. Security descriptors are data structures which store data involving securable Windows objects. The following steps will help you change the security descriptors:
-
Type Command Prompt on the Windows Search bar and choose Run as Administrator.
-
Now, you will need to type ICACLS C:\Windows\winsxs in the command prompt and hit Enter.
Finally, you just have to exit the command prompt and restart your PC.

Case 2: Windows Resource Protection Could Not Start the Repair Service
In this case, the SFC Scannow is not running or responding when you see this error message. Here is what you can do.
1. Use Command Prompt
In order for SFC scan to work, it requires administrative privileges. You can use Command Prompt as administrator to run it as mentioned below:
Open Command Prompt as advised above.
Type sc config trustedinstaller start= auto and net start trustedinstaller, then hit Enter.
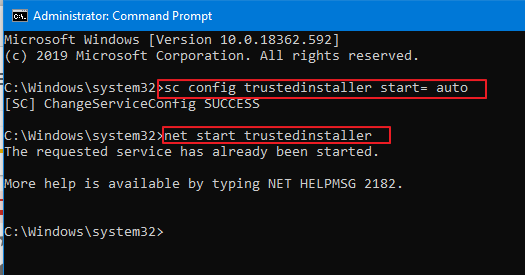
After that, run SFC scannow to see if it is responding.
2. Enable Windows Modules Installer
Windows services are integral to Windows OS. If you encounter the Windows Resource Protection could not start the repair service error while running SFC, you would need to enable the Windows Module Installer manually as mentioned below.
-
Type Services in the Windows Search bar and select Open.
-
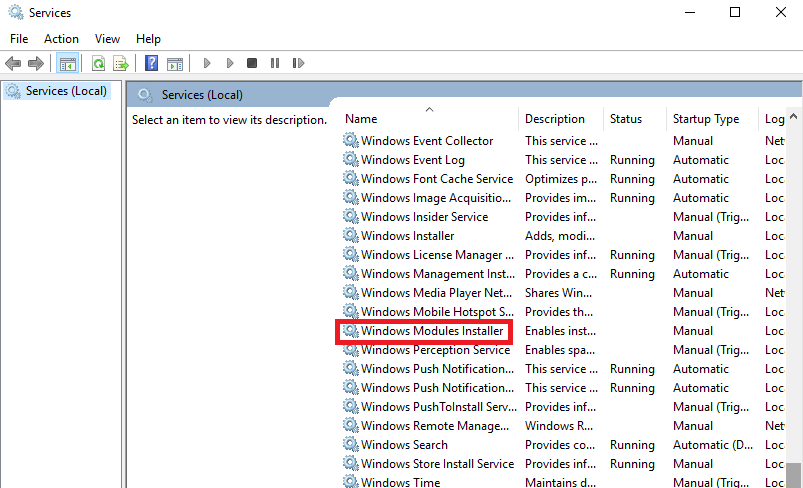
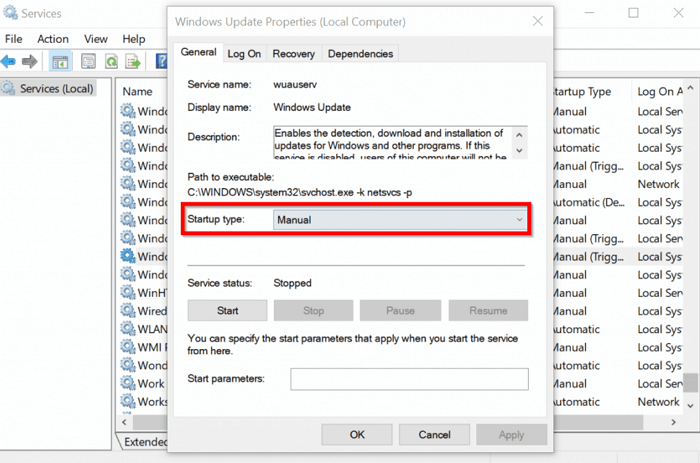
Once the Services window opens, you have to scroll down to find Windows Modules Installer service.
-
Double-click the Windows Modules Installer.
-
On the Startup type, choose Manual.
-
Last, click OK to check if the SFC scannow is running.
Case 3: Windows Resource Protection Found Corrupt Files But was Unable to Fix Some of Them
There is also a possibility that the Windows Resource Protection would be unable to fix some of the corrupt files found. In such a case, you have the following options.
1. Run DISM Command
Deployment Image Servicing and Management (DISM) helps create, change, and repair system images. It can be used to fix SFC Scannow. Here is how you can run DISM command.
-
Head over to the Windows search and type Command Prompt.
-
Click Run as Administrator.
-
Imput DISM /Online /Cleanup-Image /RestoreHealth in the Command Prompt and press Enter.
-
Finally, you can exit the command prompt to see if Windows Resource Protection could not perform the requested operation error is resolved.

2. Replace the Corrupted Files
As you might have an idea by now, power loss or improper shutdown can cause some of the files to become corrupt. It would cause the SFC scan to stop and prevent its completion. This means that any file on your computer could be causing the issue. However, you can resolve the issue by finding the corrupted file and replacing it with a working file.
Case 4: SFC Scannow Not Working System Repair Pending
If SFC Scannow does not work and system repair is pending, you will need to do as below.
1. Delete Registry Key for Pending System Repair
There is a register key which keeps track of the programs that are in queue and have to be rebooted. If any of these programs gets removed and is lost in the queue, Windows would not check system repair. Here is what you can do.
-
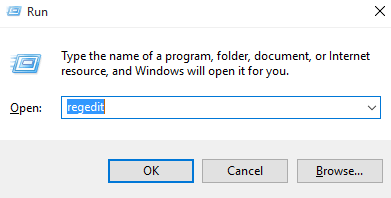
Hold the Windows and R keys to open Run dialog.
-
Type regedit and select OK.
-
Now, you must navigate to the key in the Registry by expanding the left column as HKEY_LOCAL_MACHINE\SOFTWARE\Microsoft\Windows\Current Version.
-
Find the Reboot Pending key from the Current Version key and right click on it.
-
Next, click Permissions and locate your username from the pop-up under Group or user names. If you cannot find it, you must click Add > Advanced > Find Now. Click the user account twice to add it.
-
Finally, choose the user name and look for Full Control and tick it.
-
Then, you just have to click on the Reboot Pending key and hit Delete. Make sure to confirm in the dialog box to proceed with the changes.
Case 5: SFC Scannow Frozen in Windows 11/10
If SFC Scannow is frozen, you can still restore it to get your PC working again.
1. System Restore
System Restore is an extremely important feature that can be used for fixing a variety of problems including SFC Scannow freezing.
-
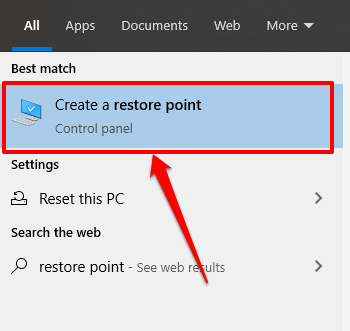
Hold both the Windows and S keys.
-
Enter restore and choose Create a restore point.
-
Select System Restore.
-
Now, System Restore would open the window and click Next.
-
Finally, you just have to choose the restore point to which you would want to return to. Click Next and proceed by going through the instructions.
Conclusion
Once you have finished reading this post, you will know everything there is to know in case of SFC scannow not working, windows resource protection could not perform the requested operation and their fixes. Each possible solution has been suggested to ensure that you no longer experience any issues. Make sure to bookmark this page so that you can come back to it when needed.
Time Limited Offer
for All Products
Not valid with other discount *

 Hard Drive Recovery
 Deleted Files Recovery
