19 Solutions to Fix Windows 11/10 Connected but No Internet Issue
The “Windows 11/10 connected, no Internet” issue has been appearing more and more often, ever since Microsoft has introduced Windows 11. The new version of the operating system has brought connectivity issues to numerous users, a thing that has caused a lot of trouble. However, there are possible solutions so that you can troubleshoot this issue and enjoy a stable Internet connection from your Windows 11/10 computer.
Part 1. Why Does My Computer Say Connected but No Internet?
Connectivity issues can appear out of the blue due to hardware malfunctions, software bugs, and an unstable operating system. If the same issue appears on all of your devices, then the problem lies with your Internet provider. On the other hand, if you only have this issue on your computer, then it might be possibly due to some hardware failing. If this is the case, one of the following solutions will fix it.
However, there is a chance that none of the above are to blame for the “Windows 11/10 connected, no Internet” issue. It is important to understand that Windows 11 is a brand-new version of the popular operating system. This practically means that it is still unstable and many issues appear because of that.
Part 2. 19 Solutions to "Windows 11/10 Connected, No Internet" Issue
1. Restart Your Computer
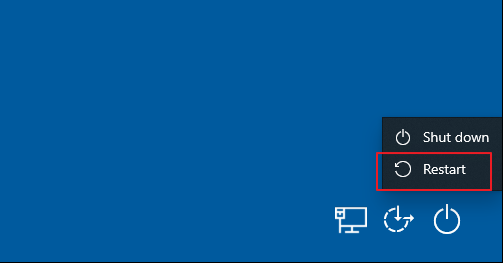
When encountering various issues on your electronic devices, restarting them is the most basic troubleshooting step that you can take. Even the most recent Windows 11 connectivity issue might be solved just by rebooting your computer. To restart your device, click on the Start button, and then, click on Power > Restart.
2. Reboot Your Modem and Router
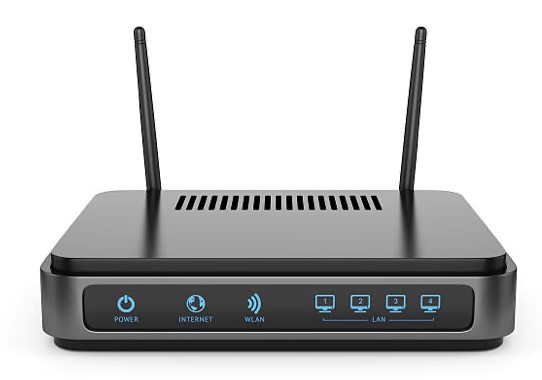
Another way with which you can solve the “Windows 11/10 connected, no Internet” issue is to reboot your modem. Sometimes, network problems are caused due to a router or modem bug, and they can be easily fixed in this way. To properly reboot your router and modem, you need to do the following:
-
Unplug these devices so that they don’t have a power connection.
-
Leave them unplugged for 10-30 seconds.
-
Plug the power back in your modem and router. Wait a couple of minutes until the connection has been fully re-established.
3. Use Windows Network Troubleshooter
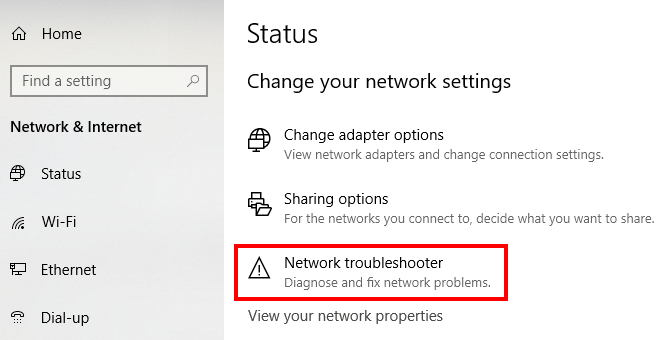
One more solution to the Windows 10/11 connected but no network issue is to use the Windows built-in troubleshooter. As in the previous version, you can find a network troubleshooter in Windows 11. To use it, you will need to follow these steps:
-
Go to Settings > Update & Security > Troubleshoot. To quickly open the Settings menu, you can use the shortcut Windows + I.
-
From the troubleshooter list, which you can find under Other troubleshooters option, locate the network troubleshooter and click on the Run button next to it.
-
Wait for a few seconds, until Windows searches for network-related issues. If it finds any, the operating system will also fix them.
-
Once the process is completed, restart your computer.
4. Check Your IP Address Validity
Another common cause for this Windows connected but no internet issue is the invalid IP address. If you see the message “Invalid IP Address”, you will need to check its validity. The easiest way to do that is through Windows Settings by following these steps:
-
Go to Settings > Networks & Internet > Status > Change adapter options.
-
Then,right click on the network you are using on this computer and choose Properties.
-
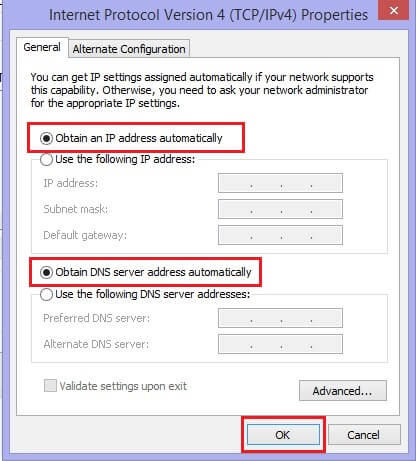
Scroll down to locate Internet Protocol Version 4, choose it and then click on Properties again.
-
Make sure the options Obtain an IP address automatically and Obtain DNS server address automatically are both checked.
-
Confirm your action and reconnect the internet for a try.
5. Check Your ISP’s Status
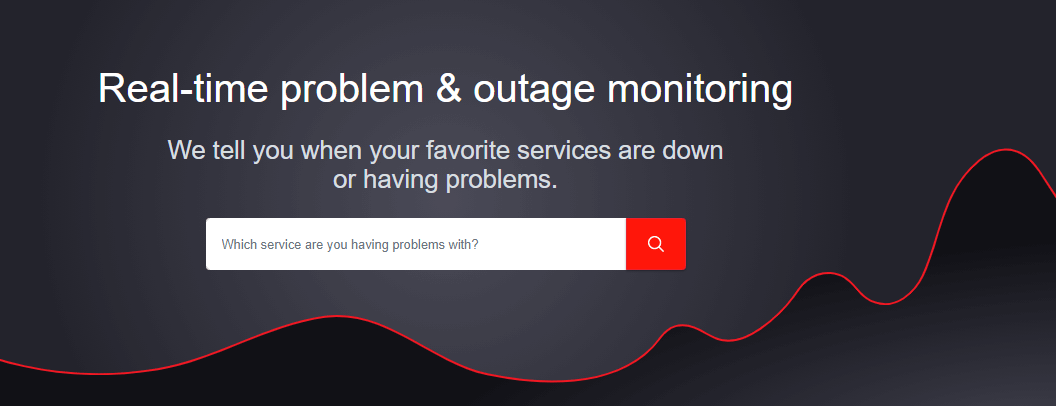
If these simple solutions don’t seem to fix the “Windows 11/10 connected, no Internet” issue, you need to check your ISP’s status. If you encounter connectivity issues to all of your devices, and the problem extends to your whole neighborhood or area, then it is related to your Internet Service Provider. If this is the case, make sure that you contact your ISP to let them know where the issue has appeared. Or you can go to the online web page for a status check.
6. Check MAC Address Filtering in Your Router Settings
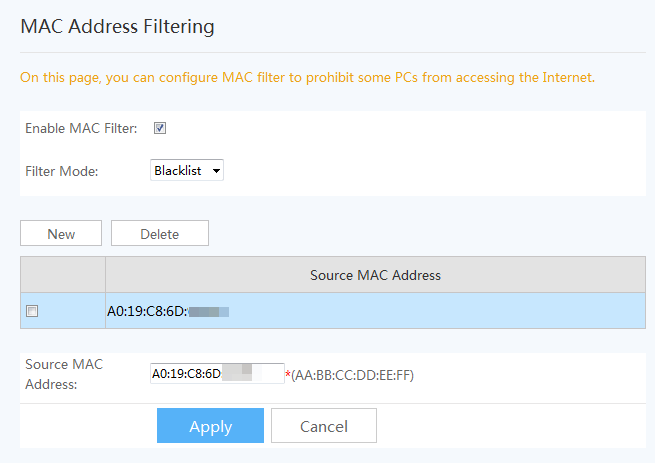
If you are using a wireless filter that has MAC filtering enabled, then you need to make sure that all of your devices using this network have their MAC addresses entered into the MAC filter. If they are not submitted, they will be unable to connect to the network. To check MAC address filtering and add your device, you will need to follow these steps:
-
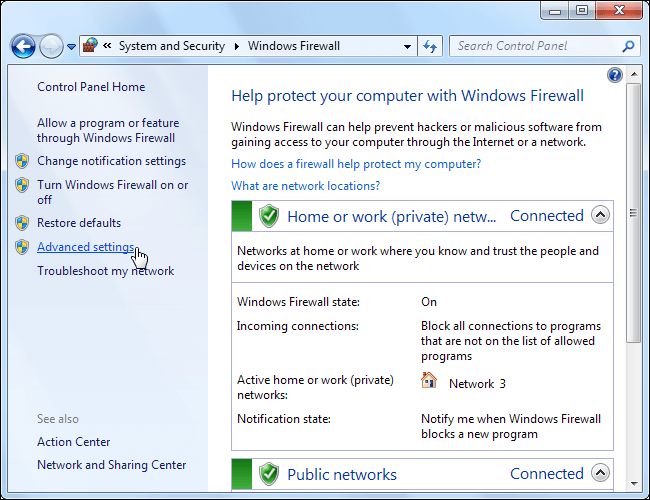
Go to Update & Security > Windows Security Center > Firewall > Advanced Settings >MAC Filtering.
-
Uncheck the box next to the option to disable this feature.
-
Copy your IP address and open it the browser.
-
Once you tap Enter, you will be asked to provide your router’s username and password.
-
Then, browse the router’s settings to find MAC filtering. In some routers, you might find it referred to as MAC Address Control, Address Reservation, or Wireless MAC Authentication.
-
Then, you can simply disable MAC filtering to allow all devices to connect to this network.
If you have no access to the Advanced Settings, you can do the following:
7. Update Network Adapter Driver
Since Windows 11 is still a new operating system, it is very unstable. For this reason, Microsoft is releasing numerous updates for all of its drivers. And if you encounter the Windows connected but no internet issue, you need to update the network adapter driver. To check if there is an available update for your computer’s network adapter driver, you need to follow this process:
-
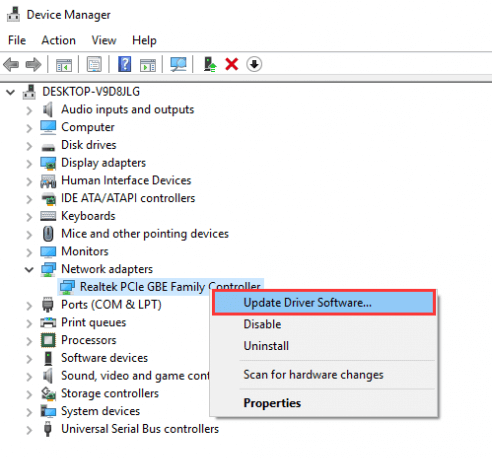
Right-click on the Start button, and then, click on Device Manager.
-
Locate the Network Adapters and expand it to view all of your devices.
-
Right-click on the device you want to update, and click the Update driver option. In some cases, you might find your device under the Other devices category, named Unknown device.
-
Then, click on the Search automatically for drivers option, and wait a few minutes until Windows finds and installs the best drivers for your device.
8. Disable Fast Startup
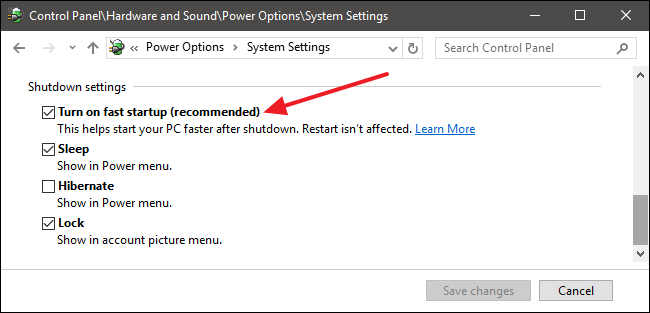
As an unstable system, Windows 11 might have issues that relate to the fast startup. In fact, there is a chance that these issues will affect your computer’s connectivity. That’s why you met the Windows connected but no internet problem. And so, you will need to disable this feature. To do that, you need to follow these steps:
-
Click on the Start button and search for the Control Panel.
-
Then, click the Hardware and Sound option.
-
Find the Power options and click the Change what the power button do link underneath it.
-
Then, you will see a new screen, where you need to click the Change settings that are currently unavailable link.
-
From the options, you will see, uncheck the box next to the Turn on fast startup (recommended) option.
9. Disable Firewall and Antivirus Software
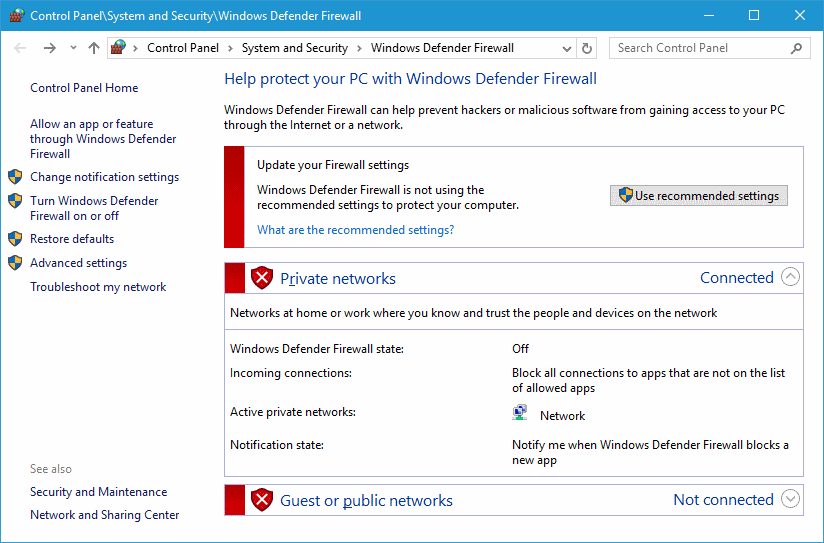
Sometimes, the “Windows 11/10 connected, no Internet” issue might be caused by the system’s firewall. If you suspect that this is the case, you can try disabling the firewall, following this process:
-
Click on the Start button and search for the Windows Defender Firewall.
-
On the sidebar, click the Turn Windows Defender On and Off option.
-
On the next window, check the Turn off Windows Defender Firewall (not recommended) option.
10. Delete Temp Files
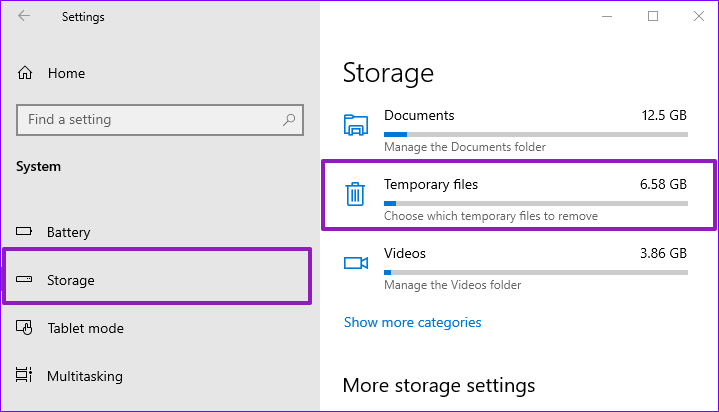
Another possible solution to this Windows connected but no network issue is deleting all the temporary files from your Windows 11/10 computer. You can do that by following these steps:
-
Click on the Start button, and then go to Settings > System > Storage.
-
Then, click the Temporary Files options.
-
On the new screen, click the Remove files to delete the temporary files from your computer.
11. Reset the Network
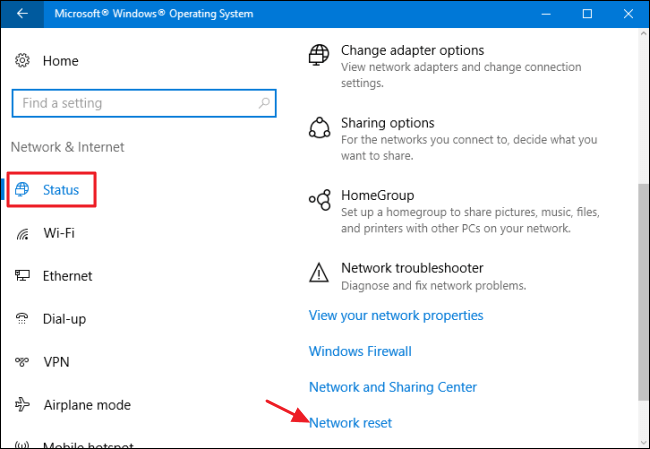
The next possible solution to this Windows connected but no internet issue is to reset the network, which is a more drastic approach. You can easily do that in your computer’s settings. In more detail, you will need to follow this process:
-
Click on the Start button, and then go to Settings > Network & Internet > Advanced network settings.
-
Then, go to More Settings > Network Reset. It’s worth mentioning that some people can find Network Reset right on the bottom of the Status section.
-
Once you click on that option, you will see the button Reset Now. Click it to reset back to the original network settings.
12. Reset IP Address
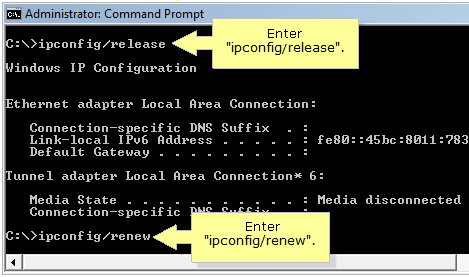
In some cases, resetting your IP address will also allow you to troubleshoot your connectivity issue. In Windows 11/10, you can do that via the Command Prompt. In more detail, the process is the following:
-
Search cmd in taskbar to open the Command Prompt. Run it as an administrator.
-
Once the command prompt window opens, type ipconfig /release, which will release your IP address.
-
Then, type ipconfig /renew to reset your IP address.
-
Lastly, type exit to close the command prompt window.
13. Reset TCP/IP Parameters
In combination with the previous method, you can also reset the TCP/IP parameters to solve the Windows connected but no internet issue. The process for doing that is as follows:
-
Search for cmd through the taskbar to open the Command Prompt. Right-click on it to run it as an administrator.
-
Type netsh int ip reset and press Enter.
-
In the case you are using IPv4 or IPv6, you can type the commands: netsh int ipv4 reset and netsh int ipv6 reset.
-
Then, you can reinstall TCP/IP by typing these commands: SYSTEM\CurrentControlSet\Services\Tcpip\Parameters SYSTEM\CurrentControlSet\Services\DHCP\Parameters
-
Restart your computer so that the commands take effect.

14. Turn Off IPv6
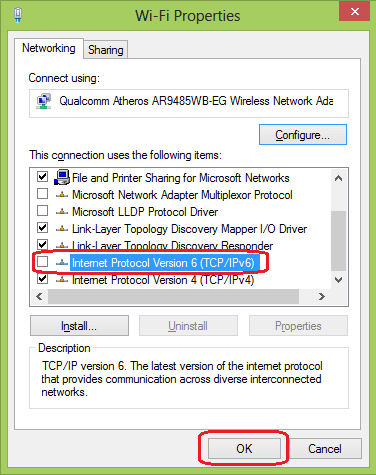
Another solution to your Windows 11/10 connectivity issue is to turn off IPv6. The steps for completing this task are the following:
-
Use the shortcut Windows + R to open the Run dialogue box. Then, type ncpa.cpl and click OK.
-
On the new window, you will see all the available network connections on your computer. Right-click on the one that you are using and right click on it to bring out the Properties option.
-
From the pop-up window, go to the Networking tab, and uncheck the Internet Protocol Version 6 (TCP/IPv6) option.
15. Change the Wireless Channel
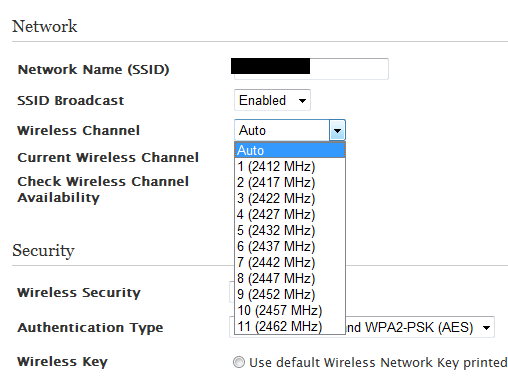
Another method that can solve the “Windows 11/10 connected, no Internet” issue is changing the wireless channel. WiFi routers are using the 2.4 GHz and 5 GHz frequency bands to transmit data, and through the settings, you can choose which channel you prefer. The steps for completing this method are the following:
-
Type your IP address in your browser’s address bar and tap Enter.
-
Type your router’s username and password to access its settings.
-
Go to Advanced Settings and then, click Wireless settings.
-
Then, you need to spot the Channels option, where you change the wireless channel.
16. Change DNS
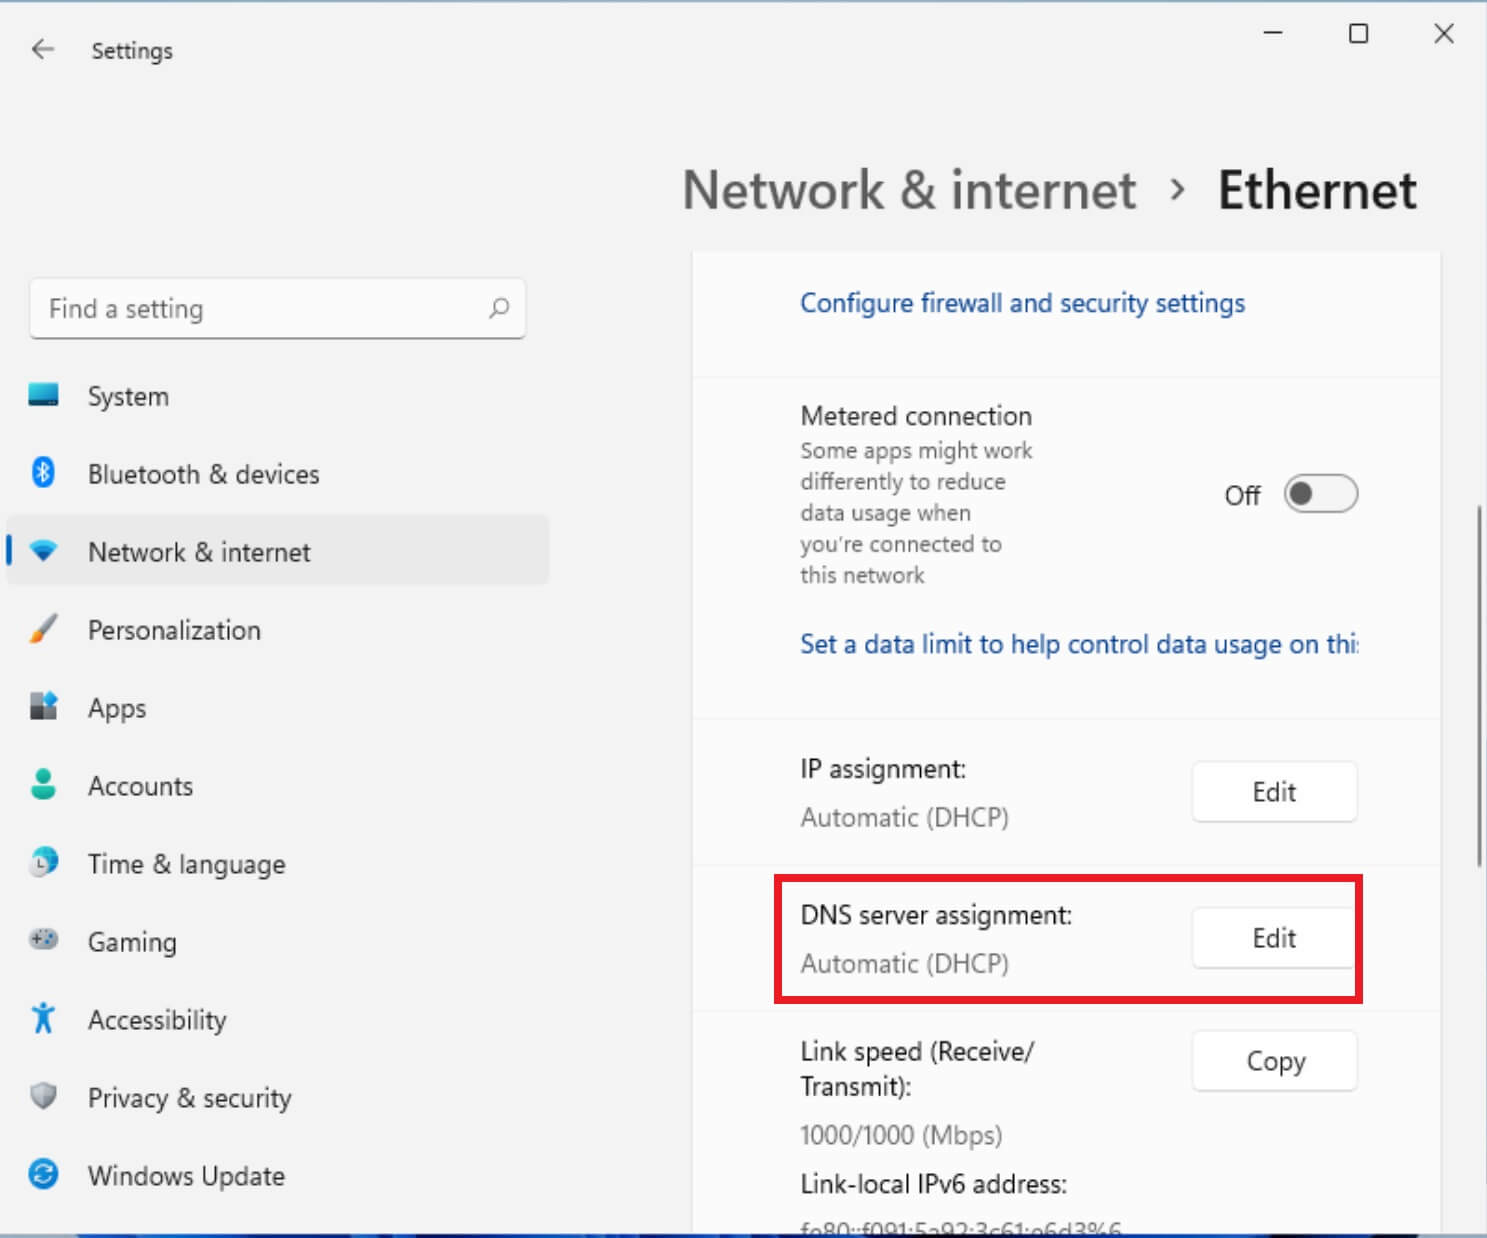
Another option that might solve your Windows connected but no internet issue is to change the DNS server on your Windows 11/10 computer. You can do that very easily with this process:
-
Locate the network icon on your taskbar and right-click on it. From the options you will see, click on the Network & Internet Settings.
-
Then, find the network you are trying to connect to and click on it.
-
From its properties, you need to locate the DNS server assignment and click on the Edit button next to it.
-
Then, change the Automatic (DHCP) option to Manual. Once you select that, you need to type your primary and secondary DNS.
17. Change Advanced DNS Settings
The above method is the simplest way to change DNS. However, if you want a more drastic approach, you have to change DNS through the control panel. The process for doing this is the following:
-
Go to Control Panel > Network & Internet > Network and Sharing Center.
-
Click the Change adapter settings link that you will find on the sidebar.
-
Once you see the icons of the available networks, right-click on the one you are trying to connect to. Click on the Properties option.
-
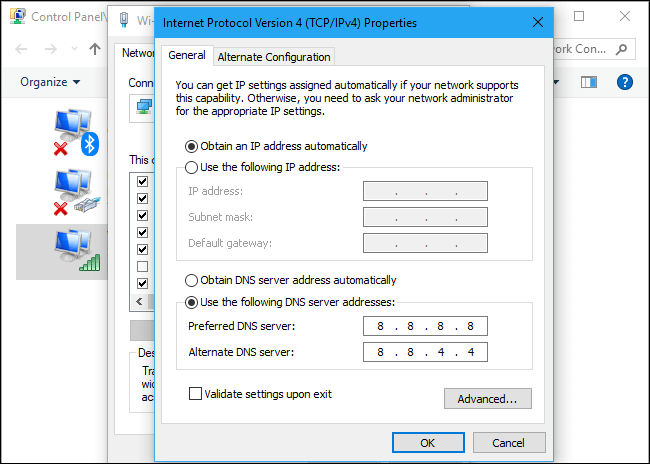
Then, you will see a pop-up window. Find the Internet Protocol Version 4 (TCP/IPv4) from the list and check it. Then, click on the Properties button.
-
Once you do, you need to select the Use the following DNS server addresses option and type your preferred and alternate DNS addresses.
-
Then, you can go to the advanced settings by clicking the Advanced button.
-
On the new window, tap the Add button and type your alternate DNS address. Click the Add button to confirm your option.
-
Click OK and close the window.
18. Refresh DNS
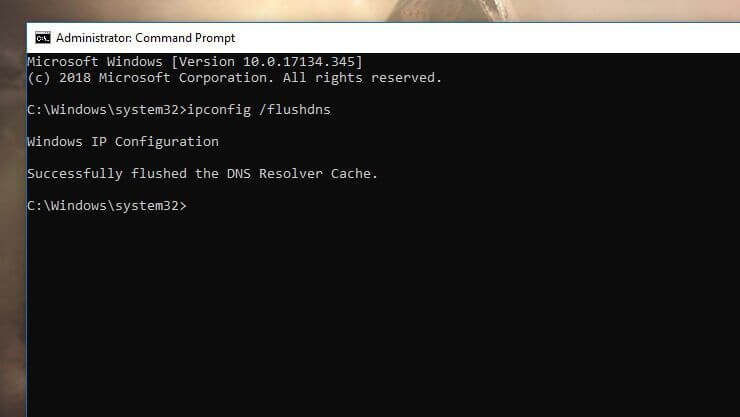
One more possible solution is to clear the DNS cache so as to refresh the DNS. This method can be easily completed through the command prompt. By this way, you are likely to solve the Windows connected but no internet issue. The steps for doing it are:
-
Search for the command prompt by typing cmd in taskbar. Run it as an administrator by right-clicking on it.
-
Then, type the command ipconfig/flushdns and tap Enter.
-
Restart your computer.
19. Downgrade the Windows 11 Version
If none of the above methods work, then you need to downgrade Windows 11 back to Windows 10 to see whether the Windows connected but no internet problem has been solved. To do that, you need to follow these steps if the update is within 30 days:
-
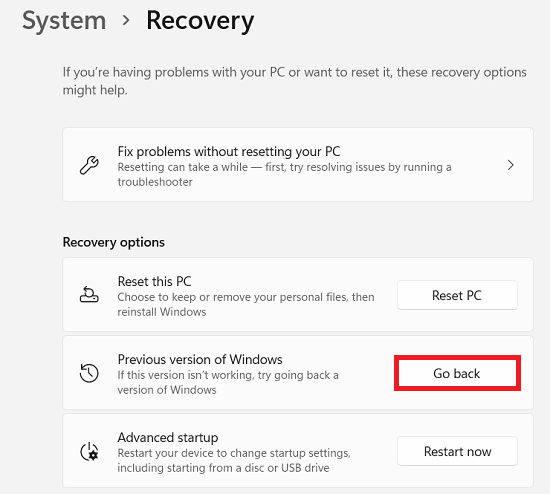
Go to Settings > System > Recovery.
-
Then, find the Recovery Settings section and locate the Previous version of Windows option.
-
Click the Go Back button next to it.
-
Follow the instructions on your screen, making sure that you click “No, thanks” when it asks you to check for updates.
-
Follow the rest of the instructions, and finally, click the Go back to earlier build option to downgrade Windows 11.
Some people may worry about the data safty by this method as the process of system downgrade can be buggy. However, there are certain professional data recovery tool can help in this situation. Just check it out!
Conclusion
Windows 11 is still in beta, which means that it is an unstable operating system. Many of the issues that appear at this stage will be fixed with later updates. Nevertheless, you can try these methods to solve the “Windows 11/10 connected, no Internet” issue. Good luck!
Time Limited Offer
for All Products
Not valid with other discount *

 Hard Drive Recovery
 Deleted Files Recovery
