Top 8 Ways to Fix Windows Explorer High CPU
The Central Processing Unit (CPU) is the hub of all computer processes; that ensures the proper functioning of all system components. These components depend on the instructions from the CPU to work effectively. However, the computer won't be able to complete essential functions when processes consume the CPU resources. When Windows Explorer has a high CPU usage, let's say 25% or more of your processing power, basic computer tasks become complex. For example, games won't play smoothly, and video editing would require more extended periods to complete.
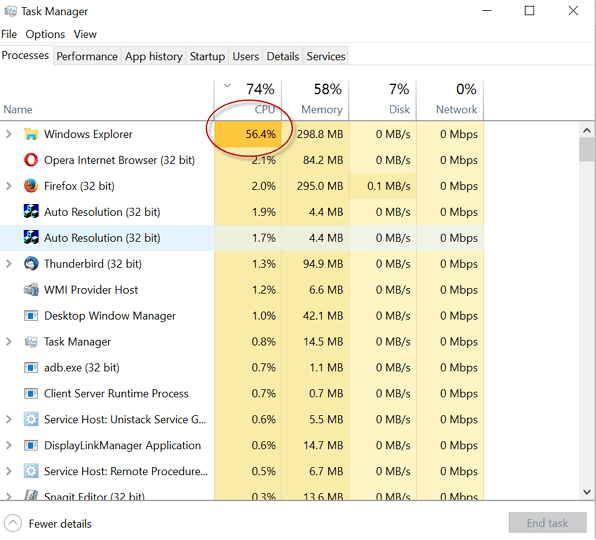
The good news is we have compiled various DIY solutions to these common computer problems. This guide outlines eight various ways you can fix the Windows Explorer high CPU usage problem. Just follow the step-by-step procedure.
 Problem
If you want to recover data that was accidently deleted for Windows Explorer high CPU usage, you can try AnyRecover to restore your lost data. We recommend one powerful data recovery software to help you in the following-AnyRecover
Part 1. Why Is the Windows Explorer Using High CPU?
Windows Explorer is an essential Windows OS file to run to navigate file location on your computer. Although this system file doesn't use up much CPU, several Windows 10 users have encountered the Windows Explorer high CPU usage issue. The various reasons why Windows Explorer uses high CPU include:
- Too many background processes.
- Third-party applications.
- System errors.
- A corrupt user profile.
- Malware attacks, amongst others.
Just like you cannot treat a sickness without a proper diagnosis, identifying the reason for the high CPU usage is the first step to fixing the issue.
Part 2. How to Fix High CPU Usage in Windows Explorer
Once you've identified the cause of the problem, you can follow the methods listed below to fix the Windows Explorer high CPU usage; starting from the top till you find a fix that works.
We hope these solutions help. Let's begin!
Fix 1: Remove Icons with No Image
You are likely to get the "Windows Explorer high CPU usage" error message if you have an icon or a shortcut without an image on your Windows desktop. The solution to this issue is to search for icons without images and remove them. Follow the steps below:
-
Locate a desktop icon or shortcut without an image.
-
Left-click on the icon and select Delete, or simply press Delete on your keyboard.
If it is an important file, we advise that you move it to another location rather than delete it.
Fix 2: Check the Task Manager
Windows Explorer is not the only cause of high CPU usage; the problem may arise from other running programs. The first step in diagnosis is to check the Task Manager for the applications that create the problem.
-
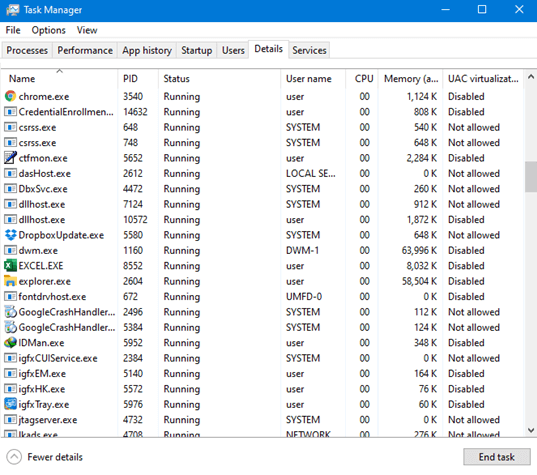
Use the Menu button or the Ctrl + Shift + Esc keyboard shortcut to launch Task Manager.
-
Navigate to the Details tab to access all running computer programs.
-
From the list of active applications, select the ones with a high CPU usage that you do not need running at the moment.
-
Click on End task to close selected applications.
Fix 3: Restart the Windows Management Instrumentation Service
Windows Management Instrumentation (WMI) Service is a feature that allows you to troubleshoot various network systems. This service can be the reason behind the issue if WMI's CPU usage is above a certain percentage and you're not running a process that would consume CPU usage.
Follow the steps listed below to restart the WMI service:
-
Press the Windows key and search for Services.
-
Launch the program.
-
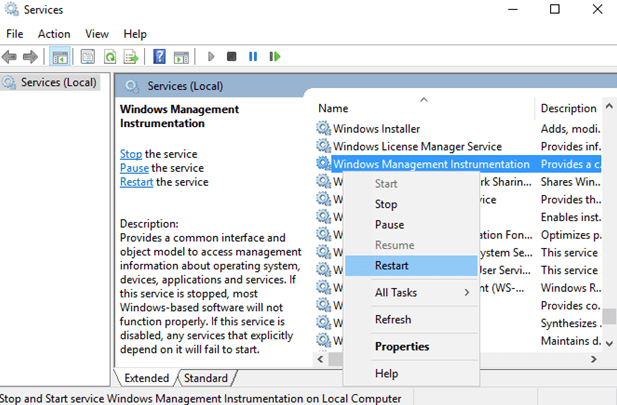
Locate Windows Management Instrumentation in the new window.
-
Right-click on WMI and select Restart. You can restart your PC if you wish to terminate the WMI service.
Fix 4: Run Disk Cleanup
The issue of Windows Explorer using a high CPU is sometimes a result of old and temporary files created by Windows. These files sometimes affect computer processes and congest your computer system. The solution to this problem is to run Disk Cleanup. To clean up the disk:-
Launch This PC.
-
Right-click on the C: drive and select Properties.
-
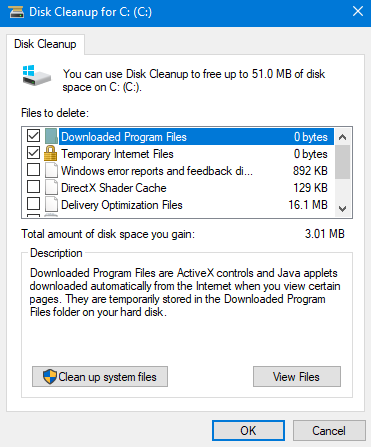
Under the General tab, click on Disk Cleanup.
-
Wait for a short period, and you see the Files to delete listed in a new window.
-
Tick the boxes to select the files you wish to delete and click OK.

Fix 5: Disable Show All Folders
Windows users who notice Windows Explorer's high CPU usage can choose to disable Show all folders in Windows Explorer. To disable Show all folders in Windows Explorer:
-
Open Windows Explorer.
-
Right-click the panel on the left side of the window.
-
Click Show all folders If there is a tick beside the option. To confirm that you've disabled Show all folders, you won't see a tick beside the options on the list.

If this solution doesn't fix the Windows Explorer high CPU usage issue, proceed onto the next step.
Fix 6: Disable OneDrive Cloud Storage
Cloud storage can interfere with computer processes and result in Windows Explorer using a high CPU. Windows 10 usually recommend OneDrive cloud storage and may automatically turn on the feature without you knowing. OneDrive cloud storage is responsible for backing up your files regularly and other issues in the CPU.
To disable OneDrive Cloud Storage:
-
Click OneDrive in the taskbar and launch Settings in the Help & Settings tab.
-
Click on Account.
-
Select Unlink this PC.
-
Click Unlink account to disable OneDrive cloud storage.

Fix 7: Run Antivirus Scan
If the Windows Explorer high CPU usage issue persists, then there is a chance that it results from a malware attack. Malware attacks can come in Windows processes that consume a chunk of CPU and GPU bandwidth for various tasks. It is usually challenging to single out these harmful processes as they bear familiar names.
We recommend that you run a complete antivirus scan with reliable antivirus software to fish out malware presence on your PC. Follow the instructions that pop up during the process and verify every protection option before confirmation.
Fix 8: Create a New Windows User Account
Creating a new Windows user account might be useful in fixing Windows Explorer using a high CPU. Follow the steps to create a new user account on your Windows 11/10 computer:
-
Launch Settings from Menu.
-
Click Accounts and select Family & other users from the menu on the left side of the window.
-
Choose Add someone else to this PC.
-
Choose a valid username, strong password, and a password hint.
-
Click Next once you are done.
-
Go back to Family & other users, select Change account type to make the account an Administrator.
-
Click OK.
-
Restart your computer and sign in to the new Administrator account.
-
Launch Windows Explorer and run Task Manager to check the CPU usage.

Fix 9: Move Your Files
If none of the solutions mentioned above prove effective, then moving your files from one user to another could be the final solution as the user profile corruption could be the cause.
-
In the new local account, press Windows + E to open File Explorer and click This PC.
-
Open the C: drive and go to the user folder.
-
Locate and choose your old account’s folder.
-
Open the Run box by pressing Windows + R keys and enter “%HOMEPATH%”.
-
Select OK. Then a second File Explorer in your new profile home folder will be opened.
-
Press Windows + Left keys to snap the folder to the left. Then once Snap assist occurs, snap your older folder to the right.
-
Finally, move the content inside the folders in the old account to that in the new account.

Part 3. How to Recover Data for High CPU Usage in Windows Explorer
AnyRecover is a powerful all-in- one data recovery software. It is designed to help users recover lost, deleted, or formatted files from various storage devices, including hard drives, SSDs, USB drives, memory cards, and more. AnyRecover utilizes advanced algorithms to scan storage devices thoroughly and retrieve data that has been accidentally deleted, lost due to formatting, or affected by system crashes, virus attacks, partition errors, and other data loss scenarios.

3 Steps to Recover Data for Windows Explorer High CPU with AnyRecover
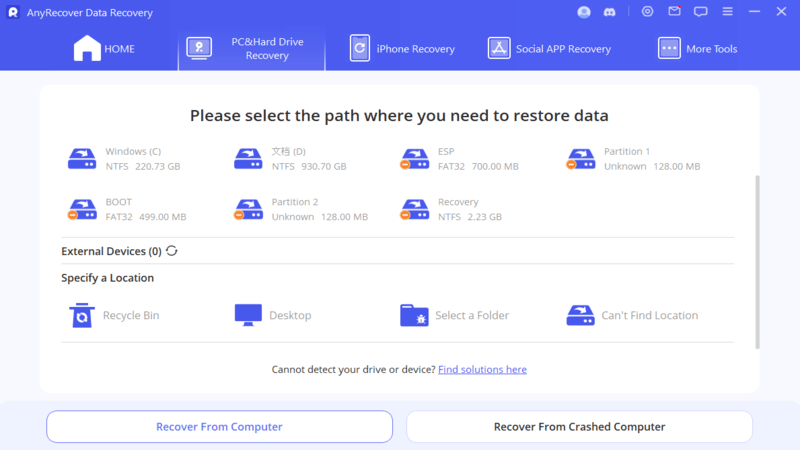
Step 1. Select a location where you lost the data, then click "Start".
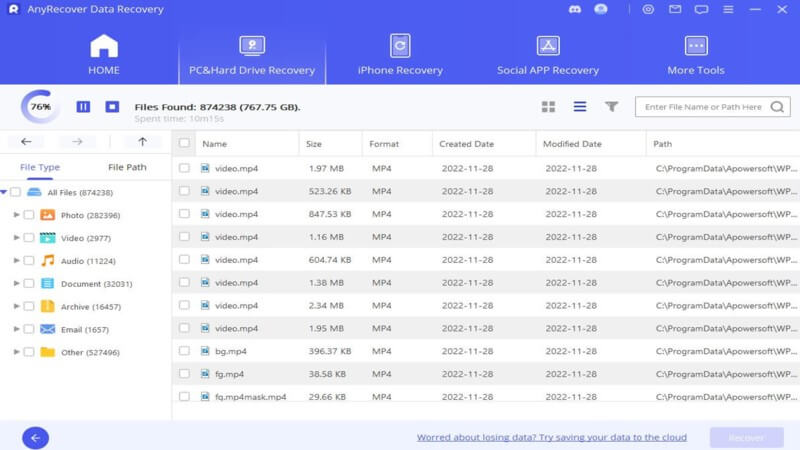
Step 2. Wait for the scanning process to complete, this process may take a while depending on the data size.
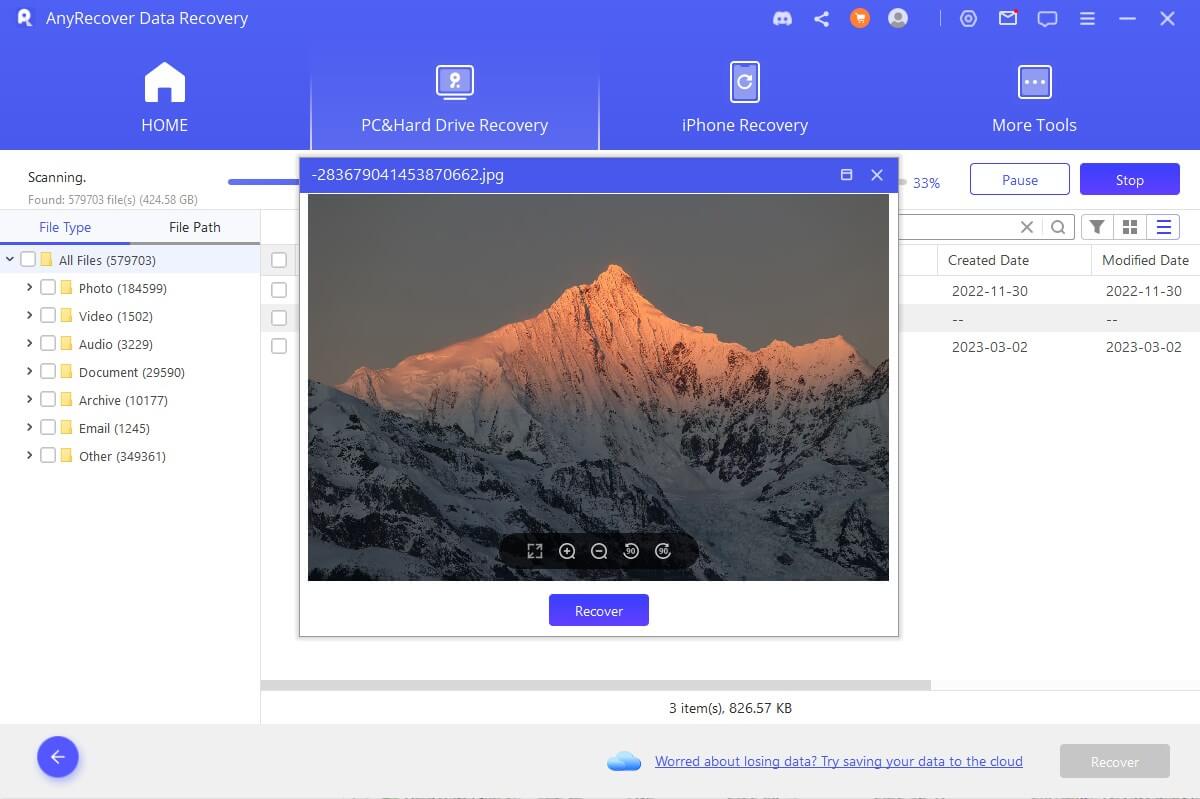
Step 3. Double-click on the file to preview it, then click "Recover" and save it to a safe location. You can also recover multiple files at once.
Conclusion
Diagnosing the root of high CPU usage can be very difficult since there are various possible causes. Bear in mind that we have only listed the most common fixes for high CPU usage. In events where the issue persists after trying out the solutions listed above, we advise finding a Windows support community and asking other users for possible fixes for Windows Explorer's high CPU usage issue.
Don't forget to recommend us to others who need a solution to this problem on their Windows 11/10 computers. If you want to recover data that was accidently deleted for Windows Explorer high CPU usage, you can try AnyRecover to restore your lost data
AnyRecover Data Recovery on Windows/Mac/iOS/Android
- 3-for-1 Deal: Buy AnyRecover for Window and get the iPhone & Mac versions free
Time Limited Offer
for All Products
Not valid with other discount *

 Hard Drive Recovery
 Deleted Files Recovery
